
Install Immich with Docker Compose using its matching release files, then open http://192.168.1.10:2283 to create your administrator and start organizing photos. Compose runs the photo server, PostgreSQL database, Valkey cache and machine-learning service together; Synology owners can deploy the same stack through Container Manager.
Before you begin, have:
- A compatible 64-bit host with Docker and the current Compose plugin, or a Synology NAS with Container Manager.
- At least 6GB RAM and two CPU cores; 8GB and four cores are recommended.
- Local storage for PostgreSQL, room for originals and generated previews, and a separate backup destination.
- Administrator access to your Docker host and a browser on your local network.
Test scope: On November 12, 2026, our Docker sandbox ran ghcr.io/immich-app/immich-server:v3.4.1 with all four services healthy. It saved an external-library path and displayed three scanned JPEGs with thumbnails. The administrator-signup and library-creation screenshot checkpoints failed, so those images are omitted. The offline test disabled machine-learning features; Synology, Docker Desktop, mobile uploads, remote access, upgrades and restoration were not tested.
1. Check requirements and choose the official images
A container runs an application with its dependencies; Docker Compose groups related containers in one configuration file. If needed, start with our Docker basics for beginners.
Immich supports amd64 and arm64. On amd64, the v3 machine-learning image requires an x86-64-v2 compatible CPU. Check older NAS processors before installing. The requirements documentation allows 4GB RAM with machine learning disabled, but that is a reduced-feature configuration.
Linux is preferred. Keep PostgreSQL on a local filesystem that supports Unix ownership and permissions, ideally an SSD; do not put its data directory on SMB or NFS. Windows users should apply the named-volume change in the FAQ before starting.
The official application images are ghcr.io/immich-app/immich-server and ghcr.io/immich-app/immich-machine-learning, hosted on GitHub Container Registry. Use the release Compose file for their supporting services; a random Docker Hub image or a lone server container is not this installation.
docker compose versionYou should see a Compose plugin version. If the command is missing, install the current plugin for your operating system before proceeding.
2. Install Immich with Docker Compose
This is the terminal route for a fresh installation. Synology users who prefer the graphical interface can use the same files in step 3 instead.
Download matching release files
Use the v3.4.1 release for this version-specific walkthrough. Download both files from that release, rather than mixing a release image with the repository's changing main configuration.
mkdir -p immich
cd immich
curl -fL -o compose.yaml https://github.com/immich-app/immich/releases/download/v3.4.1/docker-compose.yml
curl -fL -o .env https://github.com/immich-app/immich/releases/download/v3.4.1/example.env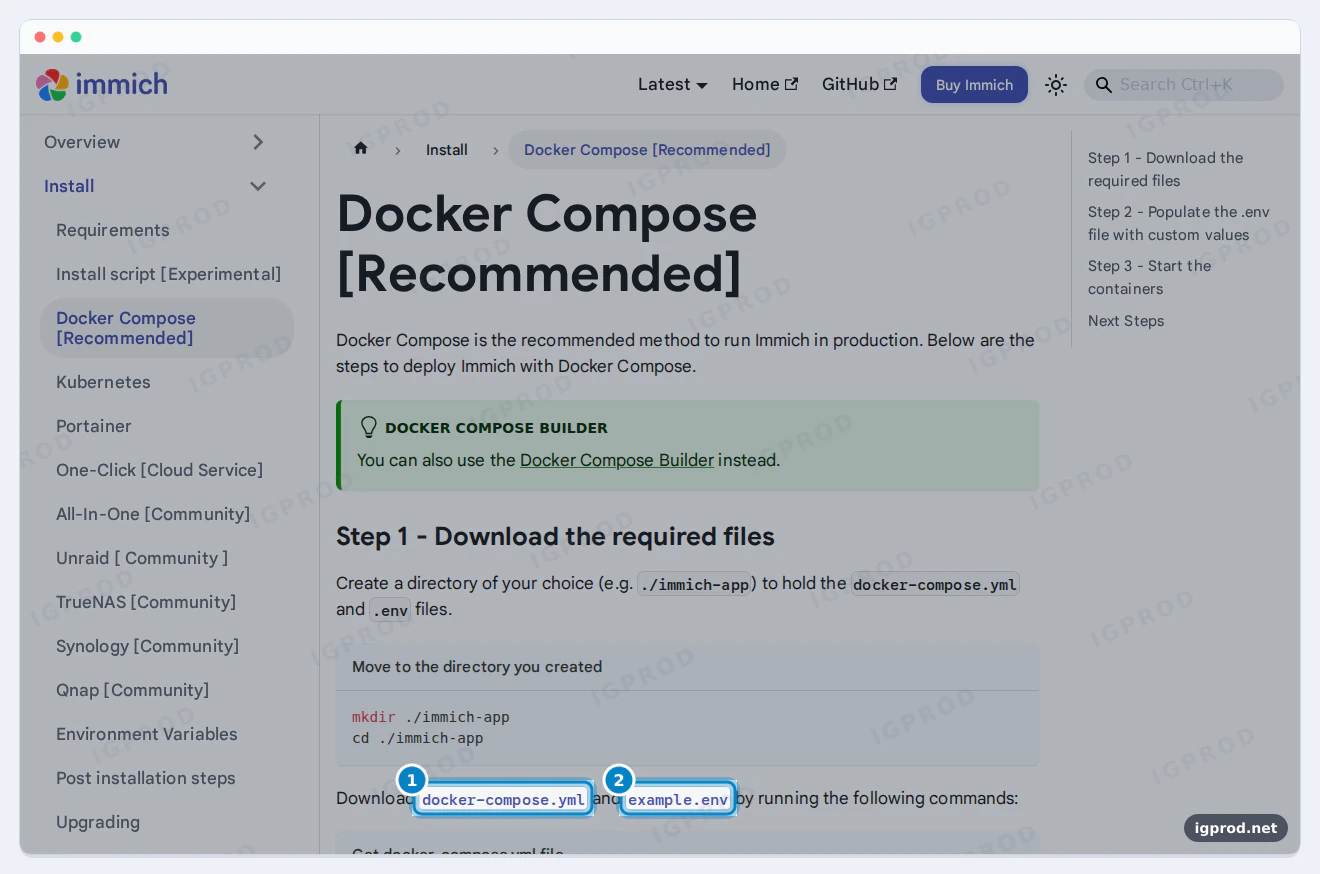
Set the storage paths, version and password
Keep one base Compose file in the project directory. Linux examples here call it compose.yaml; the documented Synology workflow uses docker-compose.yml.
Below is the complete release Compose file. Its redis service runs Valkey. Leave the database image, dependency digests and model revision matched to this release.
#
# WARNING: To install Immich, follow our guide: https://docs.immich.app/install/docker-compose
#
# Make sure to use the docker-compose.yml of the current release:
#
# https://github.com/immich-app/immich/releases/latest/download/docker-compose.yml
#
# The compose file on main may not be compatible with the latest release.

name: immich

services:
  immich-server:
    container_name: immich_server
    image: ghcr.io/immich-app/immich-server:${IMMICH_VERSION:-release}
    # extends:
    #   file: hwaccel.transcoding.yml
    #   service: cpu # set to one of [nvenc, quicksync, rkmpp, vaapi, vaapi-wsl] for accelerated transcoding
    volumes:
      # Do not edit the next line. If you want to change the media storage location on your system, edit the value of UPLOAD_LOCATION in the .env file
      - ${UPLOAD_LOCATION}:/data
      - /etc/localtime:/etc/localtime:ro
    env_file:
      - .env
    ports:
      - '2283:2283'
    depends_on:
      - redis
      - database
    restart: always
    healthcheck:
      disable: false

  immich-machine-learning:
    container_name: immich_machine_learning
    # For hardware acceleration, add one of -[armnn, cuda, rocm, openvino, rknn] to the image tag.
    # Example tag: ${IMMICH_VERSION:-release}-cuda
    image: ghcr.io/immich-app/immich-machine-learning:${IMMICH_VERSION:-release}
    # extends: # uncomment this section for hardware acceleration - see https://docs.immich.app/features/ml-hardware-acceleration
    #   file: hwaccel.ml.yml
    #   service: cpu # set to one of [armnn, cuda, rocm, openvino, openvino-wsl, rknn] for accelerated inference - use the `-wsl` version for WSL2 where applicable
    volumes:
      - model-cache:/cache
    env_file:
      - .env
    environment:
      MACHINE_LEARNING_MODEL_REVISION: v2
    restart: always
    healthcheck:
      disable: false

  redis:
    container_name: immich_redis
    image: docker.io/valkey/valkey:9@sha256:418652cfb58ef879d4978c33553735d7147016032d5aefaa14c828e611eb9dfd
    healthcheck:
      test: redis-cli ping | grep -q PONG || exit 1
    restart: always

  database:
    container_name: immich_postgres
    image: ghcr.io/immich-app/postgres:14-vectorchord0.4.3-pgvectors0.2.0@sha256:bcf63357191b76a916ae5eb93464d65c07511da41e3bf7a8416db519b40b1c23
    environment:
      POSTGRES_PASSWORD: ${DB_PASSWORD}
      POSTGRES_USER: ${DB_USERNAME}
      POSTGRES_DB: ${DB_DATABASE_NAME}
      POSTGRES_INITDB_ARGS: '--data-checksums'
      # Uncomment the DB_STORAGE_TYPE: 'HDD' var if your database isn't stored on SSDs
      # DB_STORAGE_TYPE: 'HDD'
    volumes:
      # Do not edit the next line. If you want to change the database storage location on your system, edit the value of DB_DATA_LOCATION in the .env file
      - ${DB_DATA_LOCATION}:/var/lib/postgresql/data
    shm_size: 128mb
    restart: always
    healthcheck:
      disable: false

volumes:
  model-cache:
Edit .env beside the Compose file to match the complete example below. First generate your own database password:
openssl rand -hex 24Replace REPLACEWITHYOURRANDOMALPHANUMERICPASSWORD with that output. This secret connects Immich to PostgreSQL; it is separate from the web administrator password you choose later.
# Immich-managed uploads and generated files; keep separate from existing photos.
UPLOAD_LOCATION=./library
# Local database storage only, not an SMB or NFS share.
DB_DATA_LOCATION=./postgres
# Example timezone; change if needed.
TZ=Etc/UTC
# Pin both application images to the release used in this guide.
IMMICH_VERSION=v3.4.1
# Replace before starting; use only letters and numbers.
DB_PASSWORD=REPLACEWITHYOURRANDOMALPHANUMERICPASSWORD
DB_USERNAME=postgres
DB_DATABASE_NAME=immich
./library is a host directory mounted at /data inside Immich. ./postgres holds PostgreSQL's data. Do not set UPLOAD_LOCATION to your existing Synology Photos collection. If the database resides on spinning disks, uncomment DB_STORAGE_TYPE: 'HDD' in the database service.
Start and verify the services
mkdir -p library postgres
docker compose config --quiet
docker compose up -d
docker compose ps
docker compose logs --tail=100 immich-server database
The configuration check should finish without an error. After initialization, the services should be running and their health checks should pass. Open the welcome page as described in step 4. If a service exits, inspect its logs before continuing; a published port alone does not prove the app is ready.
3. Install Immich on Synology with Container Manager
This is an alternative to the terminal deployment above. These steps follow the community-maintained Synology guide hosted by Immich; our test ran in plain Docker, not DSM.
- Install Container Manager from Package Center if available for your NAS. Check the RAM and CPU requirements in step 1.
- In File Station, create
/volume1/docker/immich, then itslibraryandpostgressubfolders. Adjust the volume number if necessary. - Place the release Compose file there as
docker-compose.yml, with the edited.envalongside it. Set the version and unique database password as above. If File Station needs a temporary.txtextension for editing, rename the file back to exactly.envafterward. - Open Container Manager → Project → Create. Name the project, select that directory and accept the existing Compose file. Enable the HDD database setting if applicable. Skip the optional Web Station portal and complete the wizard.
- If DSM's firewall is enabled, open Control Panel → Security → Firewall → Edit Rules. Allow the published TCP port from your trusted LAN and the required communication between the project's containers. The linked guide shows how to identify the server container's address for its source rule.
When the project is running, continue below. A separate SynoCommunity package also exists, but it has a different installation and update process; do not combine its database layout with this Docker guide.
4. Open port 2283 and create the administrator
Immich uses TCP port 2283. With 2283:2283, open http://192.168.1.10:2283, replacing the example address with your server or NAS address. Use http://localhost:2283 only when browsing on the Docker host itself.
If another application occupies that host port, change the mapping to 2284:2283, recreate the project and browse port 2284. The left number is the host port; the right is Immich's container port. Old 2283:3001 examples do not match this release. Leave database, cache and machine-learning ports internal.
- On the welcome page, select Getting Started.
- Enter your administrator email, password, password confirmation and name, then select Sign up. The first registered user is the administrator.
- Sign in and complete the onboarding options, including privacy, storage and backups. Finish with Done.
You should reach the Photos interface. These registration instructions follow the post-install documentation; the failed signup capture is not presented as a successful screenshot.
5. Add existing Synology photos as an external library
An external library indexes files already stored elsewhere. Immich-managed uploads go into its own storage; external originals remain in their source folder, while Immich stores database records and generated previews separately.
Mount the folder read-only
For a Synology shared folder at /volume1/photo, replace the existing immich-server volume list with this list. On Linux, substitute your actual source directory on the left:
volumes:
      - ${UPLOAD_LOCATION}:/data
      - /etc/localtime:/etc/localtime:ro
      # Existing originals: host path -> container path, read-only.
      - /volume1/photo:/mnt/photos:ro
Keep this under immich-server, preserving the YAML indentation. Apply the change and check visibility:
docker compose up -d
docker compose exec immich-server ls -ld /mnt/photos
docker compose exec immich-server ls /mnt/photos
The listing should show your source folder's contents. On DSM, save the project YAML change and rebuild the project to apply it. The :ro mount prevents Immich from modifying originals through that mount; it does not create a backup.
Create the library and scan its contents
- Open Administration → External Libraries → Create Library. Choose the user who should own the photos and select Create.
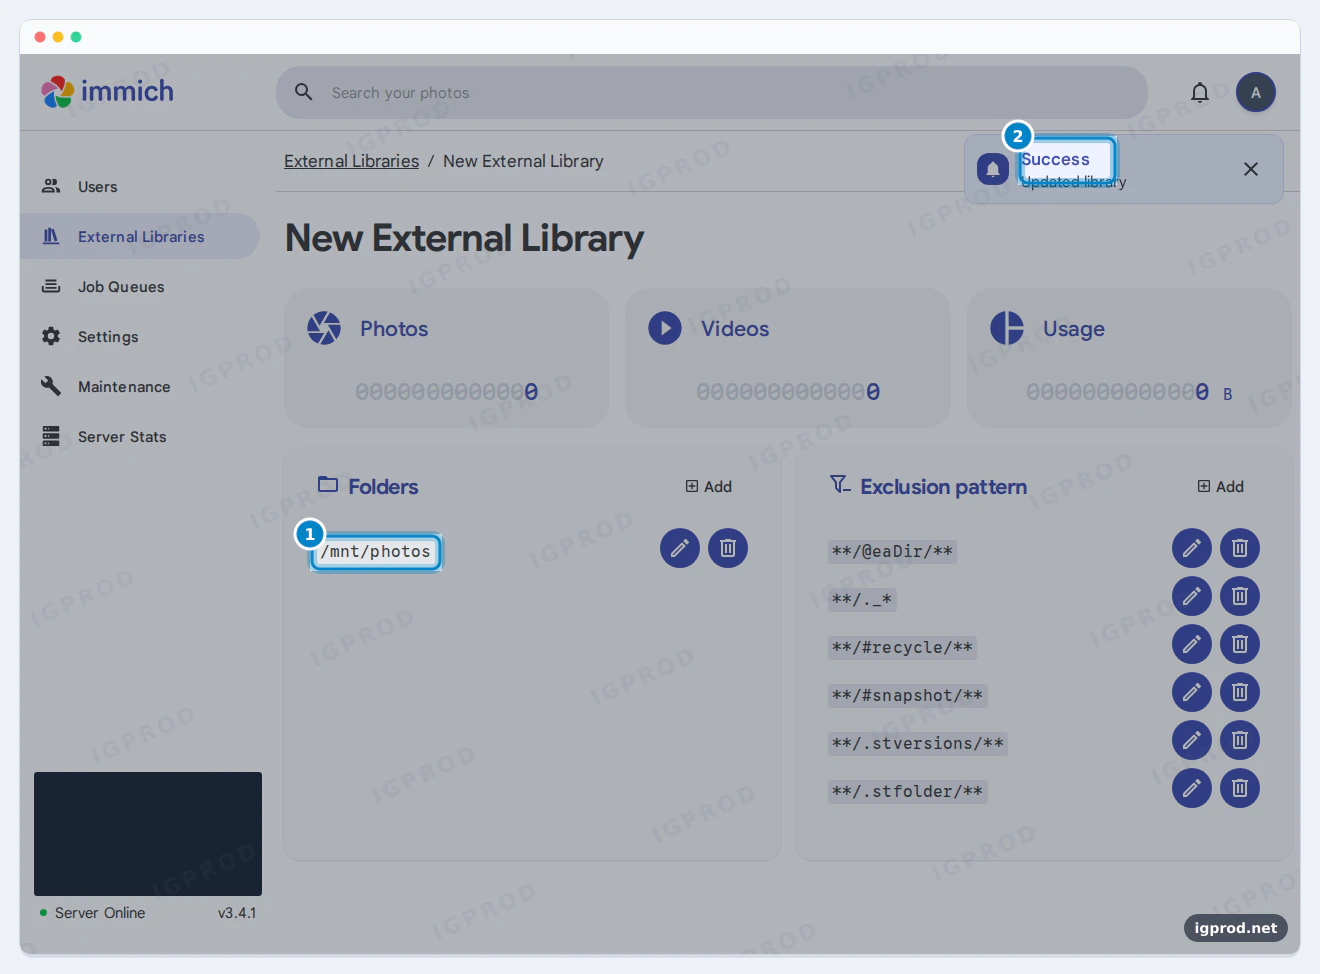
- Open the library's settings. Under Folders, select Add, enter
/mnt/photosand save with Add. Use the container path, not/volume1/photo. - Review Exclusion pattern. If relevant and not already present, add
**/@eaDir/**and**/#recycle/**to omit Synology-generated thumbnails and recycled files. - Return to External Libraries, select the library and use Scan. Allow metadata and thumbnail jobs to finish, then open Photos as its owner.
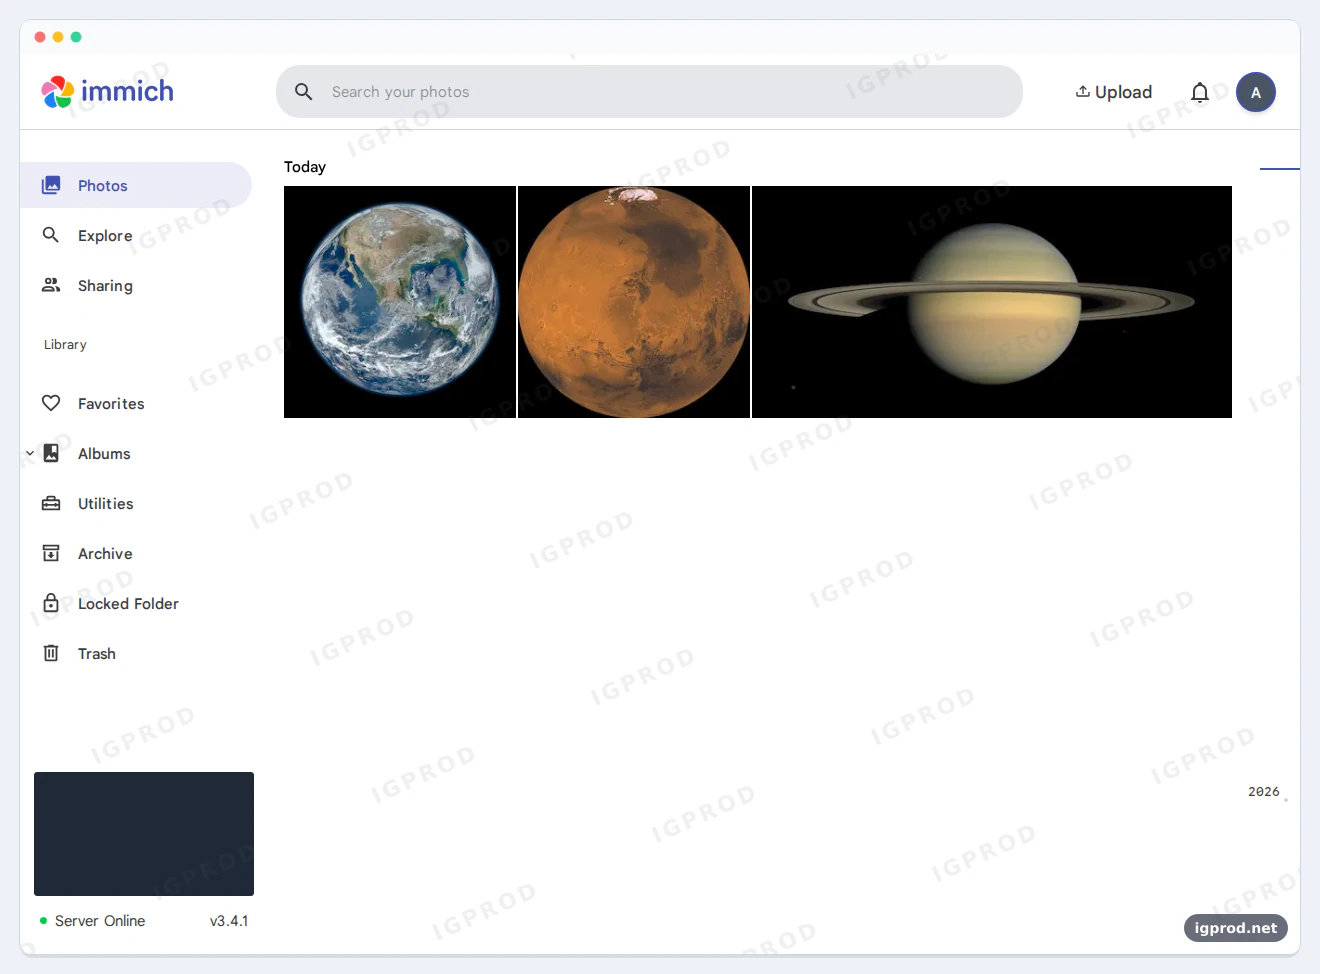
Rescan after adding files. Keep source paths stable: moving an external original can cause it to be treated as a new asset and lose Immich-only album associations or metadata. See the external-library behavior documentation.
This read-only arrangement lets Immich index Synology Photos originals while keeping its managed uploads separate. It does not migrate Synology Photos albums, permissions or users.
Upload new phone photos
In the official Immich mobile app, enter the server's base URL, such as http://192.168.1.10:2283, sign in, select albums in the backup screen and enable backup. Do not append /api. Check that a new photo appears in the web timeline; mobile uploads were not part of our test.
For access away from home, use a reachable HTTPS hostname such as https://photos.example.com or a private VPN. Follow the reverse-proxy requirements for forwarded headers, WebSockets, upload limits and /.well-known/immich. Use a dedicated hostname rather than an /immich subpath.
6. Back up the database and original files
A database backup does not contain your photos or videos. Keep the database dump, the entire UPLOAD_LOCATION, every external source folder, and your Compose and .env files. Protect the environment file because it contains a secret.
To request a dump in the interface, use Administration → Job Queues → Create job → Create Database Dump → Confirm. Look in UPLOAD_LOCATION/backups. Automatic dumps default to daily at 02:00 with 14 retained; change this under Administration → Settings → Database Dump Settings. Copies on the same disk do not protect against losing that disk.
For a consistent backup of the Linux layout above, save the following as backup.sh in the project directory. Replace /mnt/backup/immich with a mounted, independent backup destination. Run it with bash backup.sh using an account that can administer Docker and read the media files:
#!/usr/bin/env bash
set -euo pipefail
umask 077
backup_dir="/mnt/backup/immich/$(date -u +%Y%m%dT%H%M%SZ)"
mkdir -p "$backup_dir"
# Stop application writes; leave PostgreSQL running for the dump.
docker compose stop immich-server
trap 'docker compose start immich-server' EXIT
docker compose exec -T database pg_dump --clean --if-exists --username=postgres --dbname=immich | gzip > "$backup_dir/database.sql.gz"
gzip -t "$backup_dir/database.sql.gz"
tar -czf "$backup_dir/media.tar.gz" -C ./library .
cp compose.yaml .env "$backup_dir/"
# External originals need a separate backup; this archive excludes them.
docker compose start immich-server
trap - EXIT
This assumes the default database user/name and UPLOAD_LOCATION=./library. Change those values if yours differ; DSM uses docker-compose.yml in the copy command. The exit trap restarts Immich if a command fails, but the backup is then incomplete. A successful run creates the dump, media archive and configuration copies; the gzip check alone does not prove recoverability.
Back up external originals separately, pausing other writers such as Synology Photos or using a consistent snapshot. Keep an offsite copy and perform an isolated restore drill. For recovery, restore the corresponding files and external mounts, then follow the version-appropriate restore instructions: a fresh welcome screen offers Restore from backup; an existing installation has Administration → Maintenance → Restore database backup. Restoration replaces the database. This procedure was not exercised in our sandbox.
7. Update Immich with Compose or Container Manager
Update a Docker Compose installation
- Make a recoverable backup and read the target release notes, including intermediate breaking changes. Update phone clients before a major server upgrade.
- Compare the target release's Compose and environment files with yours. Preserve storage paths, external mounts and credentials; do not overwrite your
.envwith a default file. - Change
IMMICH_VERSIONto the chosen release tag. Keepingv3.4.1pins that version; pulling it again does not select a newer release. A floatingv3tag follows major-version-3 releases when pulled. - From the existing project directory, run:
docker compose config --quiet
docker compose pull
docker compose up -d
docker compose ps
docker compose logs --tail=100 immich-server database
Verify the displayed version, sign in, open a photo and check the external library. Restarting alone does not download a new image or apply changed environment values. Downgrading by changing a tag backward is unsupported; use a compatible backup if recovery is necessary.
For old installations, v3 removed pgvecto.rs support. Databases from before v1.133.0 that never migrated need the documented VectorChord migration first. Do not swap PostgreSQL major versions arbitrarily. The fresh stack above already uses the release's database image.
Update a Synology Container Manager project
After the same backup, release review and version edits, select your project in Container Manager → Project, choose Stop, then Action → Clean to remove its containers, followed by Action → Build to recreate them. Preserve the persistent folders and named volumes.
The community guide also removes unused images to force a download. That can affect other unused images; with an explicit new version tag, target the intended release. For a controlled pull, connect to Synology over SSH and run the Compose update commands from /volume1/docker/immich.
Recheck DSM's firewall source rule after recreation because container addresses can change. Confirm the version and photo access. Package Center updates apply to the separate SynoCommunity package, not this project.
Fix common Docker and external-library problems
The page does not open
Check docker compose ps and the server/database logs. Confirm the host address, the left-hand published port and firewall rules. If port 2283 is occupied, use 2284:2283 as described above. Our Docker logs guide explains how to follow errors without dumping an entire log history.
Compose rejects the file or the database rejects its password
For Compose syntax or unknown-option errors, check docker compose version and use the current plugin. For database authentication errors, verify that .env exists beside the YAML and has the original database secret. PostgreSQL initialization settings apply to an empty data directory; editing the password variable later does not change an existing database password. Restore the matching secret or perform a deliberate password change with a backup, rather than deleting the database.
The external library is empty or reports permission denied
Confirm that /mnt/photos is readable inside the server container, then check the library owner, exclusions, Scan action and background jobs. A read-only mount still allows reading. For EACCES, inspect read permissions on files and traversal permissions on every parent directory, including Synology ACL deny entries. Use narrower readable folders when necessary. Historical scan reports and a Synology ACL discussion illustrate these failure modes; they are not evidence that every old bug persists in v3.4.1. Avoid blanket Everyone-write access or recursive chmod 777.
The update changes nothing, or machine learning will not start
For an unchanged version, check the version pin and project directory, then pull and recreate. For a failing machine-learning service, check the documented CPU instruction-set and memory requirements before retrying. A healthy service container in our offline test does not establish that model downloads or recognition work.
FAQ
What port does Immich use, and can I change it?
Immich listens on TCP 2283. Change the host side of the Compose mapping to use another browser port: 2284:2283 serves it at port 2284 while preserving the internal port.
Which Immich Docker image should I use?
Use ghcr.io/immich-app/immich-server and the matching immich-machine-learning release through the upstream Compose file. These application images come from GitHub Container Registry; you do not need a Docker Hub substitute.
Can I run Immich with Docker Desktop?
Windows and macOS are possible, although Immich recommends Linux. On Windows, keep PostgreSQL away from NTFS/exFAT bind mounts and WSL /mnt/... paths. For a fresh installation, set DB_DATA_LOCATION=pgdata in .env and replace the top-level volumes declaration with:
volumes:
  model-cache:
  pgdata:
Leave the database's existing ${DB_DATA_LOCATION}:/var/lib/postgresql/data mapping in place. It now uses a Docker-managed named volume. This change does not migrate an existing database. The terminal commands above assume a Linux shell; Docker Desktop itself was not tested here.
Is there an Immich Synology package?
Yes. SynoCommunity documents a third-party package for compatible 64-bit DSM 7.2+ systems. Its dependencies and Package Center updates differ from the upstream Docker stack used here.
Can Immich use my existing Synology Photos folders?
Yes, through an external library with a read-only source mount and a separate Immich upload directory. Originals stay in place; Synology Photos album membership and access permissions are not automatically imported.
Does Immich's database backup include my photos?
No. Back up the database together with uploaded media and every external original. Phone-to-Immich uploads and database dumps are only parts of a backup plan; keep independent copies and verify restoration.
Sources
- Immich v3.4.1 release
- Release Compose file
- Release environment example
- Official Docker Compose installation
- Hardware and software requirements
- Environment variables
- Post-installation steps
- Synology community installation and updates
- External library setup
- External library behavior
- v3.4.1 external-library UI actions
- Backup and restore
- Upgrading Immich
- v3.0.0 breaking changes
- Reverse-proxy requirements
- PostgreSQL image initialization
- SynoCommunity Immich package
- Reported scan permissions issue #12713
- Synology ACL discussion #6141
- Reader reports: Synology installation and port conflicts
- Reader reports: Synology update confusion
- NASA Earth image PIA18033
- NASA Mars image PIA00407
- NASA Saturn image PIA11141