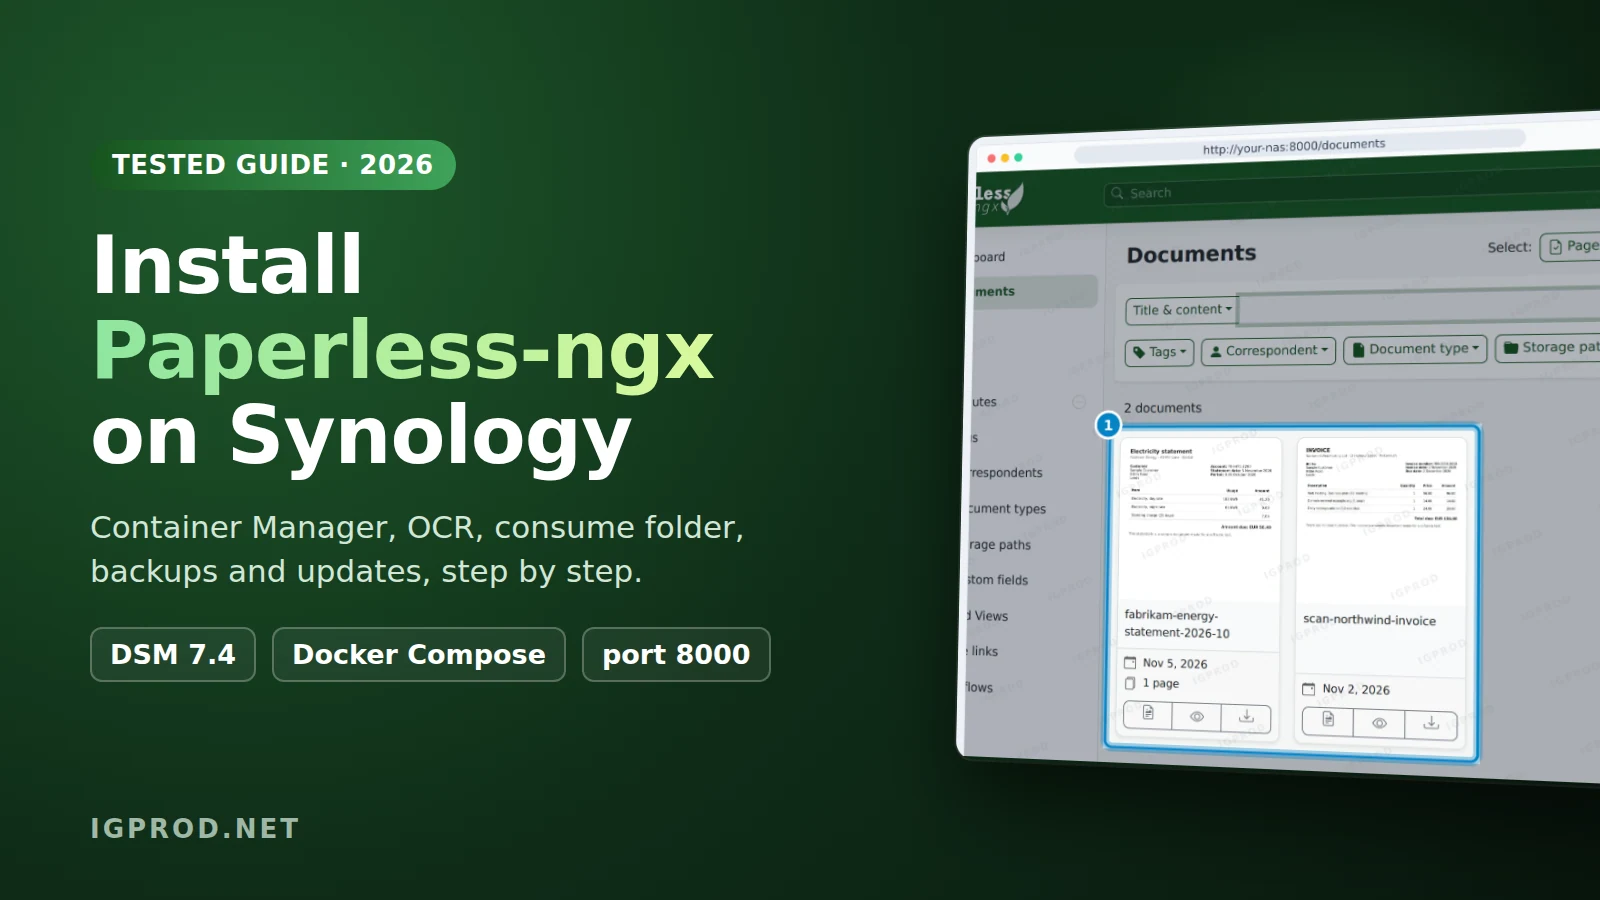
Paperless-ngx is a free, open-source document manager. You give it your scanned letters, invoices and PDFs. It reads their text with OCR, keeps each file with its date, and finds any document again with a search. You host it yourself, so your documents stay on your own NAS.
This guide installs Paperless-ngx on a Synology NAS with Container Manager and Docker Compose. You will create the admin account, upload a first scan, use the consume folder, then back up and update Paperless. We also show the Synology error that stops most first installs, and its fix.
We tested every step on 13 November 2026: Paperless-ngx 3.4.2 (the ghcr.io/paperless-ngx/paperless-ngx:latest image, released on 3 November 2026), Valkey 9 as the broker, DSM 7.4.1 and Container Manager 24.0.2. Our test documents are a made-up invoice and a made-up electricity statement.
What you need
- A Synology NAS with the Container Manager package from Package Center. Paperless-ngx has images for amd64, arm and arm64 processors.
- SSH access with an administrator account, to read your user ID and create the folders. If SSH is off, follow our guide to SSH into your Synology.
- Port 8000 free on the NAS. If another container already uses it, you choose another port in step 3.
Step 1: Find your user ID and group ID
Inside its container, Paperless-ngx runs with the user ID and group ID that you give it in USERMAP_UID and USERMAP_GID. Use the IDs of your DSM user: then the files that Paperless writes belong to you, and you can open them in File Station. Connect over SSH and type:
iduid=1038(igprod) gid=100(users) groups=100(users),101(administrators)Our test user has the user ID 1038. The group users has the ID 100. Write down your two numbers: you need them in steps 2 and 3.
Step 2: Create the folders
Container Manager does not create missing folders for a project. If one folder is missing, the start fails with Bind mount failed (see Troubleshooting). So create all of them first, in the docker shared folder:
sudo mkdir -p /volume1/docker/paperless
cd /volume1/docker/paperless
sudo mkdir data media export consume redisdata
sudo chown 1038:100 data media export consume redisdata
Replace 1038 with your user ID. If your docker shared folder is on another volume, replace /volume1 too. What goes into each folder:
data: the SQLite database, the search index and the logs.media: your documents: the original files, the searchable PDF copies and the thumbnails.consume: an inbox. Paperless imports every file that you put there (step 6).export: where the backup command writes (see "Back up Paperless-ngx").redisdata: the data of Valkey, the small task queue that Paperless needs. At its first start, Valkey gives this folder to its own user (ID 999). That is normal.
Step 3: Create the project in Container Manager
Open Container Manager, go to Project and click Create. Type paperless as project name, click Set Path and choose the docker/paperless folder of step 2. As Source, choose Create docker-compose.yml:
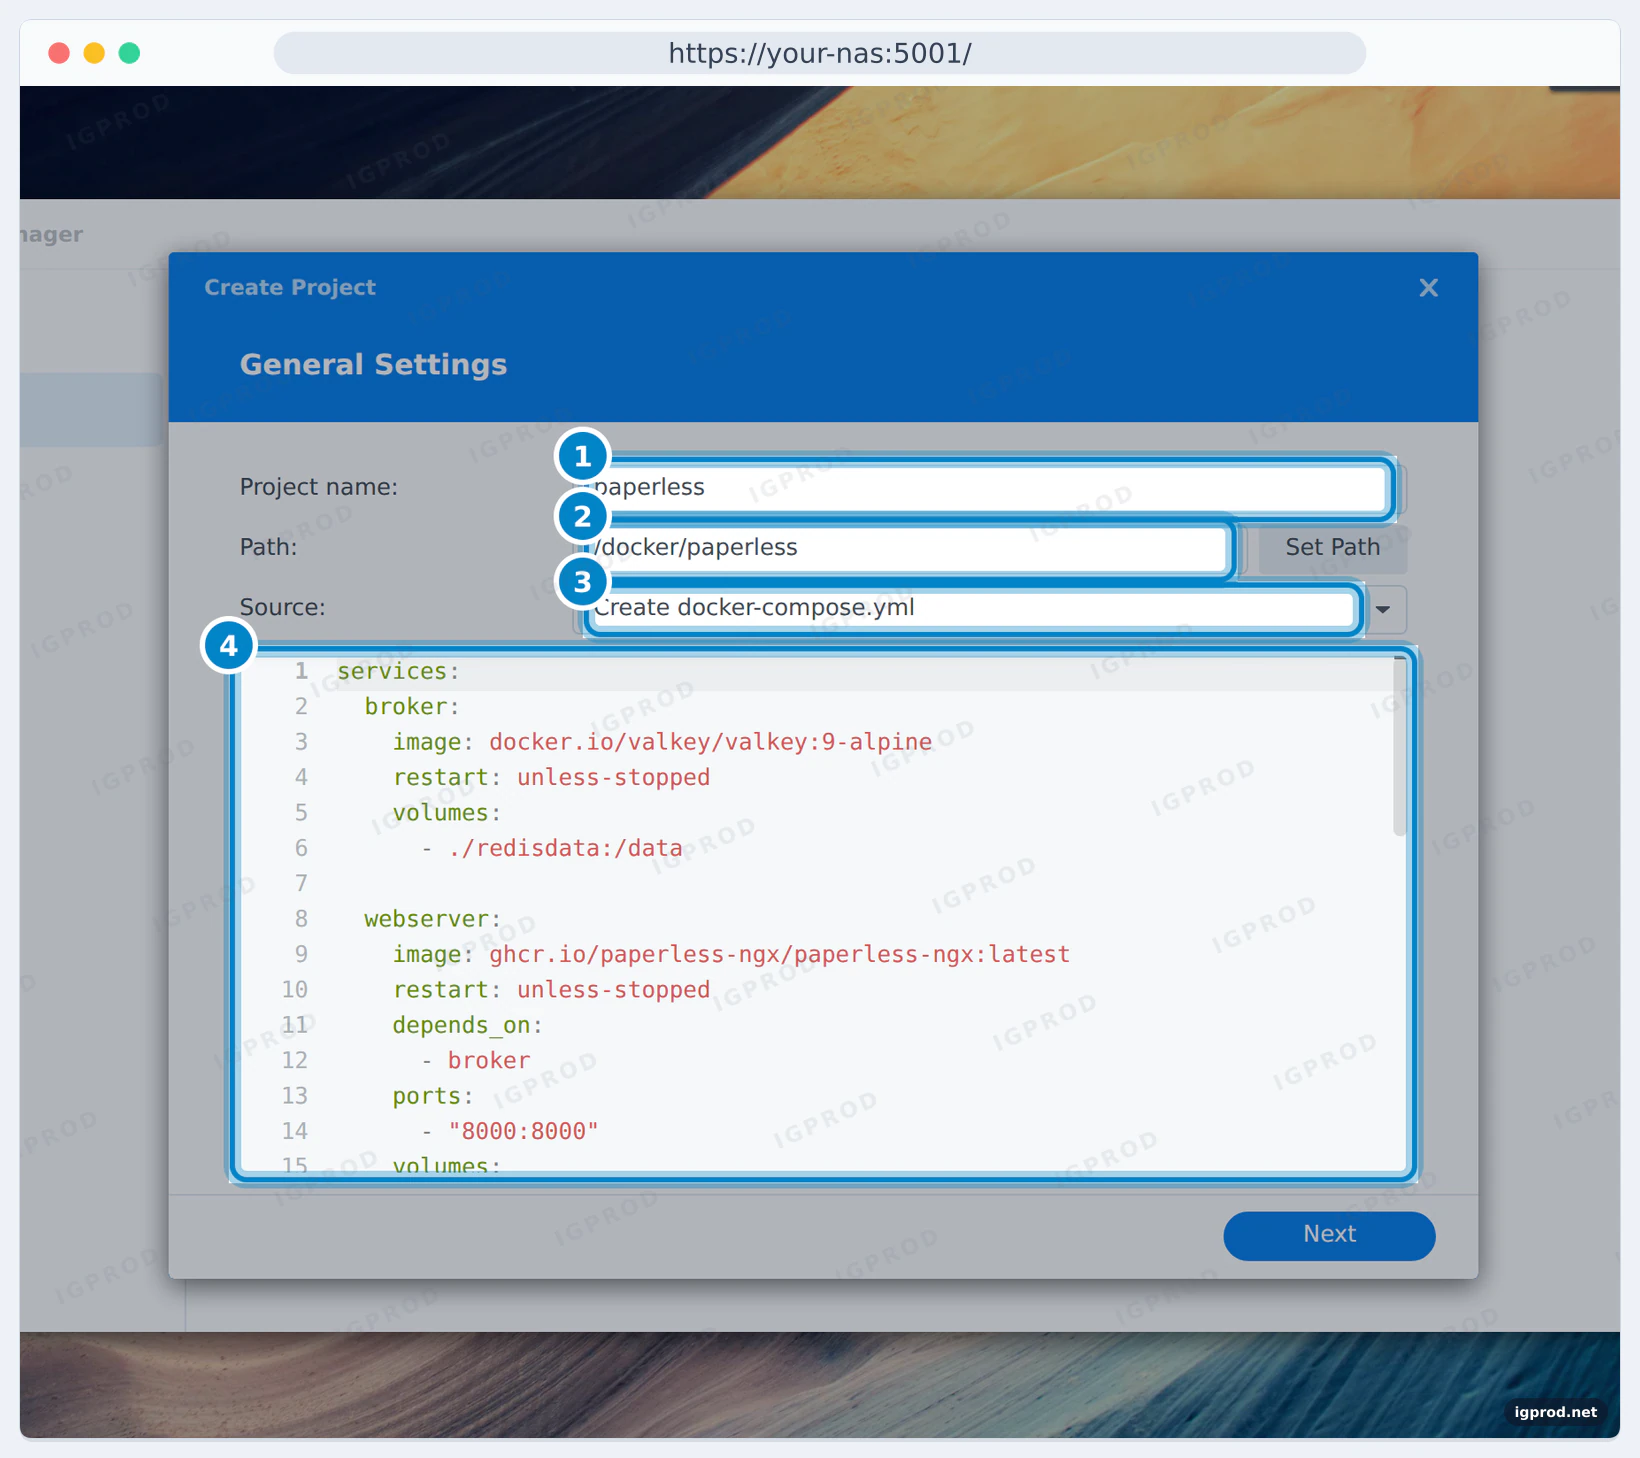
Paste this file. It is the official SQLite Compose file of Paperless-ngx, with two changes for Synology. It uses folders instead of Docker volumes, so you see your files in File Station and your NAS backups include them. And the settings are in the file itself, so you do not need a second file:
services:
  broker:
    image: docker.io/valkey/valkey:9-alpine
    restart: unless-stopped
    volumes:
      - ./redisdata:/data

  webserver:
    image: ghcr.io/paperless-ngx/paperless-ngx:latest
    restart: unless-stopped
    depends_on:
      - broker
    ports:
      - "8000:8000"
    volumes:
      - ./data:/usr/src/paperless/data
      - ./media:/usr/src/paperless/media
      - ./export:/usr/src/paperless/export
      - ./consume:/usr/src/paperless/consume
    environment:
      PAPERLESS_REDIS: redis://broker:6379
      PAPERLESS_DBENGINE: sqlite
      PAPERLESS_SECRET_KEY: change-this-to-a-long-random-string
      PAPERLESS_TIME_ZONE: America/New_York
      PAPERLESS_OCR_LANGUAGE: eng
      USERMAP_UID: 1038
USERMAP_GID: 100broker: Valkey, the message broker. Paperless-ngx sends its background work through it, such as the import of a new document. The official Compose files use Valkey; Redis works too.webserver: Paperless-ngx itself, the official image from the GitHub container registry.latestfollows the newest release."8000:8000": the web interface. If port 8000 is already used on your NAS, change only the left number, for example"8010:8000", and open port 8010 instead.- The four
volumeslines: the folders of step 2. The./means "in the project folder". PAPERLESS_DBENGINE: sqlite: one database file indata, no database server to run. The documentation recommends PostgreSQL for several users or for a high number of documents.PAPERLESS_SECRET_KEY: required. Paperless refuses to start without it. Replace our example with a long random string. DSM has Python 3, so you can make one over SSH with the command from the documentation:
python3 -c "import secrets; print(secrets.token_urlsafe(64))"PAPERLESS_TIME_ZONE: your time zone, for exampleEurope/London. Paperless uses it for the dates of your documents.PAPERLESS_OCR_LANGUAGE: eng: the main language of your documents, as a three-letter code. For several languages, join them with+, for exampledeu+eng.USERMAP_UIDandUSERMAP_GID: your two numbers from step 1.
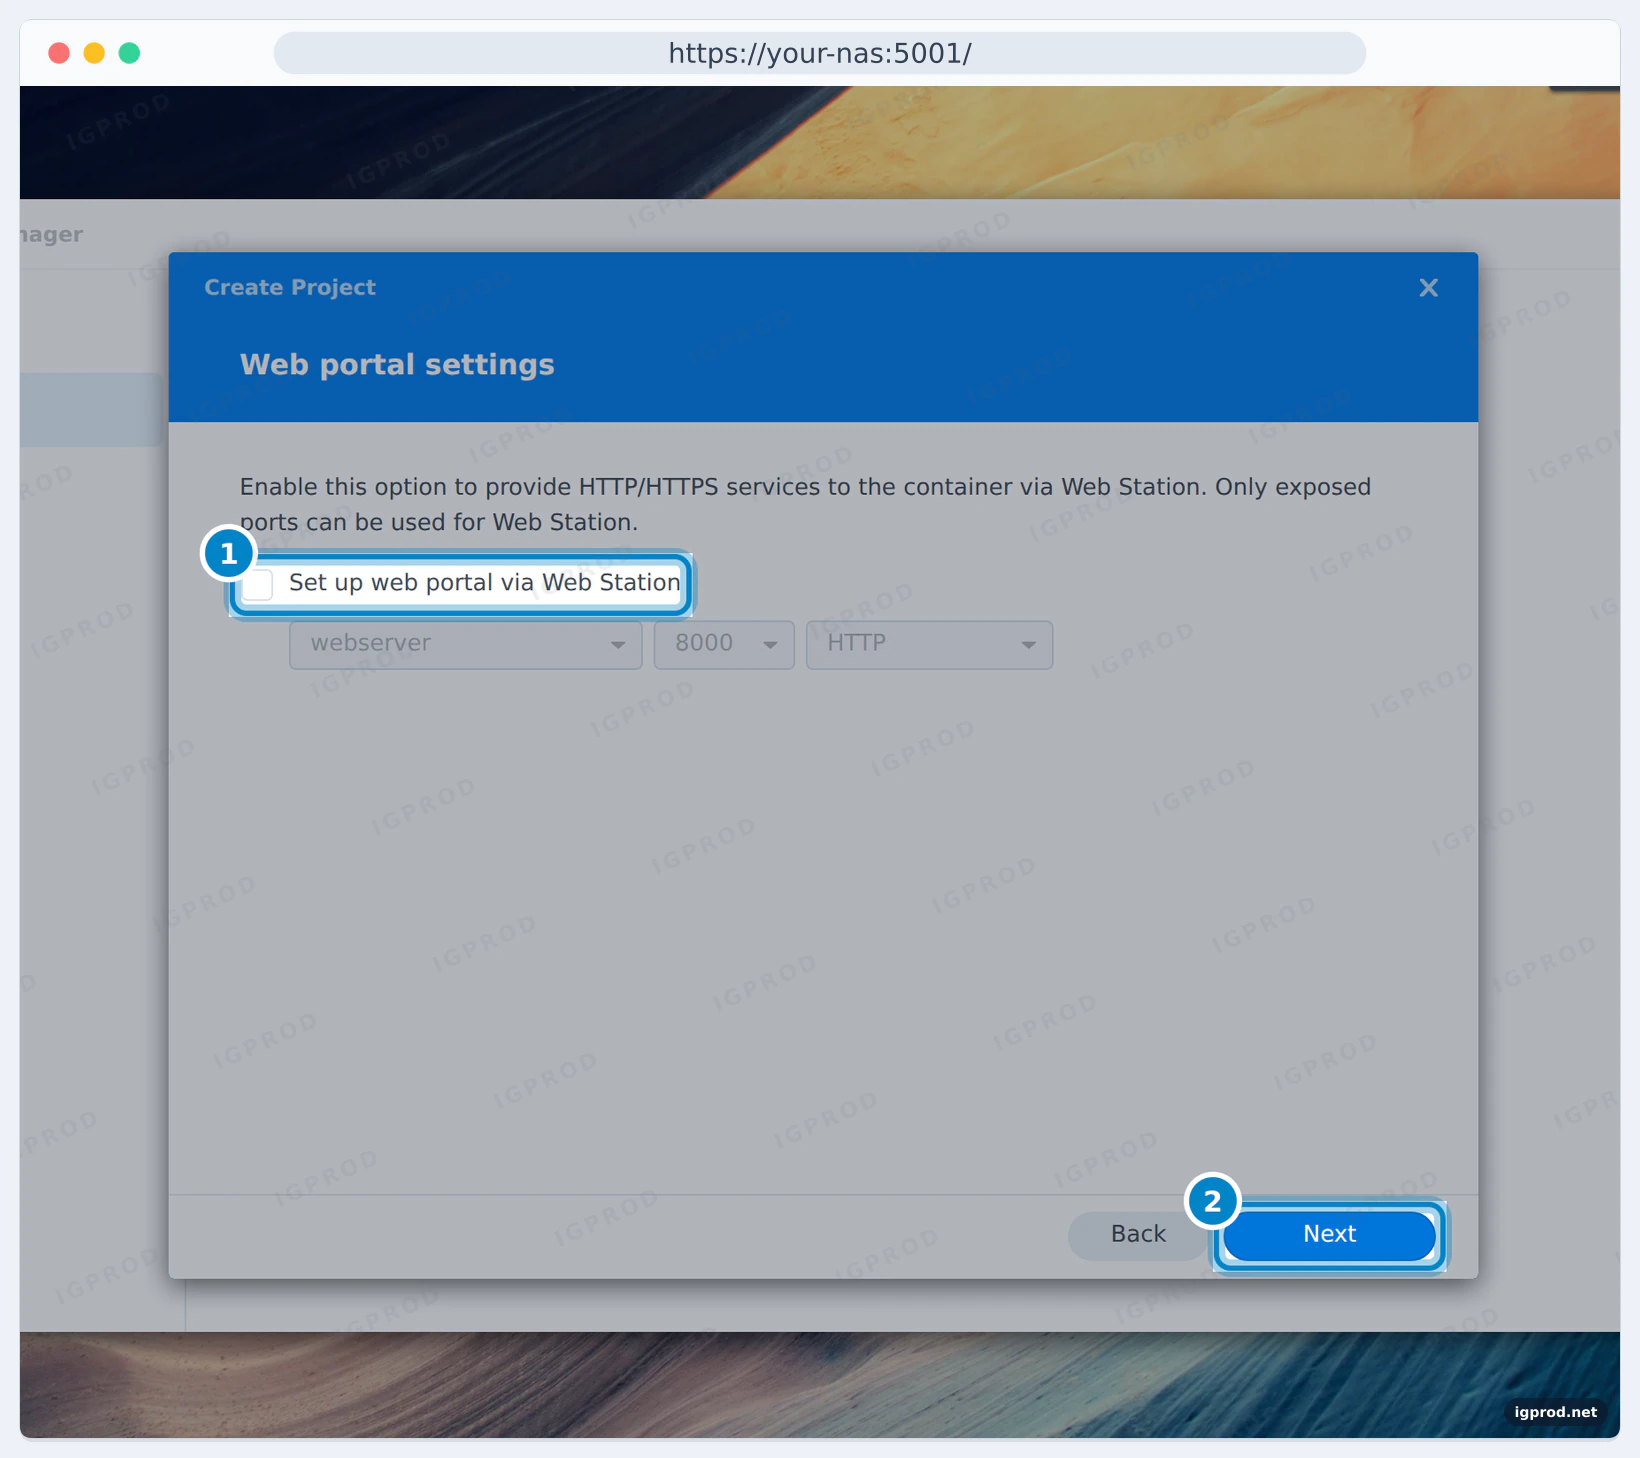
Click Next. On the Web portal settings page, leave Set up web portal via Web Station cleared: you open Paperless directly on its port.
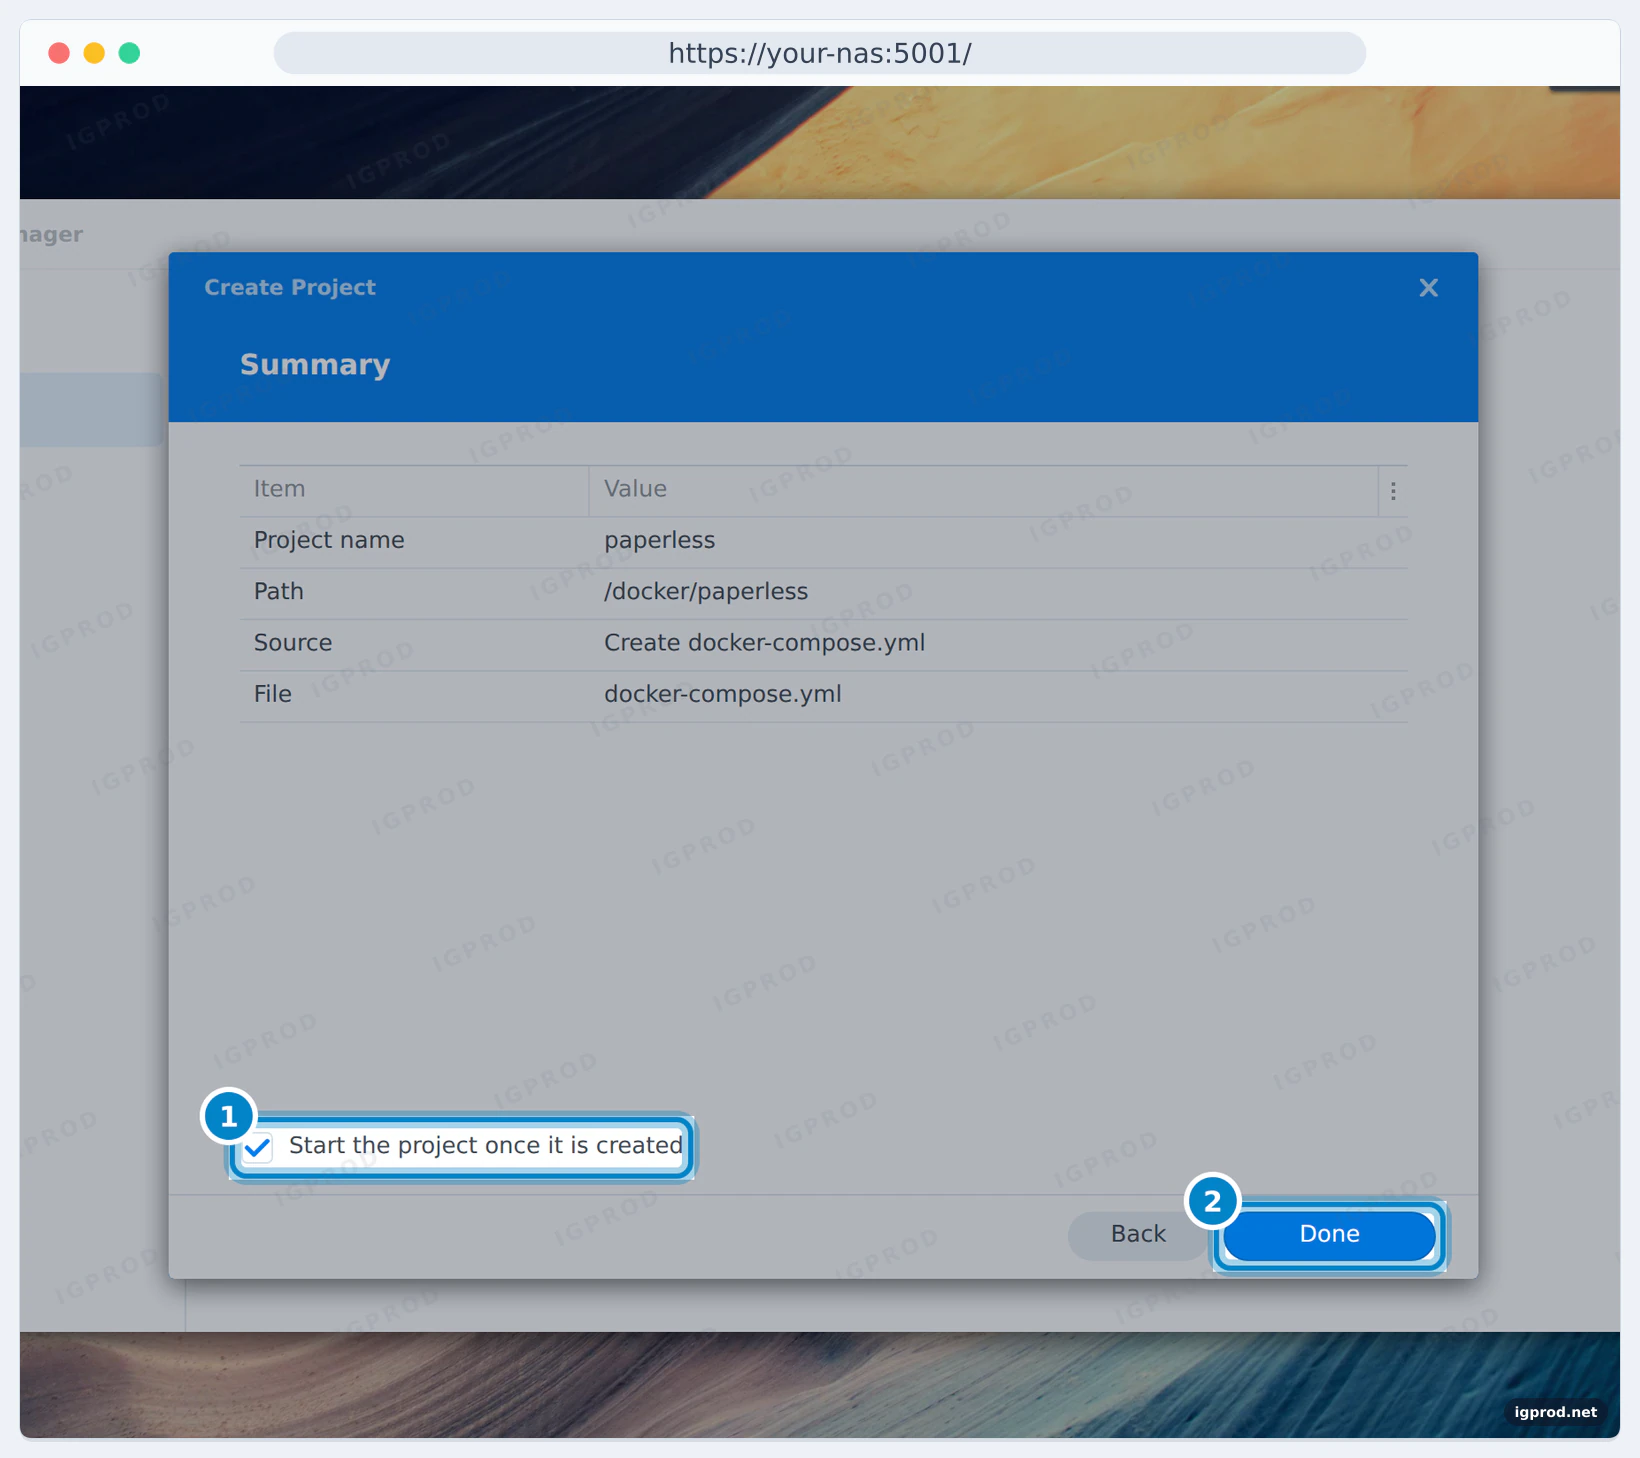
On the summary, keep Start the project once it is created selected and click Done:
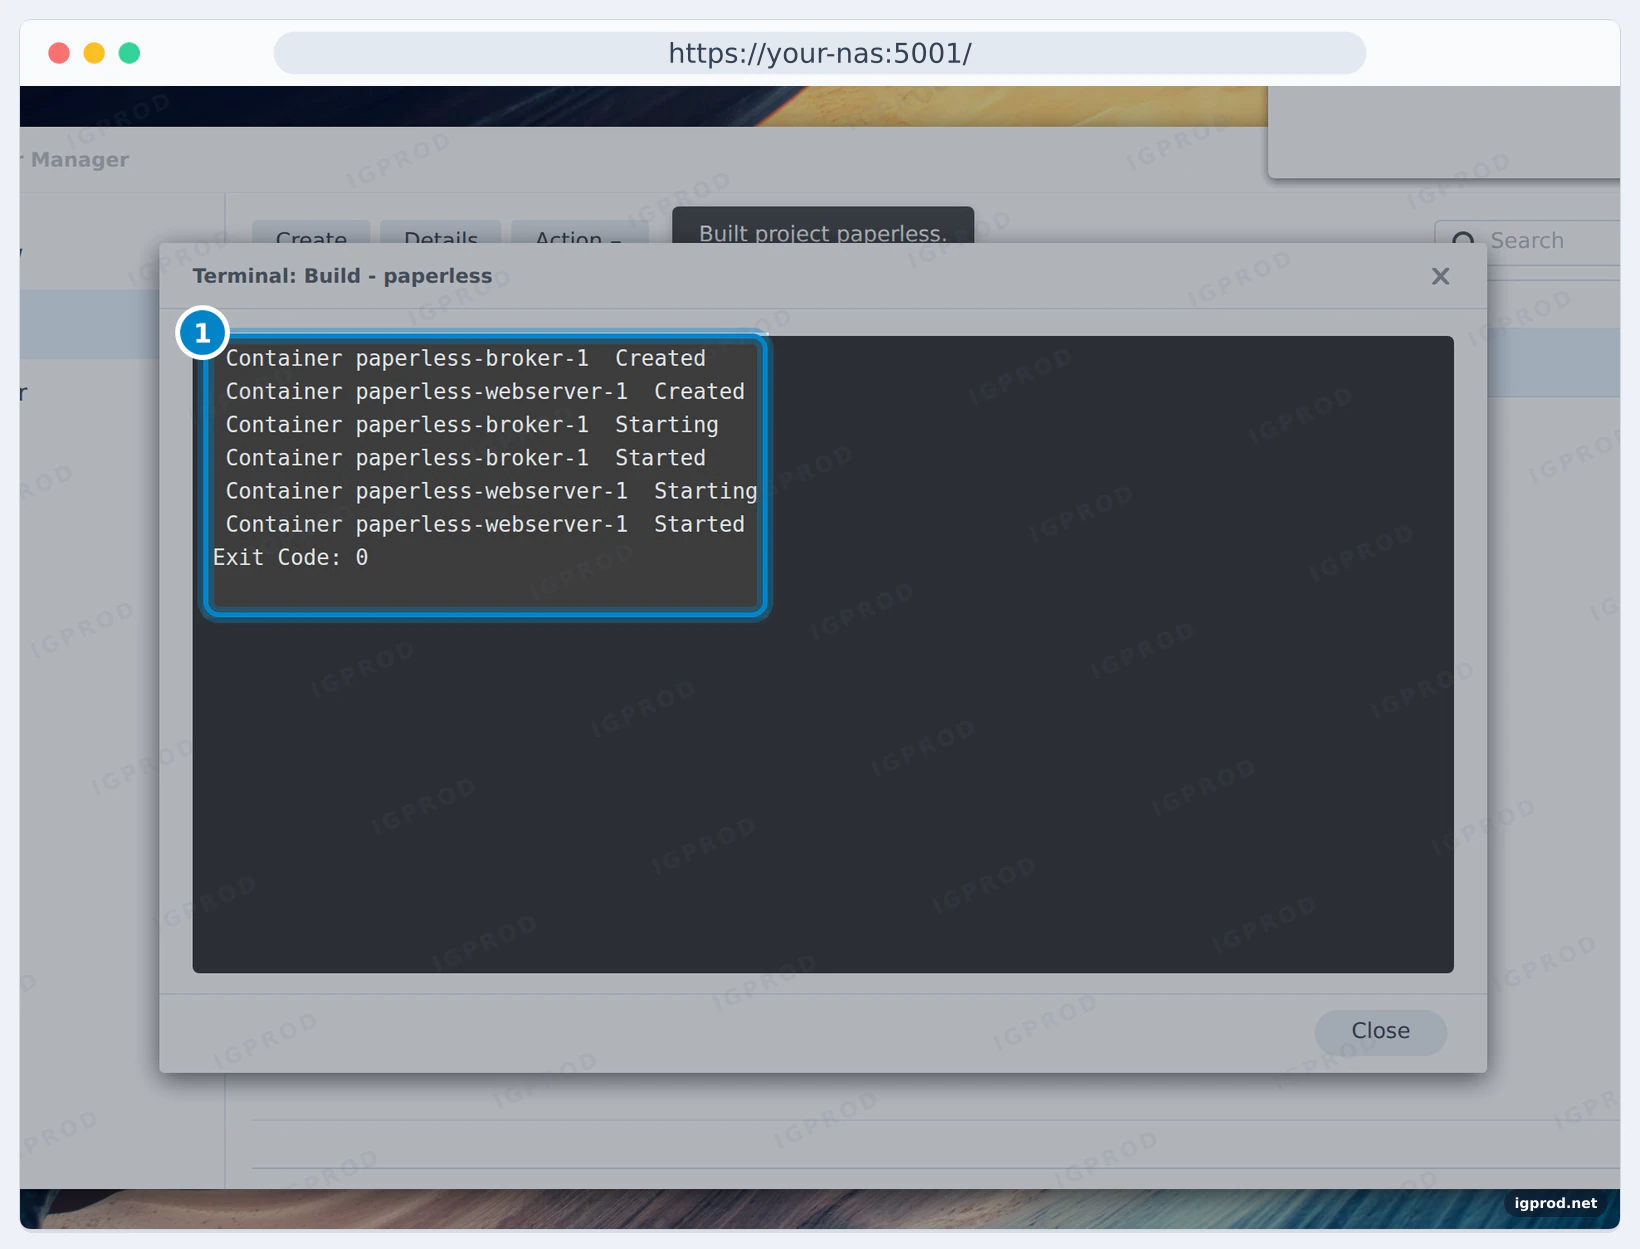
Container Manager downloads the two images and starts the containers. When the build window shows Exit Code: 0, Paperless-ngx is running:
You can also check the containers over SSH. On DSM, the docker command needs root, so type sudo -i first:
sudo -i
cd /volume1/docker/paperless
docker compose psNAME IMAGE COMMAND SERVICE CREATED STATUS PORTS
paperless-broker-1 docker.io/valkey/valkey:9-alpine "tini -- docker-entr…" broker About an hour ago Up 36 minutes 6379/tcp
paperless-webserver-1 ghcr.io/paperless-ngx/paperless-ngx:latest "/init" webserver About an hour ago Up 36 minutes (healthy) 0.0.0.0:8000->8000/tcp, :::8000->8000/tcpWait until the webserver shows (healthy).
Step 4: Create the admin account
Open http://your-nas-ip:8000 in a browser. On a new installation, Paperless-ngx opens a sign-up page. It says: "Note: This is the first user account for this installation and will be granted superuser privileges."
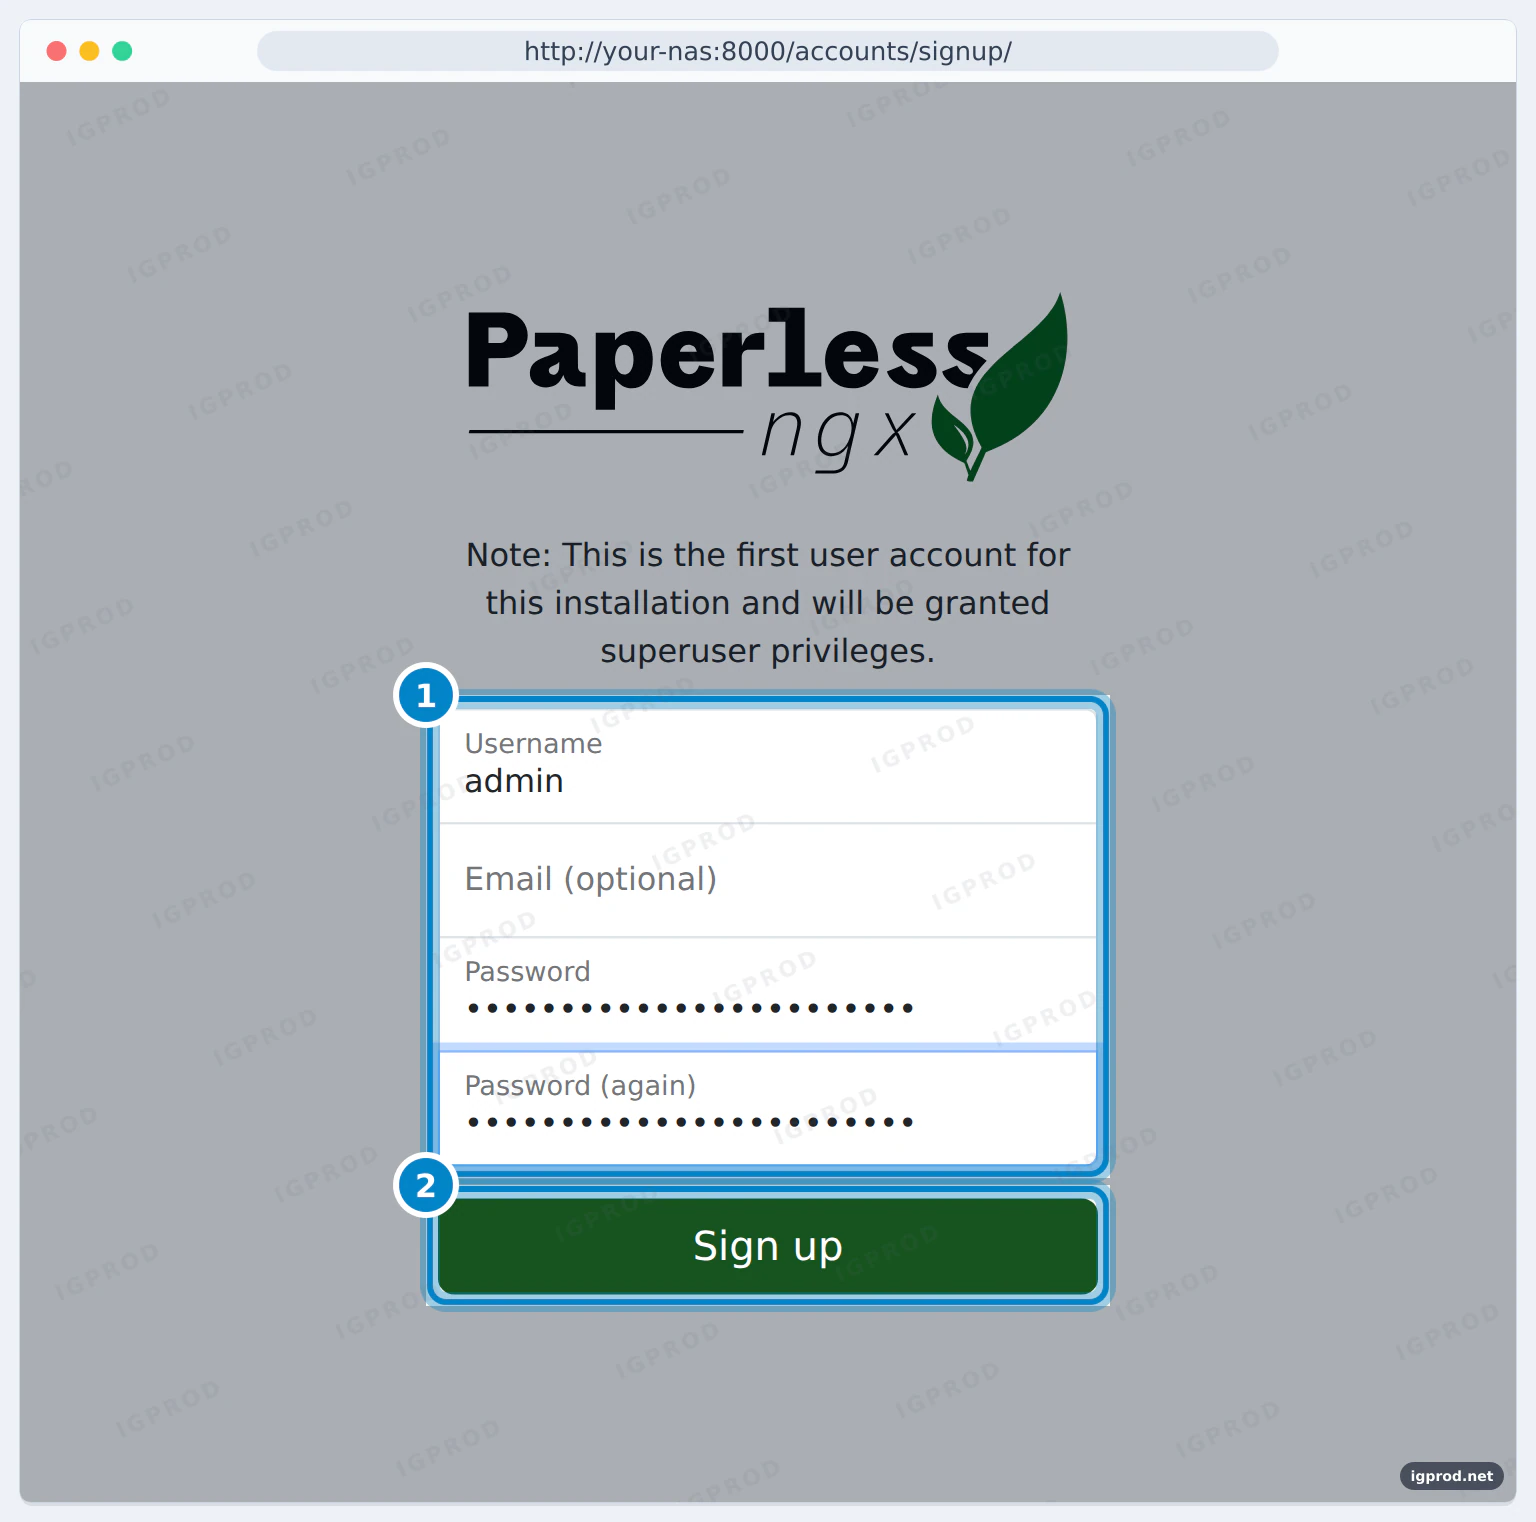
Paperless signs you in and shows the dashboard:
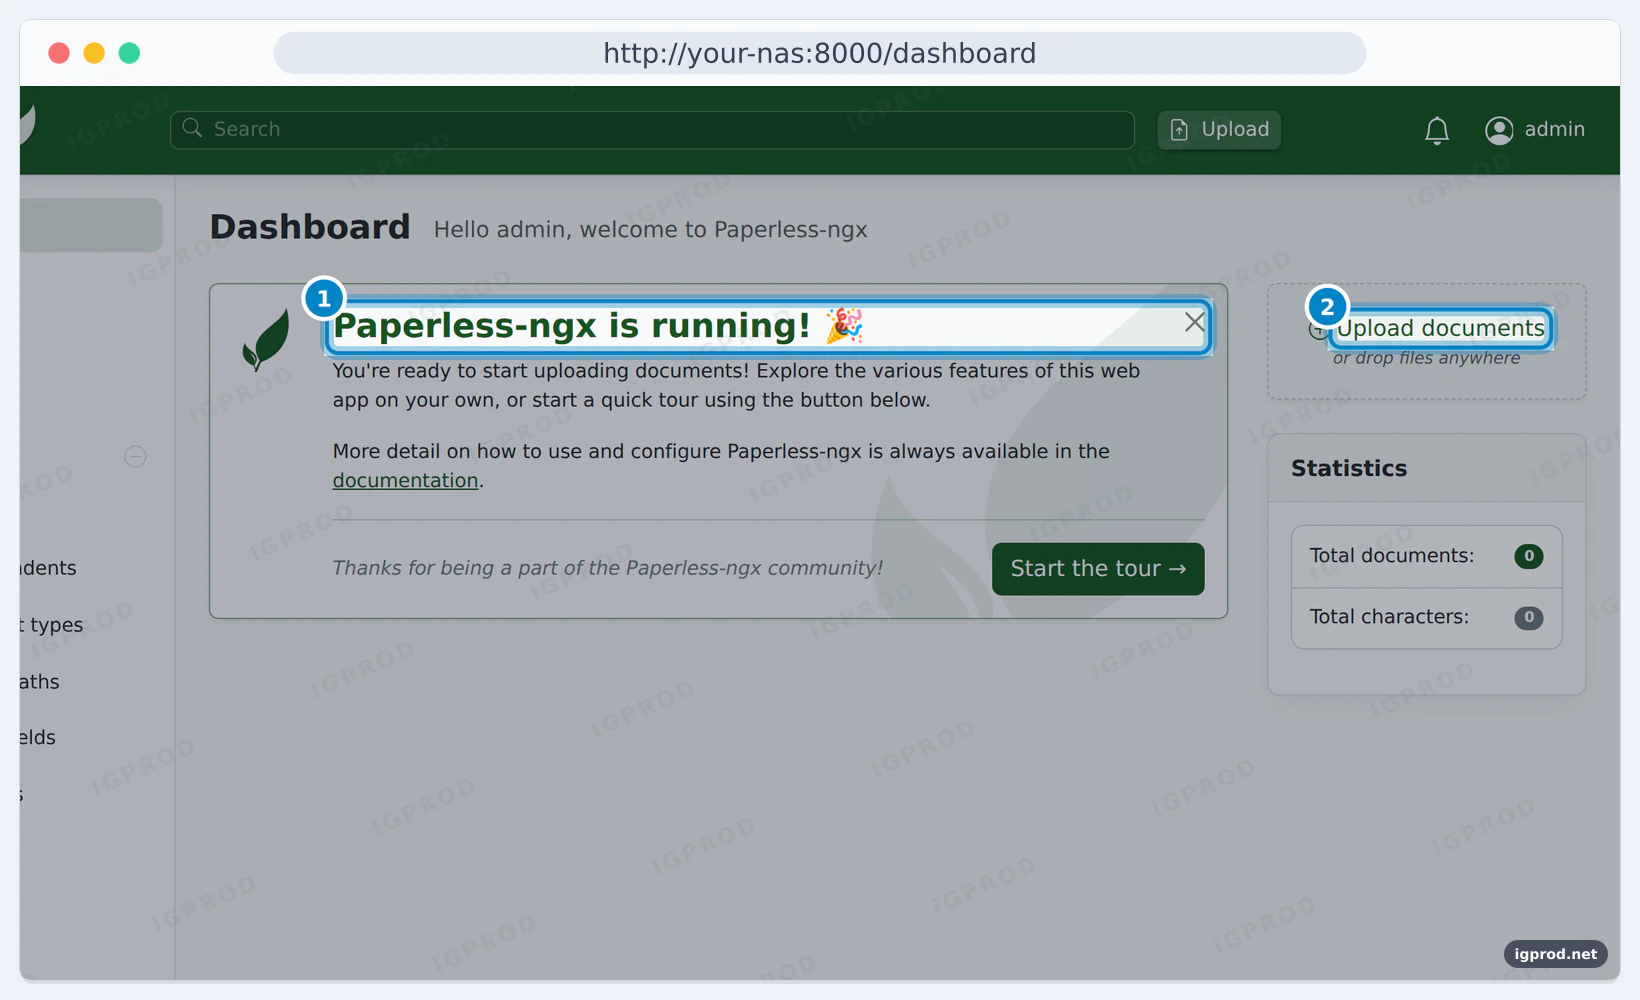
A superuser can see and change everything. The documentation suggests a second, normal account for daily use. Create it under Users & Groups, in the Administration part of the menu.
Step 5: Upload a scan and check the OCR
Click Upload documents and choose a file. We uploaded a PNG image of our made-up invoice, as a phone scan would give. About 35 seconds later, the document was in the list.
Open the document and click the Content tab. It shows the text that Paperless read from the image with OCR. The search uses this text:
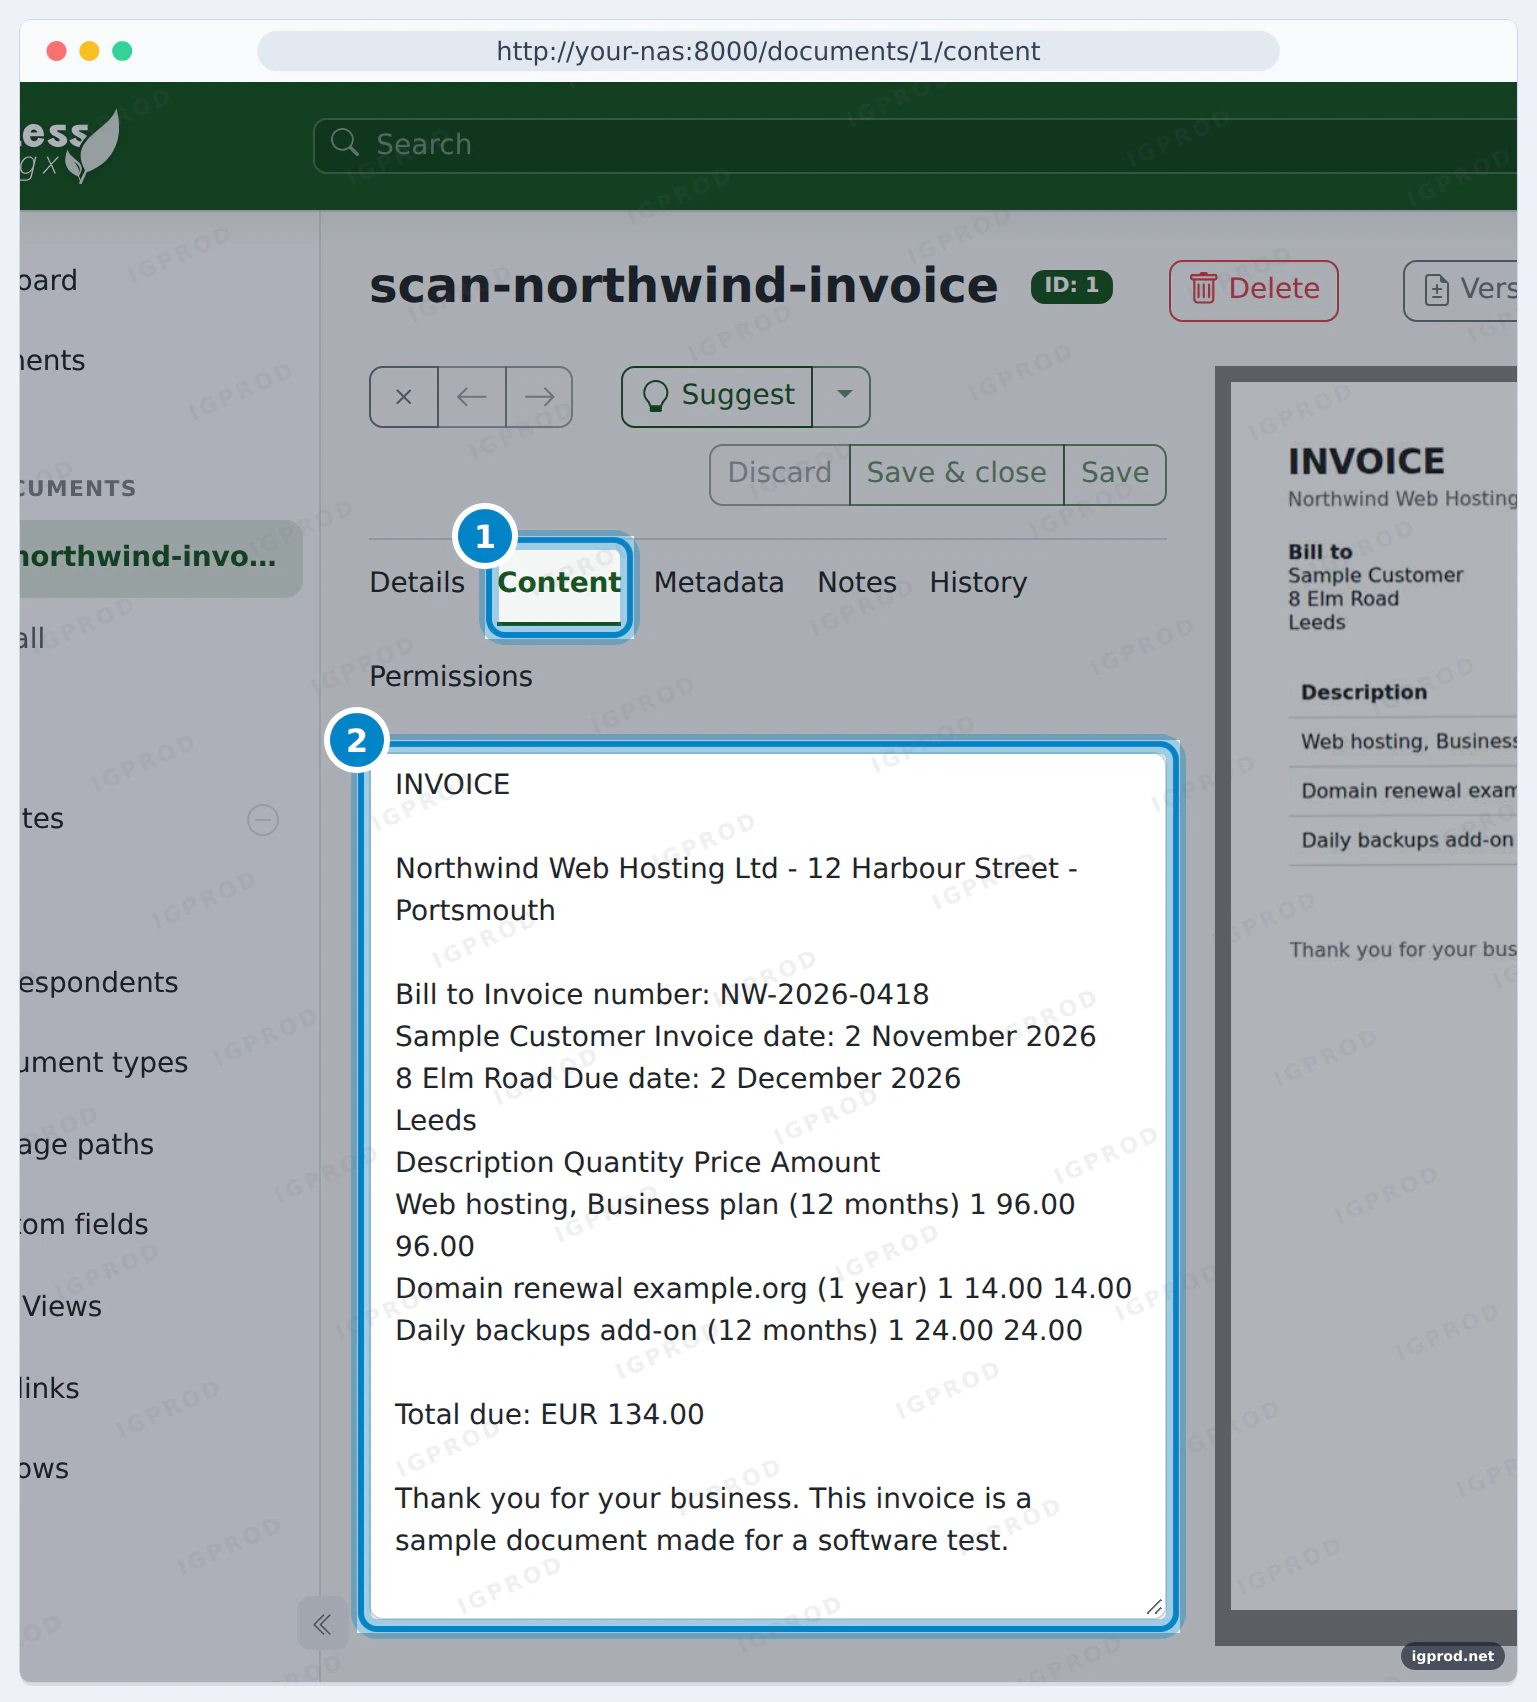
Paperless keeps your original file. For a scan, it also makes a searchable PDF copy, the archive version. It took the date of the document from the text too: 2 November 2026, the invoice date, not the upload date.
Step 6: Use the consume folder
The consume folder is the easiest way to feed Paperless. Put a file in it: Paperless imports it, then removes it from the folder. You can copy files there with File Station, from your computer over the network, or from a scanner that saves to a shared folder.
We copied a PDF statement into /volume1/docker/paperless/consume. Fifteen seconds later, the folder was empty again. The log of the webserver container shows the import:
docker logs --since 3m paperless-webserver-1 2>&1 | grep -iE "consum|success|error|warn"[2026-11-13 13:25:24,085] [INFO] [paperless.management.consumer] Adding /usr/src/paperless/consume/fabrikam-energy-statement-2026-10.pdf to the task queue
[2026-11-13 13:25:24,312] [INFO] [celery.worker.strategy] Task documents.tasks.consume_file[b67fa74d-3a0b-4d6d-b177-11d12cbfae86] received
[2026-11-13 13:25:24,401] [INFO] [paperless.tasks] [b67fa74d] ConsumerPreflightPlugin completed with no message
[2026-11-13 13:25:24,422] [INFO] [paperless.consumer] [b67fa74d] Consuming fabrikam-energy-statement-2026-10.pdf
[2026-11-13 13:25:25,216] [INFO] [paperless.consumer] [b67fa74d] pdftotext exited 0
[2026-11-13 13:25:30,239] [INFO] [paperless.consumer] [b67fa74d] Document 2026-11-05 fabrikam-energy-statement-2026-10 consumption finished
[2026-11-13 13:25:30,245] [INFO] [paperless.tasks] [b67fa74d] ConsumeTaskPlugin completed with: {'document_id': 2}
[2026-11-13 13:25:30,247] [INFO] [celery.app.trace] Task documents.tasks.consume_file[b67fa74d-3a0b-4d6d-b177-11d12cbfae86] succeeded in 5.931971927006089s: {'document_id': 2}The import took 6 seconds. This PDF already had a text layer, so Paperless read the text with pdftotext and did not need OCR. Both test documents are now in the list, each with the date from its own text:
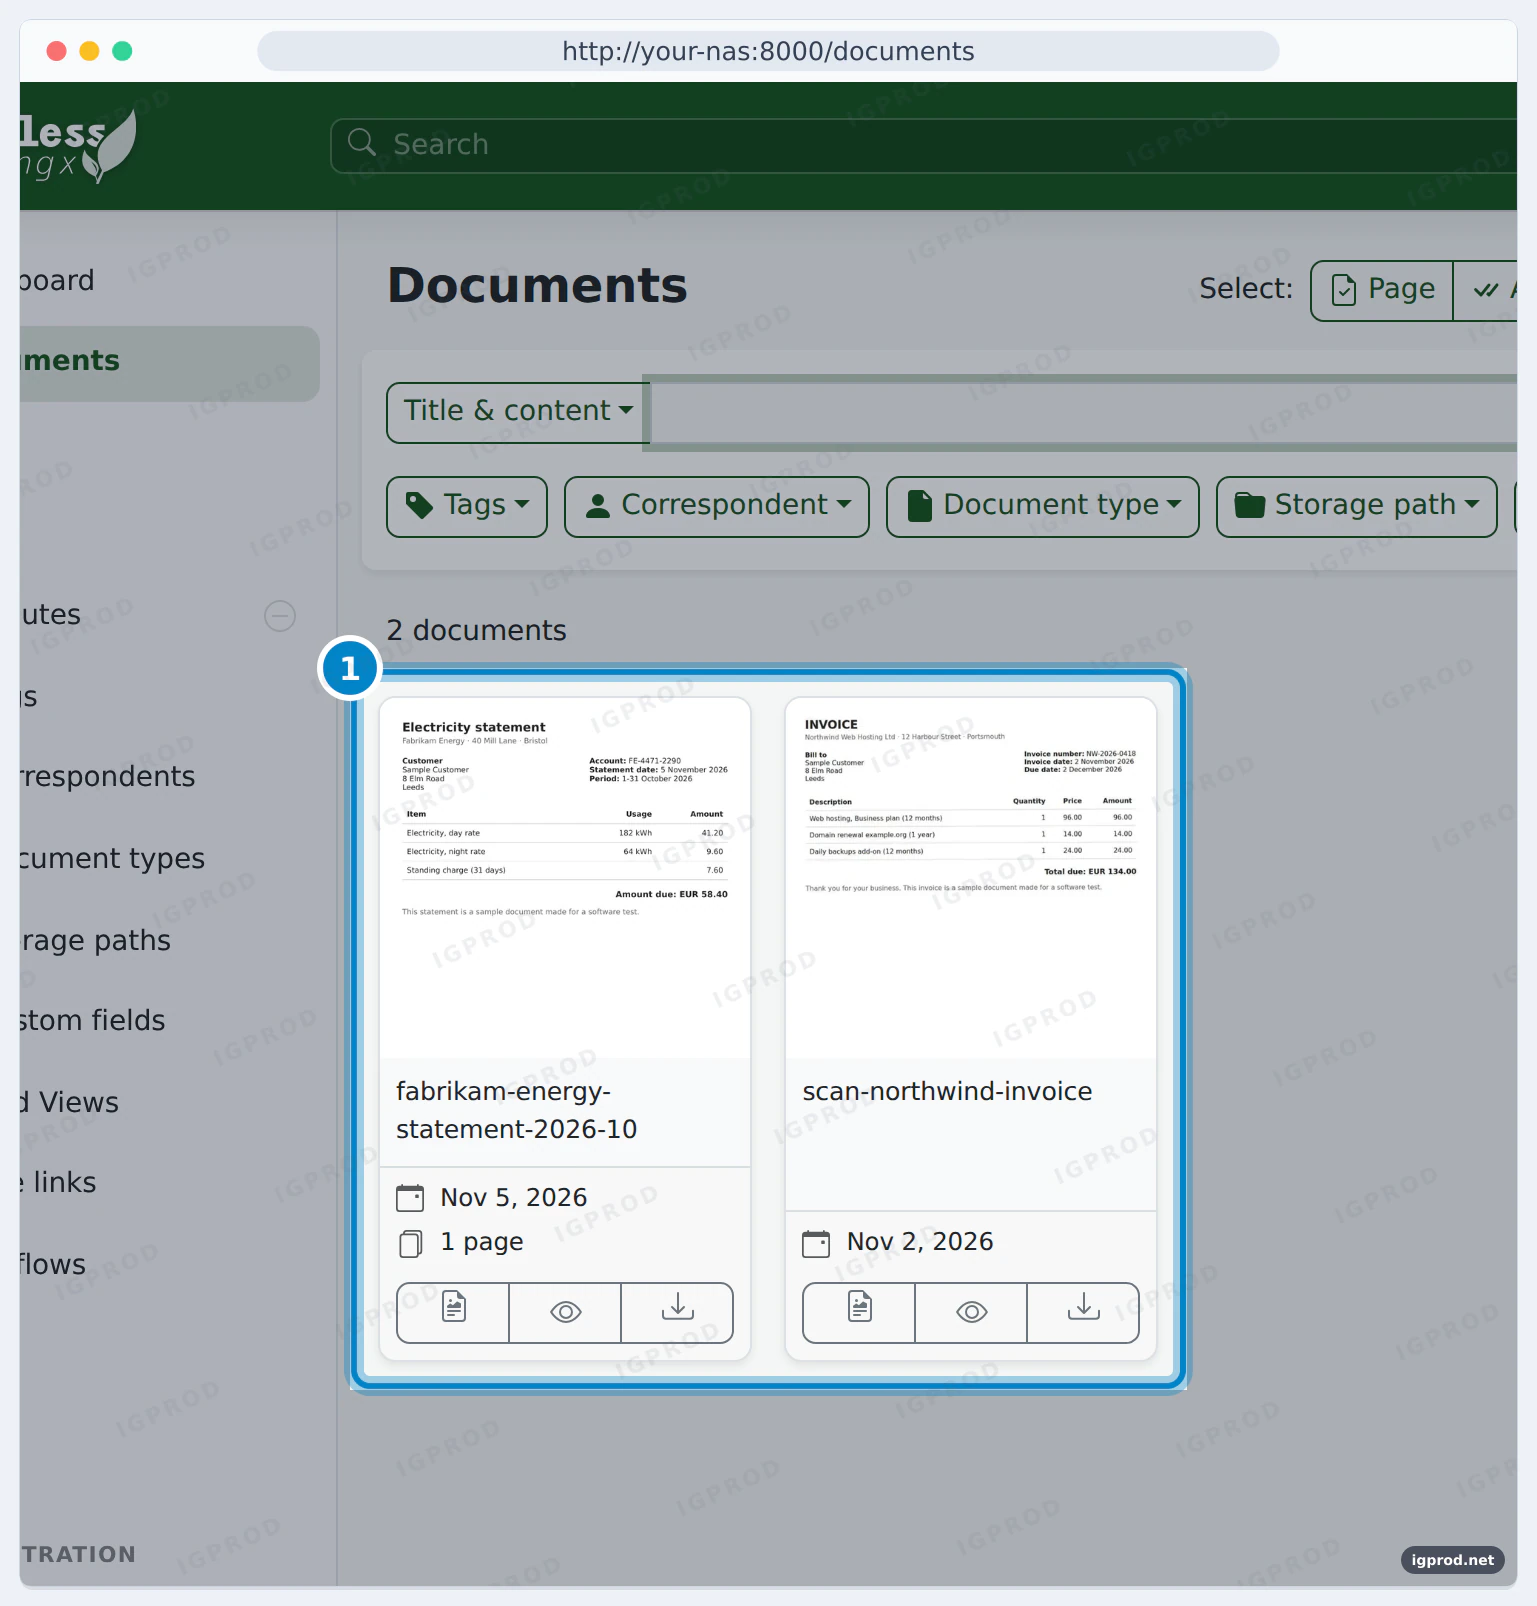
On the disks of the NAS, Paperless saw the new file at once. If your consume folder is a network share, read the troubleshooting section.
Organize your documents
Paperless-ngx sorts documents with:
- Tags, such as taxes or insurance. One document can have several tags.
- Correspondents: who sent the document, such as your bank or your energy company.
- Document types, such as invoice, statement or contract.
- Storage paths and custom fields, when you need more structure.
Create a few of them under Manage and give them to your first documents. Then Paperless suggests tags, correspondents and document types for new documents. The documentation explains that a machine learning model (not an LLM) learns this from the documents that you already sorted. Workflows can act on new documents, and Mail can fetch attachments from an email account.
Back up Paperless-ngx
The document exporter copies everything into the export folder: your documents, and the content of the database with your settings, users, tags and dates. The documentation describes it as the way to back up Paperless or move to another system. Over SSH, as root:
sudo -i
docker exec paperless-webserver-1 document_exporter ../export
ls -l /volume1/docker/paperless/exportExporting documents... ━━━━━━━━━━━━━━━━━━━━━━━━━━━━━━━━━━━ 2/2 0:00:00 0:00:00
total 200
-rwxr-xr-x 1 igprod users 39675 Nov 13 19:23 2026-11-02 scan-northwind-invoice-archive.pdf
-rwxr-xr-x 1 igprod users 11860 Nov 13 19:23 2026-11-02 scan-northwind-invoice-thumbnail.webp
-rwxr-xr-x 1 igprod users 58429 Nov 13 19:23 2026-11-02 scan-northwind-invoice.png
-rwxr-xr-x 1 igprod users 11742 Nov 13 19:25 2026-11-05 fabrikam-energy-statement-2026-10-thumbnail.webp
-rwxr-xr-x 1 igprod users 21160 Nov 13 19:25 2026-11-05 fabrikam-energy-statement-2026-10.pdf
-rwxr-xr-x+ 1 igprod users 46063 Nov 13 19:26 manifest.json
-rwxr-xr-x+ 1 igprod users 24 Nov 13 19:26 metadata.jsonFor each document, the export holds the original file, the archive PDF when Paperless made one, and the thumbnail. manifest.json holds the content of the database and metadata.json the Paperless version (3.4.2). Keep the export as private as your documents: it contains your users and settings.
Then copy the export folder away from the NAS, for example with Hyper Backup to another NAS or to a cloud storage. Our Backblaze B2 vs Synology C2 comparison helps you choose a cloud. To restore, the document_importer command loads an export into a new, empty Paperless-ngx. We did not test a restore in this guide.
Update Paperless-ngx
Make an export first (see above). Then, as root over SSH, in the project folder:
sudo -i
cd /volume1/docker/paperless
docker compose pull && docker compose up -d webserver Pulling
broker Pulling
broker Pulled
webserver Pulled
Container paperless-broker-1 Running
Container paperless-webserver-1 RunningWhen newer images exist, Compose downloads them and creates the containers again. Your folders stay, so your documents and settings stay too. On our test day, 3.4.2 was still the newest release, so both containers kept running. Paperless shows its version at the bottom of the menu. Read the release notes before you jump to a new major version.
For more ways to update containers on a NAS, read our guide to update Docker containers on Synology.
Open Paperless from outside your home
Do not forward port 8000 on your router: your documents would then be one password away from the whole internet. Use a VPN, or a tunnel with a login page in front, such as a Cloudflare Tunnel on your Synology.
When you serve Paperless on a domain name, add PAPERLESS_URL to the environment list, for example PAPERLESS_URL: https://paperless.example.com, without a slash at the end. The Paperless documentation requires it when you put Paperless on a public domain.
Troubleshooting
"Bind mount failed: '/volume1/docker/paperless/redisdata' does not exist"
In our first try, we had created only the project folder. Container Manager stopped the build with this error:
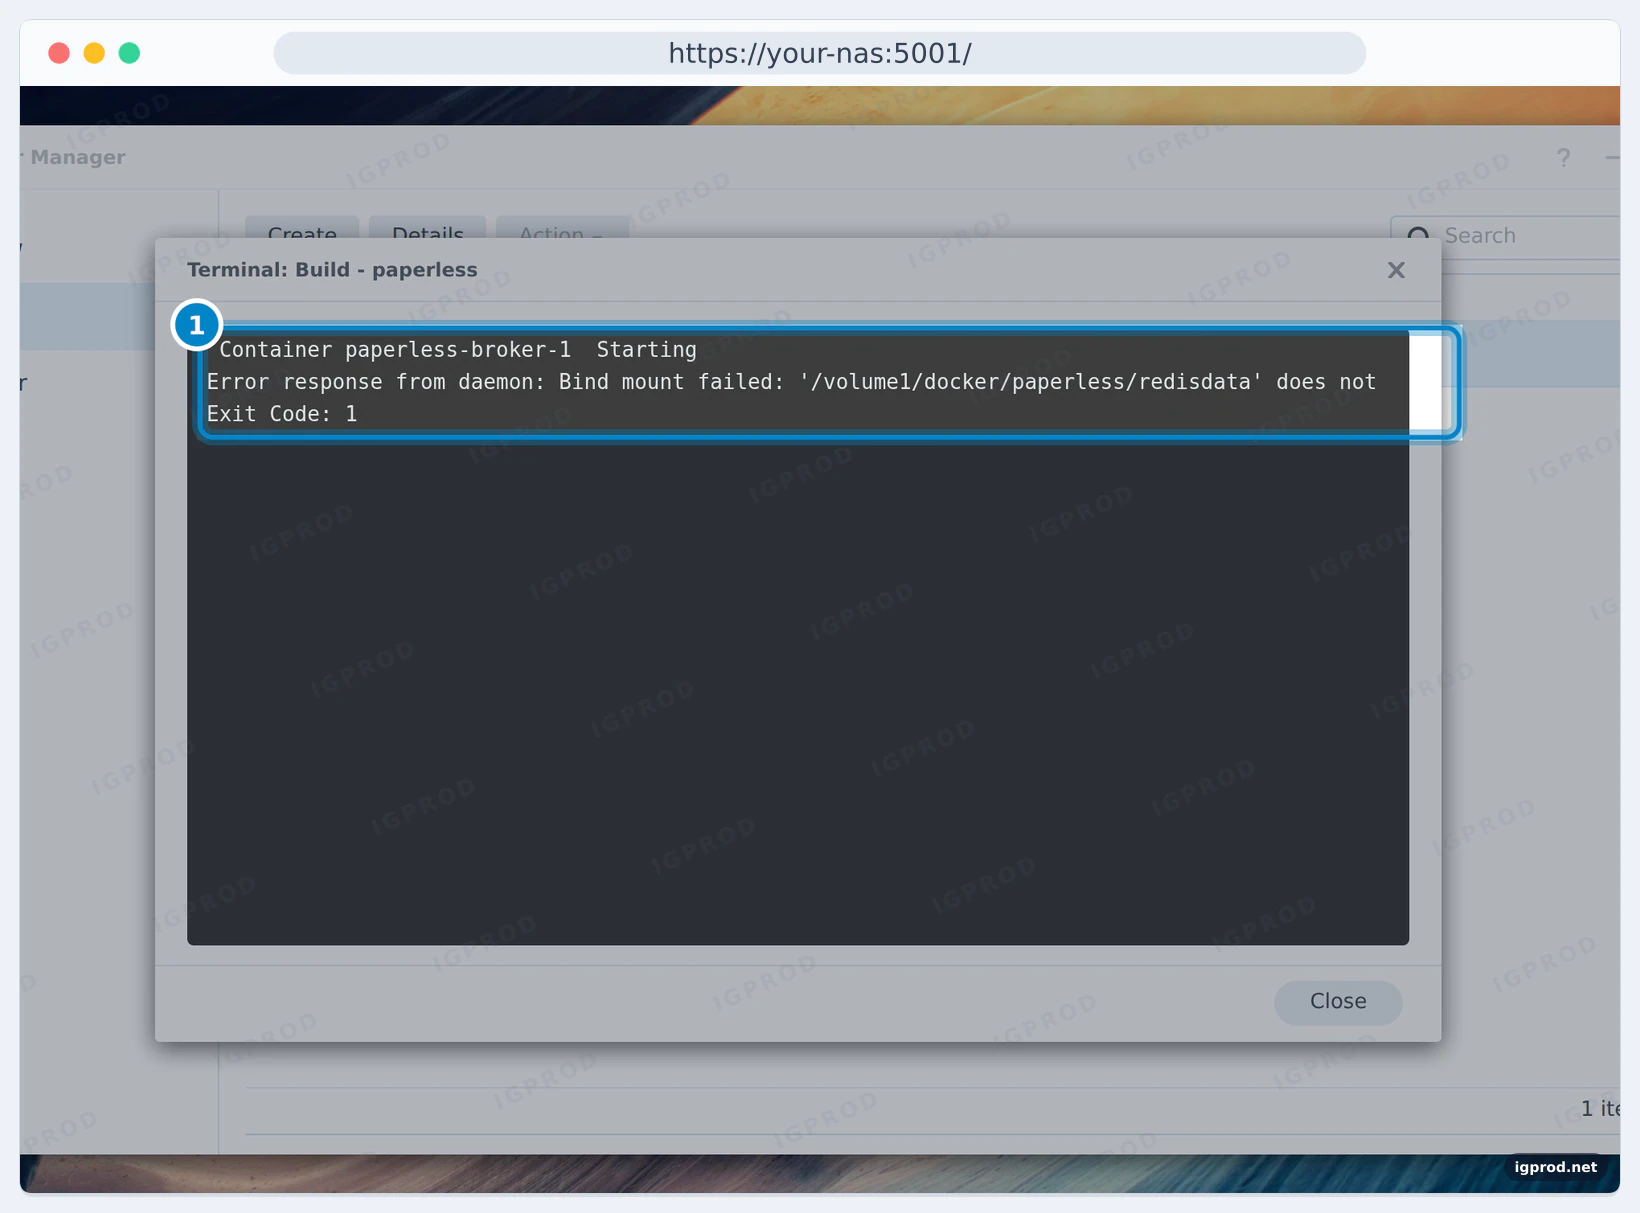
Container paperless-broker-1  Starting
Error response from daemon: Bind mount failed: '/volume1/docker/paperless/redisdata' does not exist
Exit Code: 1
Create the missing folders and give them to your user, as in step 2. Then select the project in Container Manager, open Action and click Build. Our second build ended with Exit Code: 0.
The consume folder does not pick up files
- Look at the log first, with the
docker logscommand of step 6. If the file does not appear in it, Paperless did not see it. - Network shares: some file systems, such as NFS shares, do not send file notifications (
inotify). The documentation says that Paperless then does not pick up new files. AddPAPERLESS_CONSUMER_POLLING_INTERVAL: 10to theenvironmentlist: Paperless then checks the folder every 10 seconds. - Permissions: Paperless runs with your
USERMAP_UID. It must be able to read the new files and remove them from the folder, so give the folder to that user, as in step 2.
The OCR text is wrong or empty
Check PAPERLESS_OCR_LANGUAGE: OCR with the wrong language gives bad text. The image includes English, German, Italian, Spanish and French. For other languages, also add PAPERLESS_OCR_LANGUAGES with the language packages to install, as the docker-compose.env file of Paperless-ngx explains. Then rebuild the project.
Frequently asked questions
Can Paperless-ngx run on a Synology NAS?
Yes. Run it as a project in Container Manager, with the Compose file of this guide. We tested it on DSM 7.4.1 with Container Manager 24.0.2.
Which port does Paperless-ngx use?
Port 8000, for the web interface and the API. To use another port on the NAS, change the left side of the mapping, for example "8010:8000".
Do I need PostgreSQL?
No. SQLite is the default, and it is enough for one household. The documentation recommends PostgreSQL for several users or a high number of documents.
Where does Paperless-ngx keep my files?
In the media/documents folder of the project: originals holds your files as you gave them, archive the searchable PDF copies and thumbnails the previews. The database and the search index are in data.
Which languages can the OCR read?
The Docker image includes English, German, Italian, Spanish and French. Set the main language with PAPERLESS_OCR_LANGUAGE, and add other languages with PAPERLESS_OCR_LANGUAGES.
Is Paperless-ngx free?
Yes. Paperless-ngx is open source, under the GPL-3.0 license, and has no paid plan.
Related guides
- Install Immich with Docker Compose and Synology, for your photos
- How to SSH into your Synology
- Synology: update Docker containers
- Get Docker container notifications on Telegram with Synology
- Docker Compose: what it is and what it does for you
Sources

Leave a comment
Your email address will not be published. Required fields are marked *