

Fail2ban and CrowdSec both read your server's logs and block the IP addresses that attack it. Fail2ban does all of it on one machine. CrowdSec splits the work: an engine detects attacks, a separate bouncer blocks them, and the engine shares what it detects with the CrowdSec network, which sends back a community blocklist.
We installed both on the same Ubuntu 26.04 server and attacked it: SSH brute force, a web vulnerability scan, an IPv6 attacker and a Docker app with a published port. This guide shows what each tool caught, how fast, what its default settings missed, how much memory it used, and the production settings we kept. At the end, we move the server from Fail2ban to CrowdSec without locking anyone out.
Test lab, 18 November 2026: Ubuntu 26.04.1 LTS with systemd 259, OpenSSH 10.2, nginx 1.28 and Docker 29.1. Fail2ban 1.1.0 from Ubuntu's archive, and CrowdSec 1.8.2 with its nftables firewall bouncer 0.0.38 from CrowdSec's repository. The server was a full systemd system in an isolated container network, next to three other machines: an attacker (203.0.113.50), a laptop on a private LAN (10.20.0.50) and an admin PC with a fixed address (203.0.113.7). These are documentation addresses: use your own.
CrowdSec vs Fail2ban: the short answer
For a server that faces the internet, especially one with a web app or Docker containers, install CrowdSec. In our tests it banned a web scanner during its first pass, protected Docker's published ports with no extra setting, and loaded 15,000 known attackers before they tried anything. Fail2ban is still a good choice for a small machine, for a network without internet access, or where it already runs well: it blocked faster and used 16 MB of memory, against 132 MB for CrowdSec and its bouncer.
| Measured on our server | Fail2ban 1.1.0 | CrowdSec 1.8.2 + firewall bouncer |
|---|---|---|
| SSH brute force on a key-only server | Banned after 5 failed logins (with mode = aggressive) | Banned after 6 failed logins |
| Time from the deciding failure to the block | 0.13 s | 5 to 10 s with the default 10 s pull, 1 s with a 2 s pull |
| Default ban time | 10 minutes | 4 hours |
| Web scan on Ubuntu's default nginx site | Missed by default; 2 of 13 requests counted after a fix | Banned during the first scan (3 scenarios) |
| Docker published ports | Not blocked by default; one setting fixes it | Blocked by default |
| IPv6 attacker | Banned | Banned |
| Shared blocklist | None | 15,000 addresses from the community |
| Memory (systemd) | 16.2 MB | 121 MB, plus 11.3 MB for the bouncer |
| Installed size | 2.1 MiB | 330 MiB, plus 15 MiB for the bouncer |
| Bans after a reboot | Restored | Restored |
The words this guide uses, in plain words:
- Log: the file or journal where a service writes what happens, such as each failed SSH login.
- Ban: a firewall rule that drops every packet from an attacker's address for a while.
- Jail (Fail2ban): one rule set that says which log to read, which lines count as failures, and how many failures earn a ban.
- Scenario (CrowdSec): CrowdSec's name for a detection rule, such as SSH brute force.
- Bouncer (CrowdSec): the separate program that applies CrowdSec's bans, here in the server's nftables firewall.
- Community blocklist: addresses that the CrowdSec network saw attacking other servers, sent to yours before they try anything.
How we attacked the server
The server accepts SSH keys only, as every server on the internet should. This file turns passwords off:
# /etc/ssh/sshd_config.d/10-keys-only.conf - SSH keys only, no passwords.
PasswordAuthentication no
KbdInteractiveAuthentication no
PermitRootLogin prohibit-password
Check it with sudo sshd -t, then apply it with sudo systemctl reload ssh. Keep your current session open until a new login with your key works.
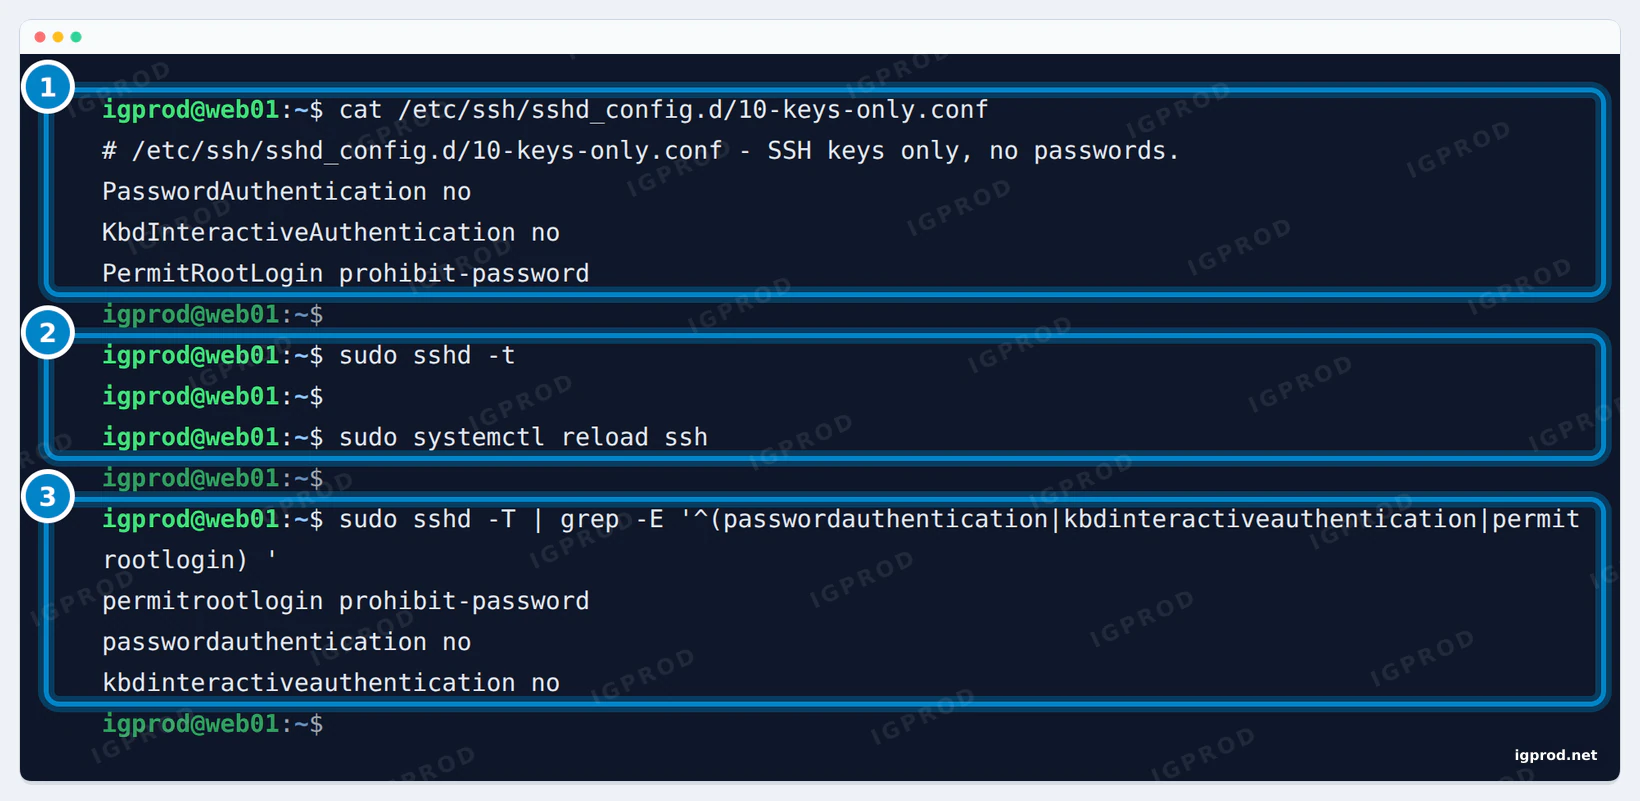
sshd -t finds no error, and the reload applies it. 3: sshd -T prints the settings in force: no passwords, and root with a key only.The attacker has no key. It logs in as root once per second, and each line shows the time and the answer of its SSH client:
for i in $(seq 8); do printf "%s try %2d: " $(date +%T) $i; ssh [email protected] true 2>&1; sleep 1; done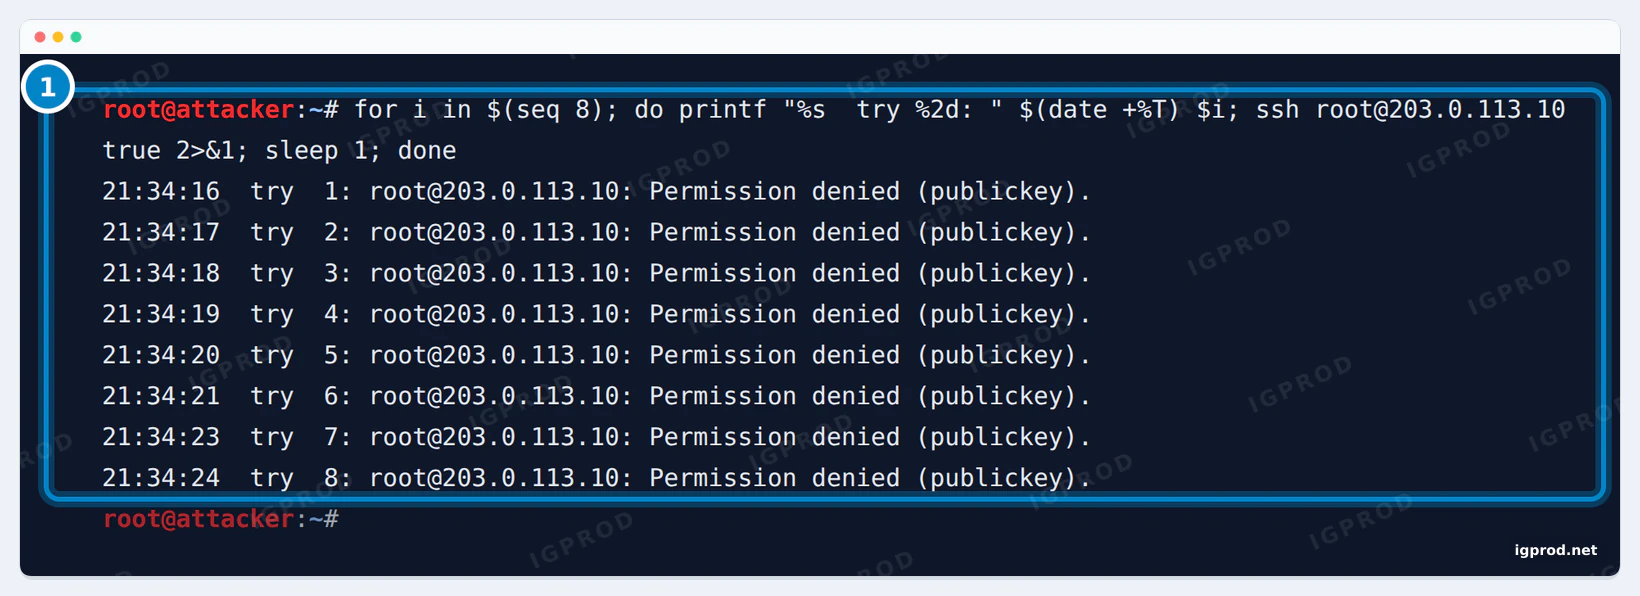
Permission denied (publickey), and nothing stops the next one./wp-login.php /.env /.git/config /phpmyadmin/ /admin.php /wp-admin/setup-config.php /config.php
/.aws/credentials /backup.zip /server-status /xmlrpc.php /vendor/phpunit/phpunit/src/Util/PHP/eval-stdin.php /Fail2ban on Ubuntu 26.04
Install Fail2ban and what it does by default
sudo apt update
sudo apt install fail2ban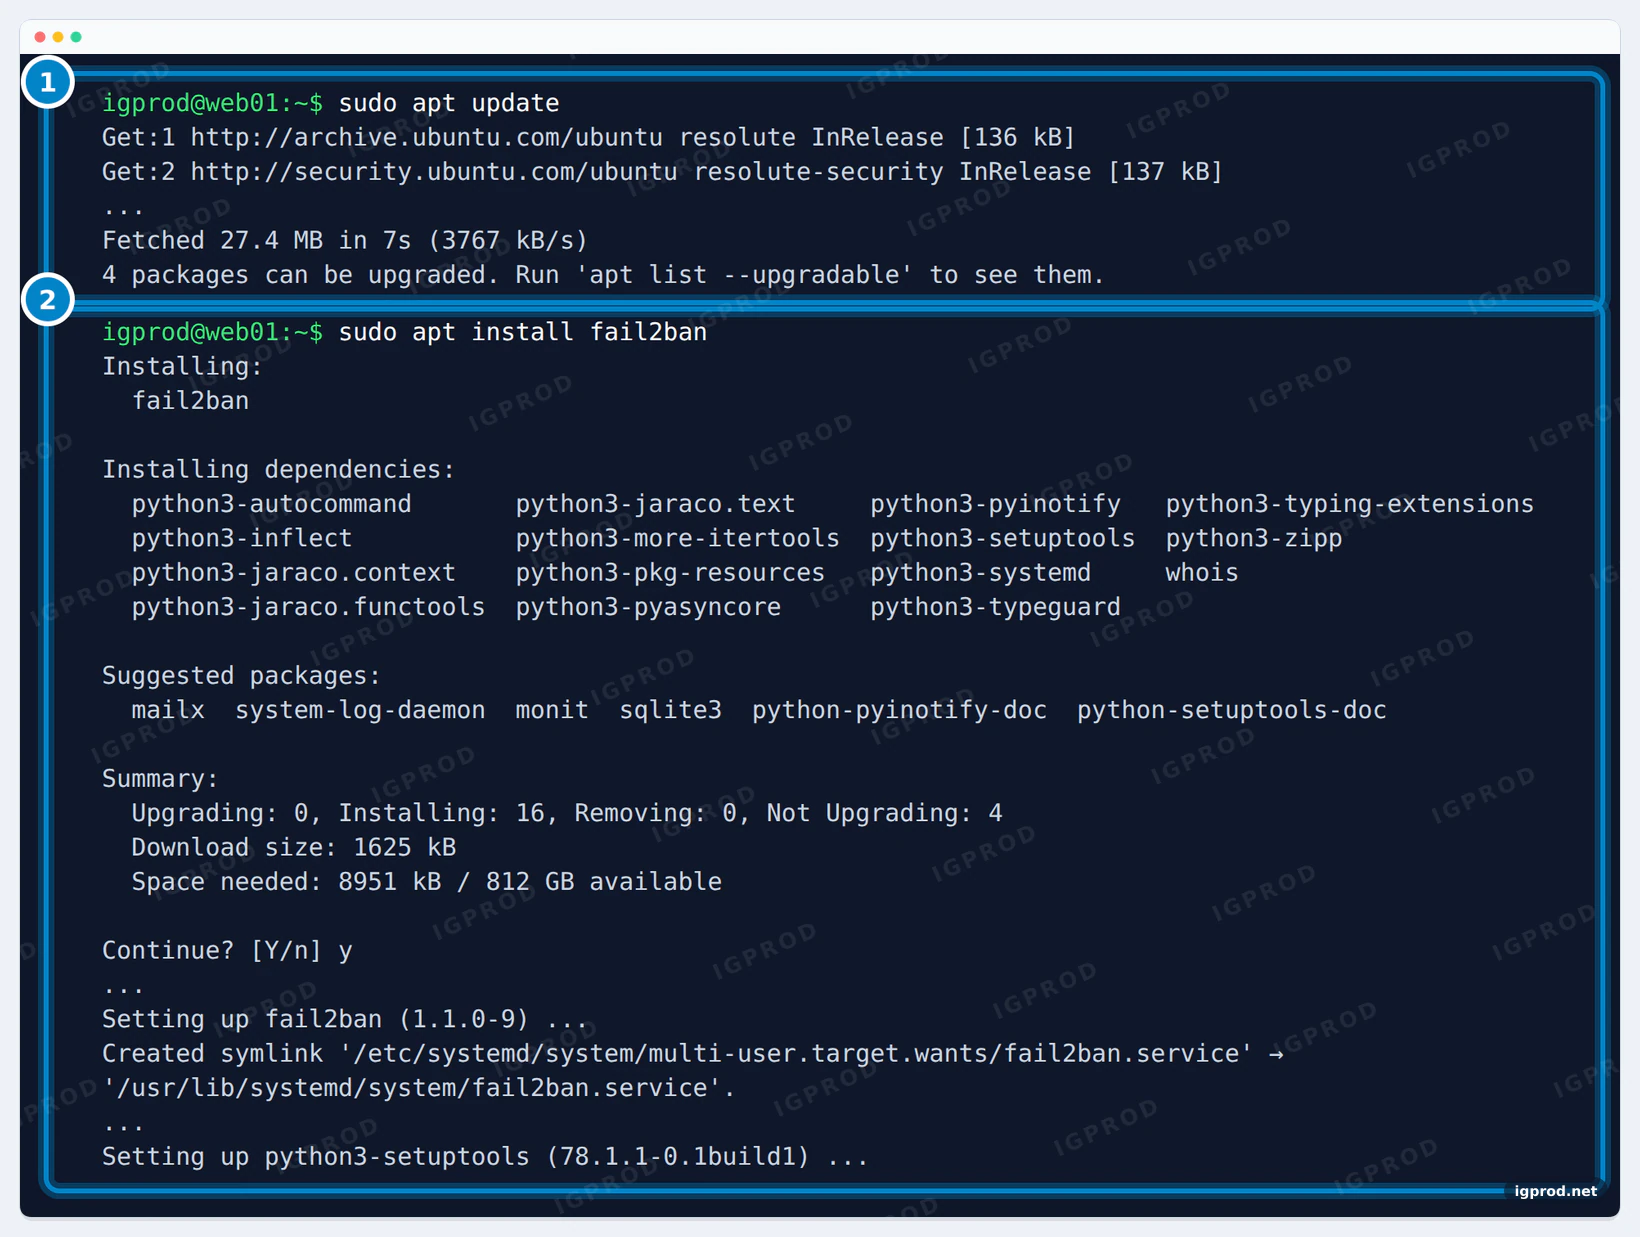
apt update refreshes the package lists. 2: apt install fail2ban installs Fail2ban 1.1.0 and enables its service.Fail2ban starts right after the install, with one jail for SSH. Ubuntu's file /etc/fail2ban/jail.d/defaults-debian.conf chooses nftables for the bans and the systemd journal for the SSH logs (Ubuntu 26.04 has no /var/log/auth.log):
[DEFAULT]
banaction = nftables
banaction_allports = nftables[type=allports]

[sshd]
backend = systemd
journalmatch = _SYSTEMD_UNIT=ssh.service + _COMM=sshd
enabled = true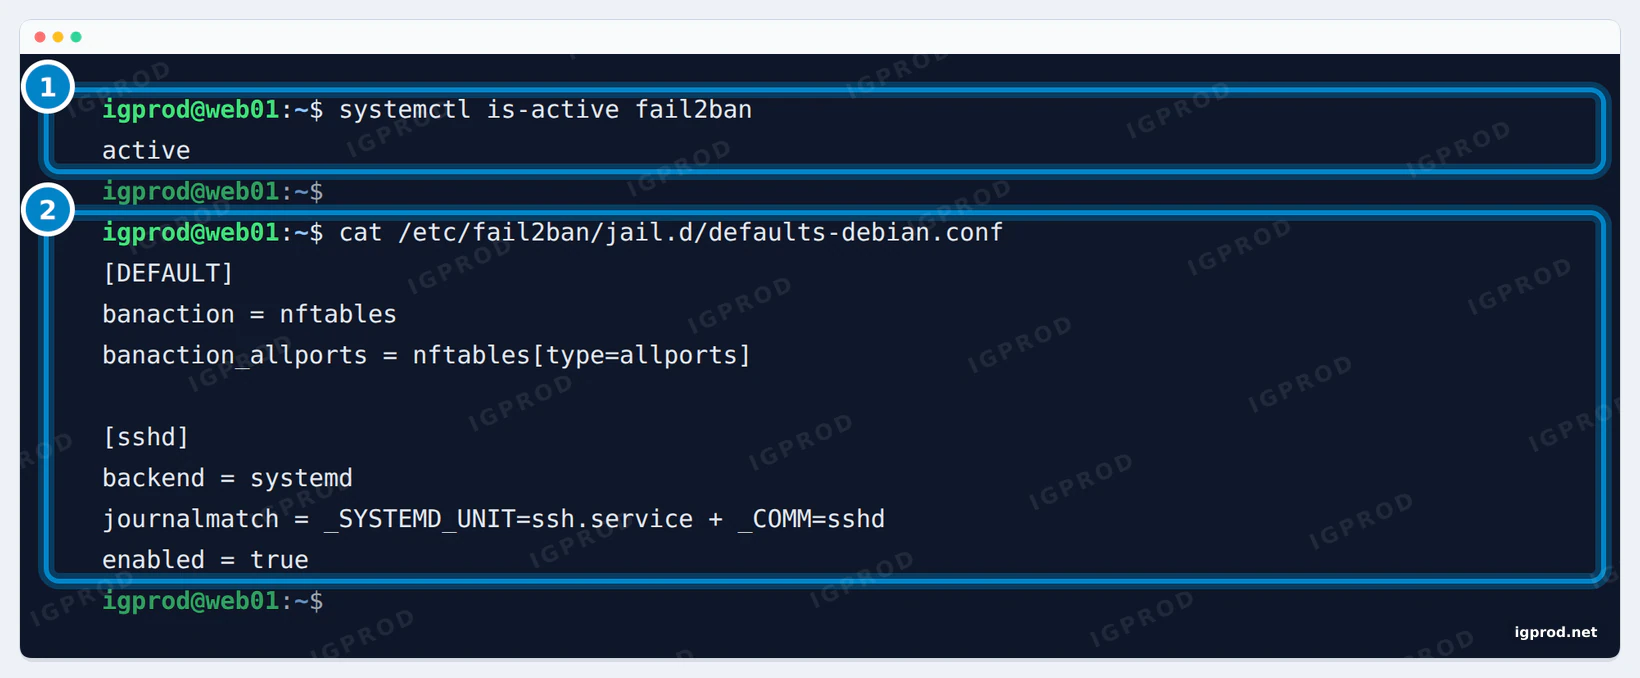
defaults-debian.conf.The global defaults ban an address for 10 minutes after 5 failures within 10 minutes. The ban rule only closes port 22, with a refusal, so a banned attacker sees Connection refused:
tcp dport 22 ip saddr @addr-set-sshd reject with icmp port-unreachable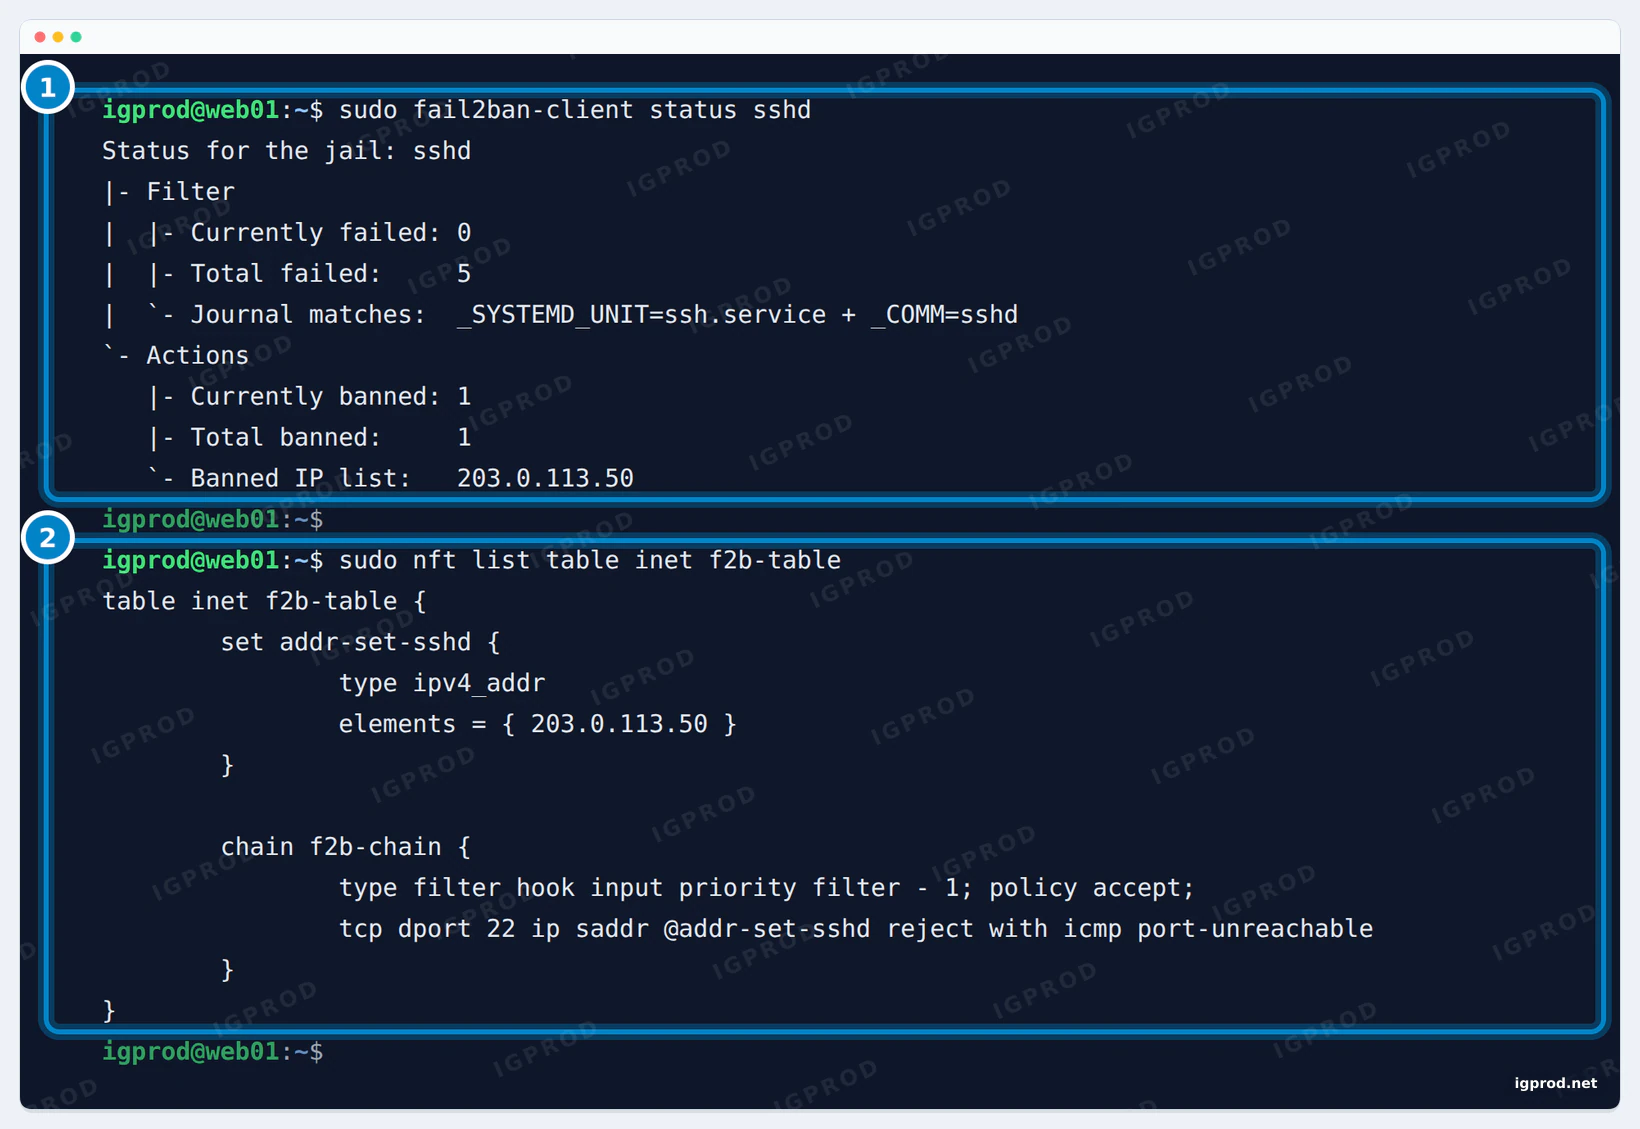
Key-only SSH: the default filter misses real user names
On a key-only server, a bot that tries a user that exists, such as root, gets Permission denied (publickey), and the log says Connection closed by authenticating user root ... [preauth]. Fail2ban's default normal mode does not count that line: 7 tries as root added nothing to the counter. A user that does not exist was banned after 5 tries: the sixth try got Connection refused.
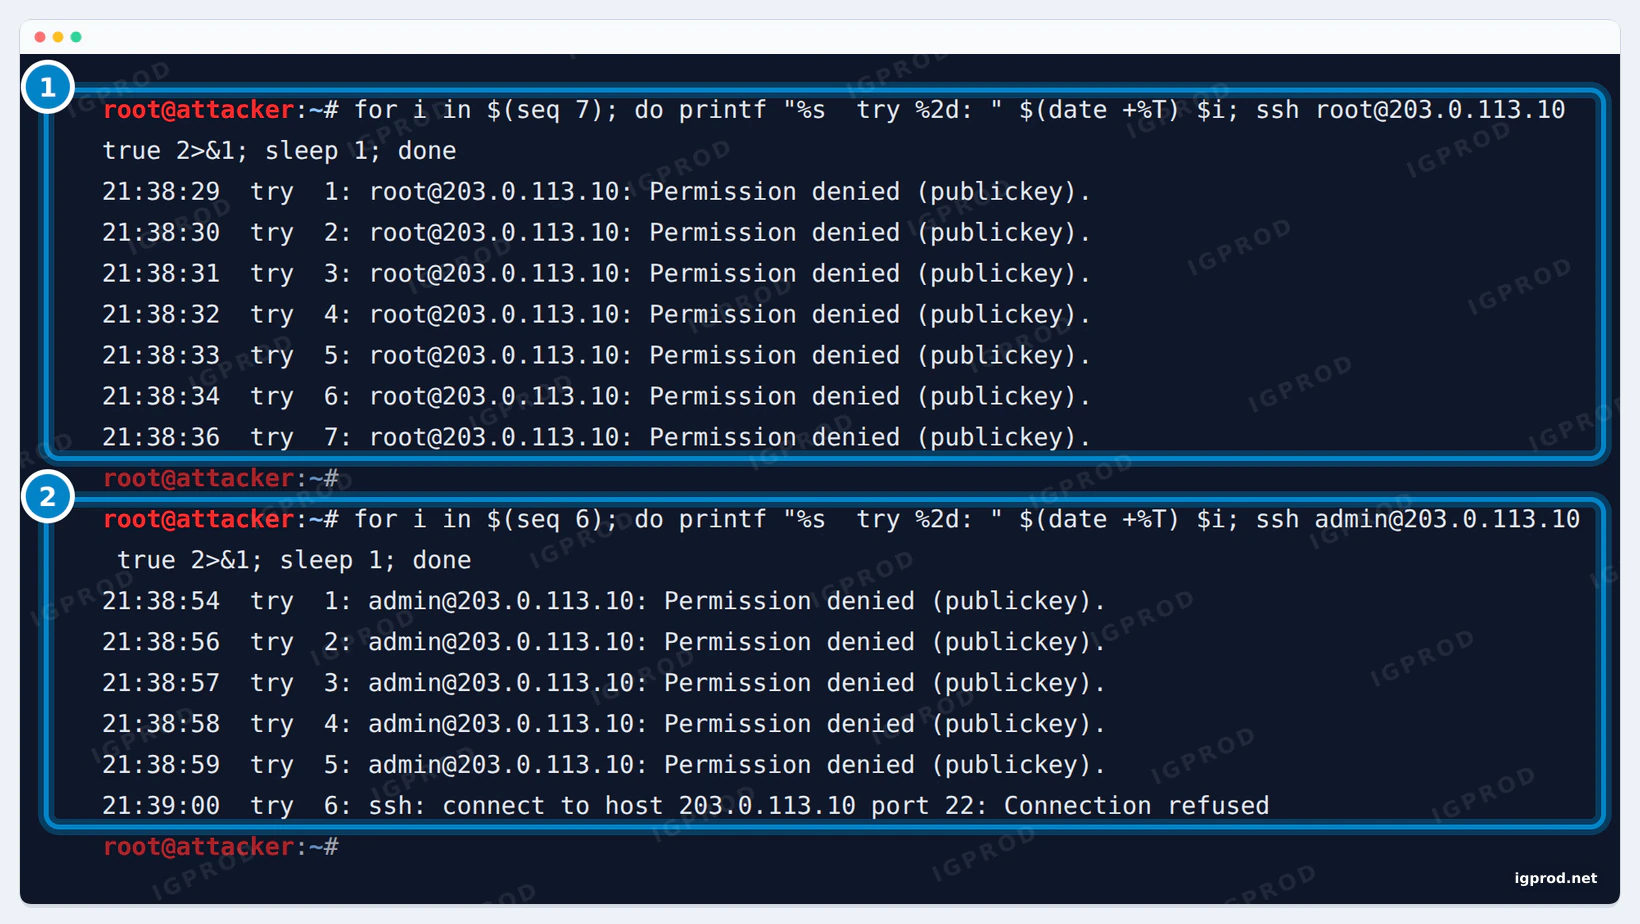
root, a user that exists: seven refusals, none counted. 2: as admin, a user that does not exist: banned after five tries, and the sixth gets Connection refused.Set mode = aggressive in the sshd jail. It counts those lines too, and the same root attacker was banned after 5 tries.
A production jail.local
Do not edit jail.conf: package upgrades can overwrite it. Put your settings in /etc/fail2ban/jail.local. This is the file we tested. Change 203.0.113.7 to the fixed address you manage the server from, and remove the [nginx-botsearch] block if the server has no nginx:
# /etc/fail2ban/jail.local - local settings; package upgrades never overwrite this file.
[DEFAULT]
# Never ban these: localhost and the admin's own static address (change 203.0.113.7 to yours).
ignoreip = 127.0.0.1/8 ::1 203.0.113.7
bantime  = 1h
findtime = 10m
maxretry = 5
# Repeat offenders: every new ban of the same address doubles (1h, 2h, 4h ...), up to one week.
bantime.increment = true
bantime.maxtime = 1w
# Count earlier bans from all jails, not only this one.
bantime.overalljails = true

[sshd]
enabled = true
# "aggressive" also counts key-only probes ("Connection closed by authenticating user ... [preauth]").
mode = aggressive
# Block the attacker on every port, not only 22, including ports Docker publishes: the prerouting hook sees the
# packets before Docker forwards them to a container (an input-hook rule never sees those).
banaction = nftables[type=allports, chain_hook=prerouting, blocktype=drop]

[nginx-botsearch]
enabled = true
# Ubuntu's default site answers missing files with try_files ... =404, which writes nothing to error.log:
# read the access log instead (the filter has a pattern for it).
logpath = %(nginx_access_log)s
Repeat offenders need their ban history. Fail2ban forgets bans older than one day by default, so keep a week, the longest ban above, in /etc/fail2ban/fail2ban.local:
# /etc/fail2ban/fail2ban.local - keep ban history as long as the longest ban, so repeat offenders are recognised.
[Definition]
dbpurgeage = 1w
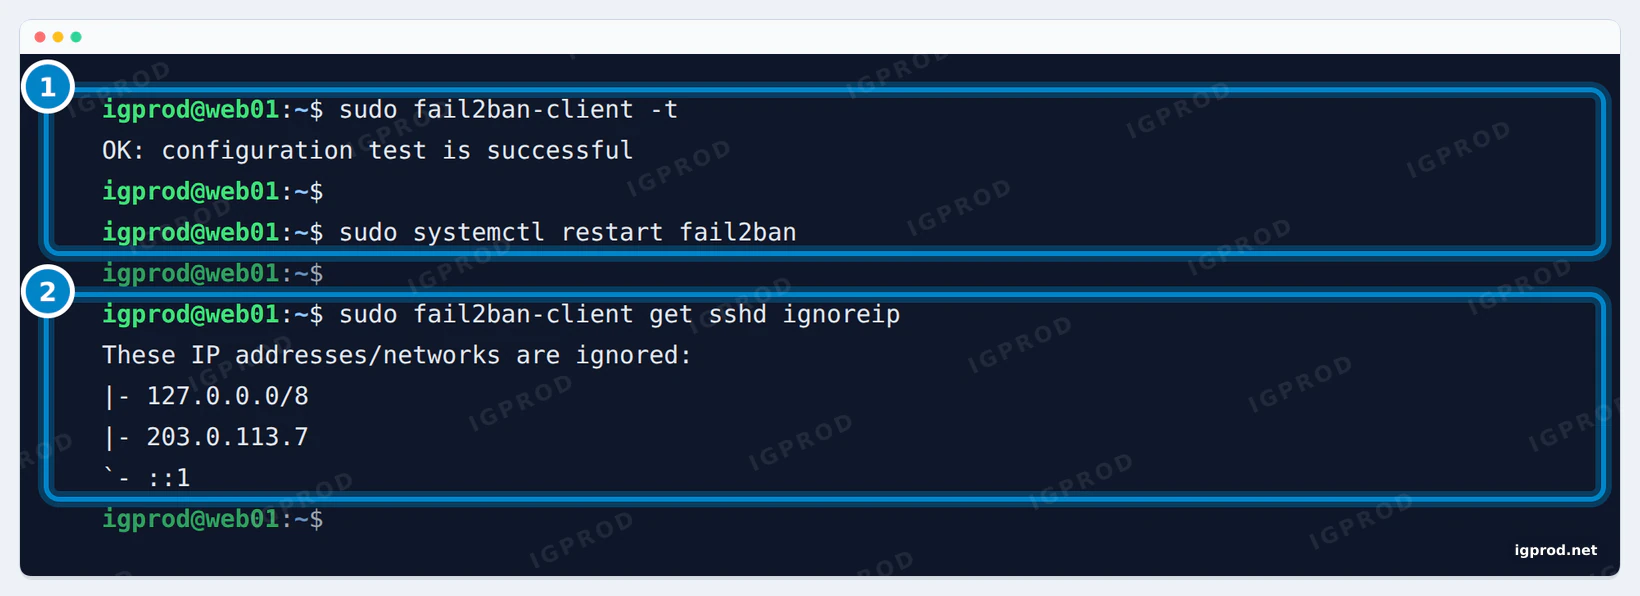
Test the configuration before you restart, then check the addresses that can never be banned:
sudo fail2ban-client -t
sudo systemctl restart fail2ban
sudo fail2ban-client get sshd ignoreip
The test answered OK: configuration test is successful, and the ignore list showed 127.0.0.0/8, 203.0.113.7 and ::1.
The first ban
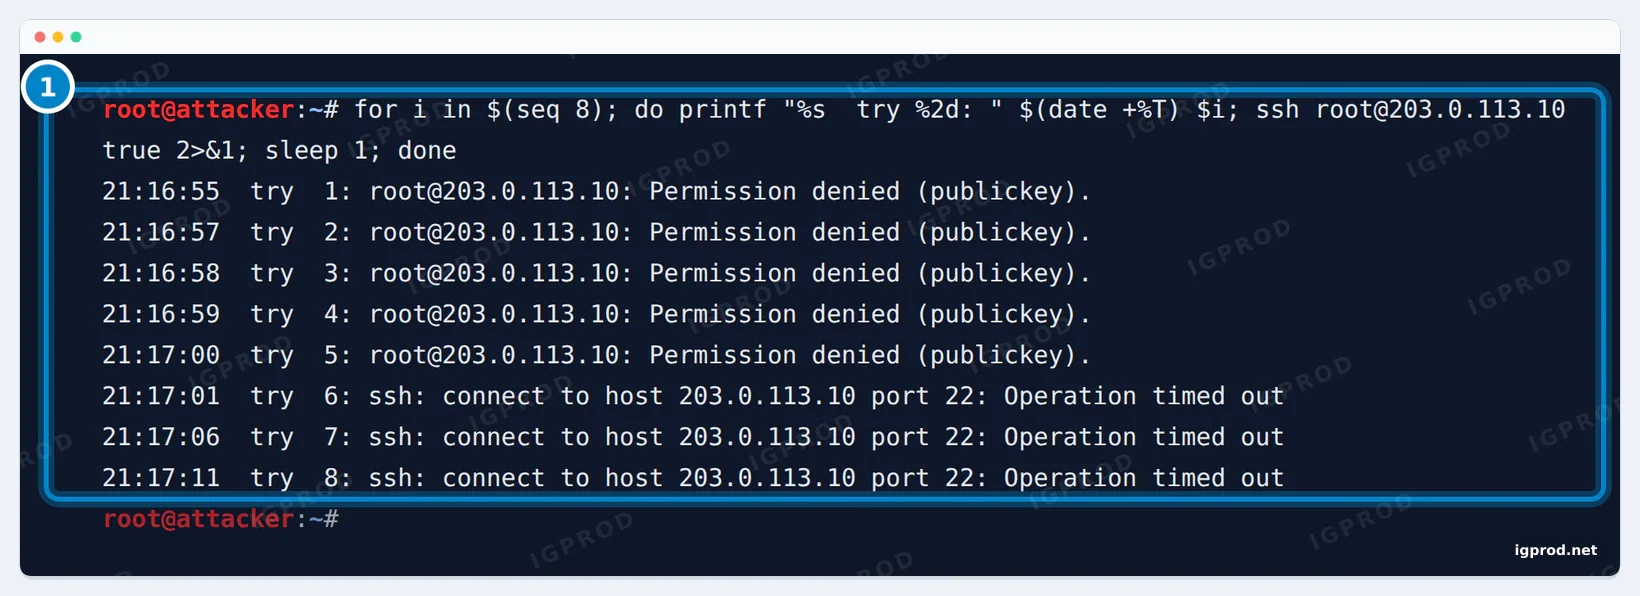
Fail2ban's log shows the 5th failure at 21:17:00.878 and the ban at 21:17:01.005, 0.13 seconds later. On the server:
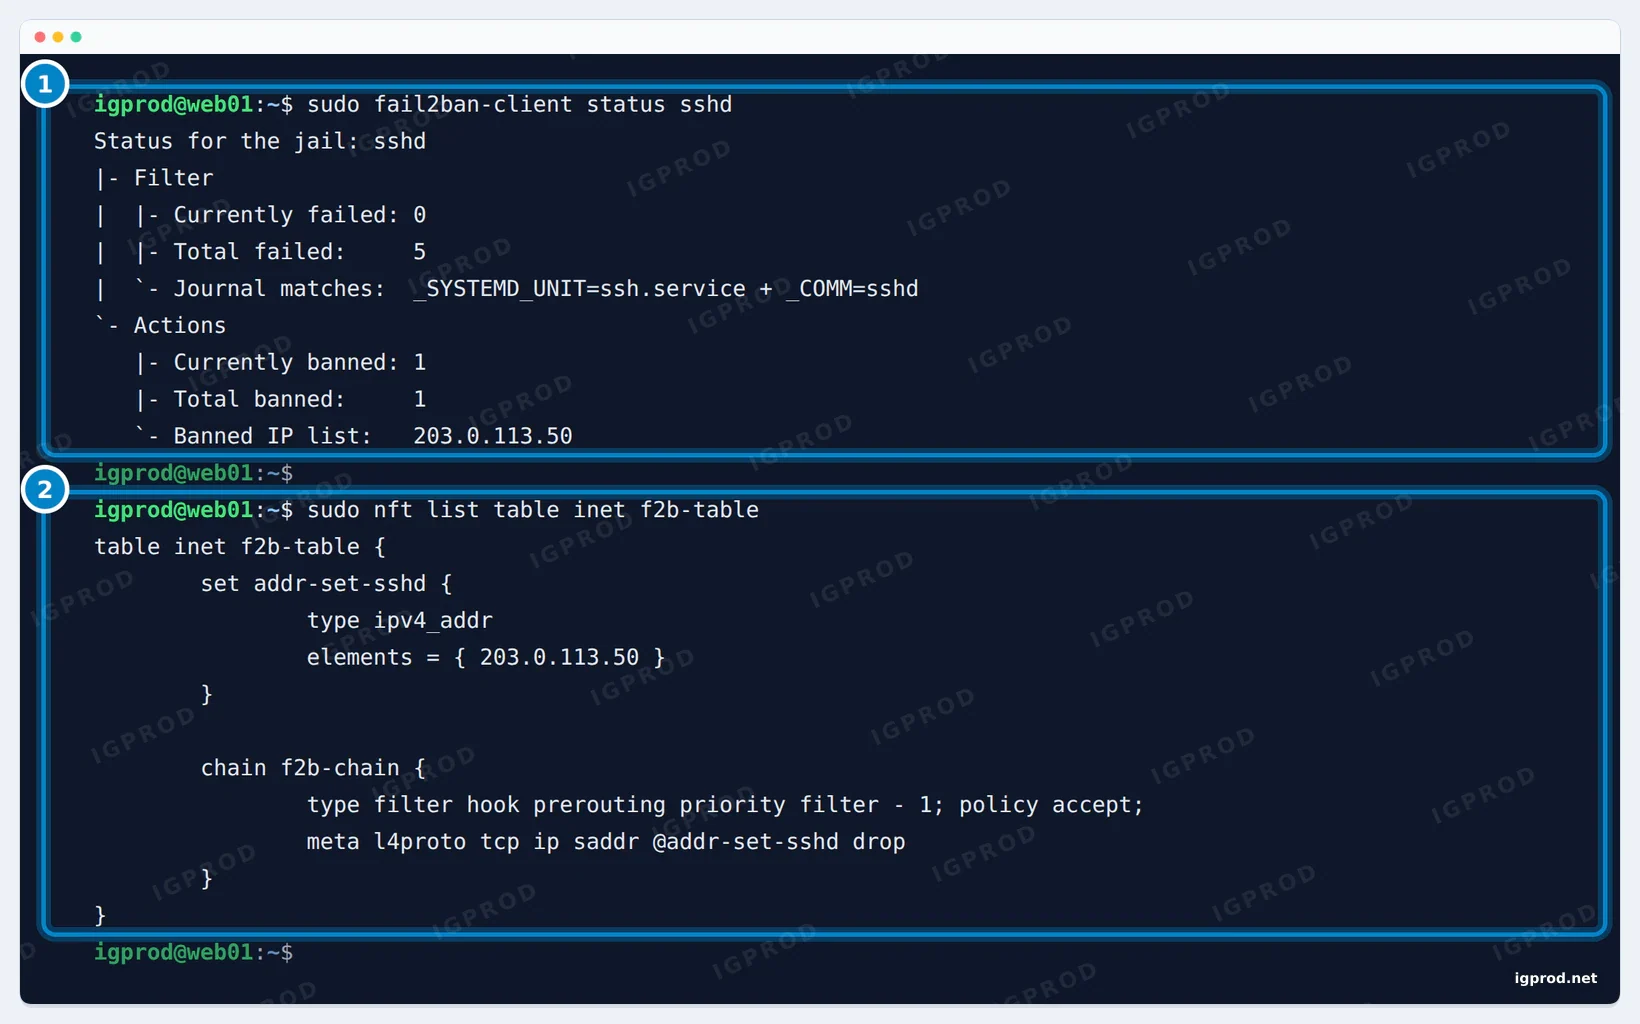
Fail2ban keeps its bans in a database, so they survive a restart and a reboot. After our reboot, its log showed:
2026-11-18 21:01:36,169 NOTICE  [sshd] Restore Ban 2001:db8:50::50
2026-11-18 21:01:36,175 NOTICE  [nginx-botsearch] Restore Ban 10.20.0.50
Longer Fail2ban bans for repeat offenders
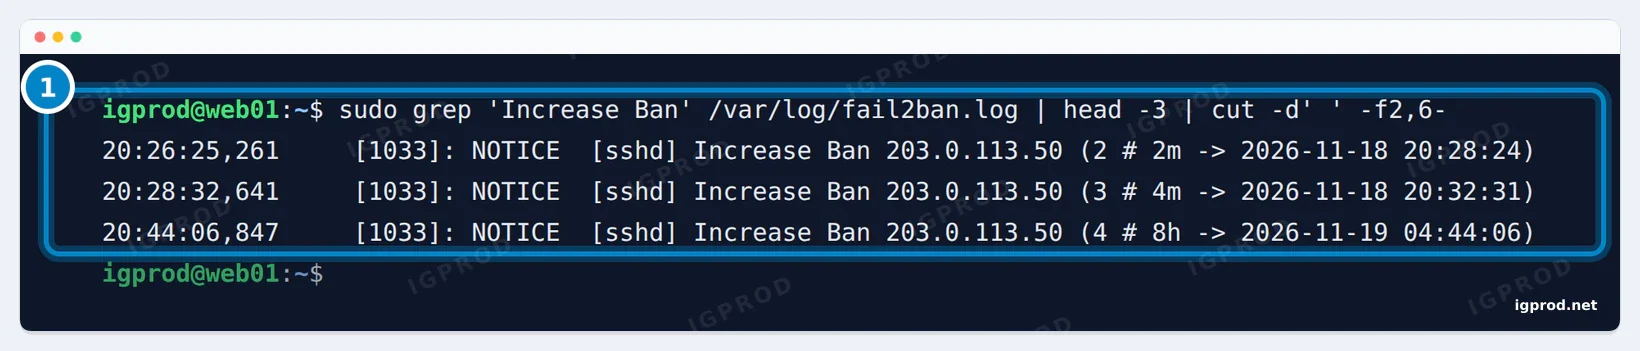
bantime.increment, each new ban of the same address doubles: 2 and 4 minutes from a 1-minute test ban, then 8 hours for the 4th ban once the base was 1 hour.bantime.increment doubles the ban each time the same address comes back, up to bantime.maxtime. With bantime.overalljails, a ban in any jail counts. For the test we set a 1-minute base, and the address was banned for 1, 2, then 4 minutes; with the 1-hour base of our jail.local, its 4th ban lasted 8 hours.
The Docker trap: published ports are not protected by default
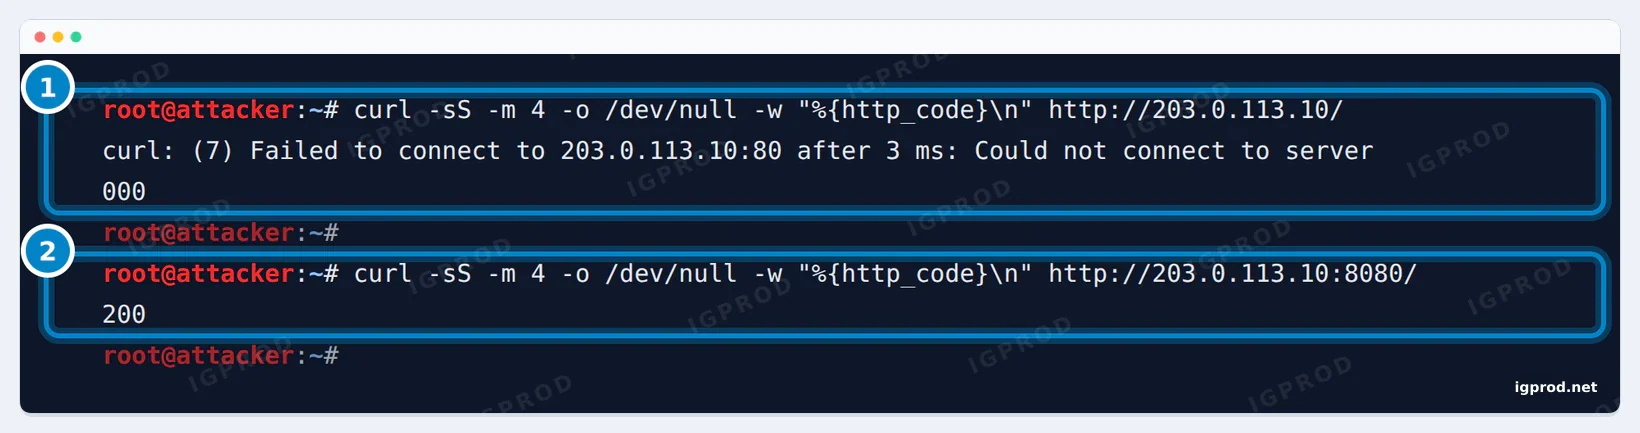
Docker publishes a container port by rewriting the destination of incoming packets in the prerouting hook, then routes them through the forward hook. A rule in the input hook never sees that traffic. We ran nginx in a container with -p 8080:80 and banned the attacker with Fail2ban's "all ports" action:
The fix is the banaction line of our jail.local: the ban rule moves to the prerouting hook, which every incoming packet passes, published ports included.
banaction = nftables[type=allports, chain_hook=prerouting, blocktype=drop]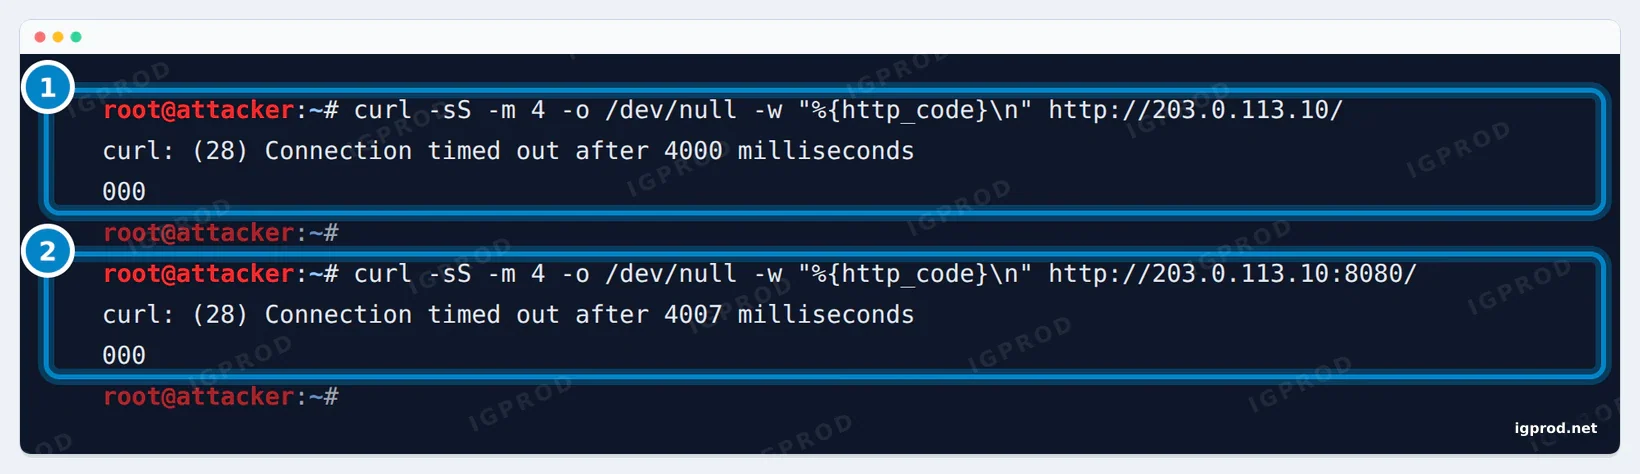
This applies to any Docker install, including the one from our guide to installing Docker Compose on Ubuntu. Two notes: the all-ports action matches TCP only, like the default one, and blocktype=drop makes the ports silent, so a banned client waits for a timeout instead of getting a quick refusal. On a server where Docker manages iptables rules, Docker's documentation reserves the DOCKER-USER chain for your own filter rules.
nginx scans: the jail reads the wrong log on Ubuntu
Fail2ban has an nginx-botsearch jail for scanners. It reads /var/log/nginx/error.log, but Ubuntu's default site answers missing files with try_files $uri $uri/ =404;, which writes nothing to the error log. After two full scans, the jail had counted 0 failures. The filter also has a pattern for the access log, so the logpath = %(nginx_access_log)s line of our jail.local points it there.
Even then, the filter only knows a short list of paths: WordPress login pages, phpMyAdmin, webmail, cgi-bin and mysqladmin. Of our 13 requests it counted 2 per scan, /wp-login.php and /phpmyadmin/, so the scanner was banned during its third pass. .env, .git/config, .aws/credentials and the PHPUnit exploit path were never counted.
CrowdSec on Ubuntu 26.04
Install CrowdSec from its repository, not from Ubuntu
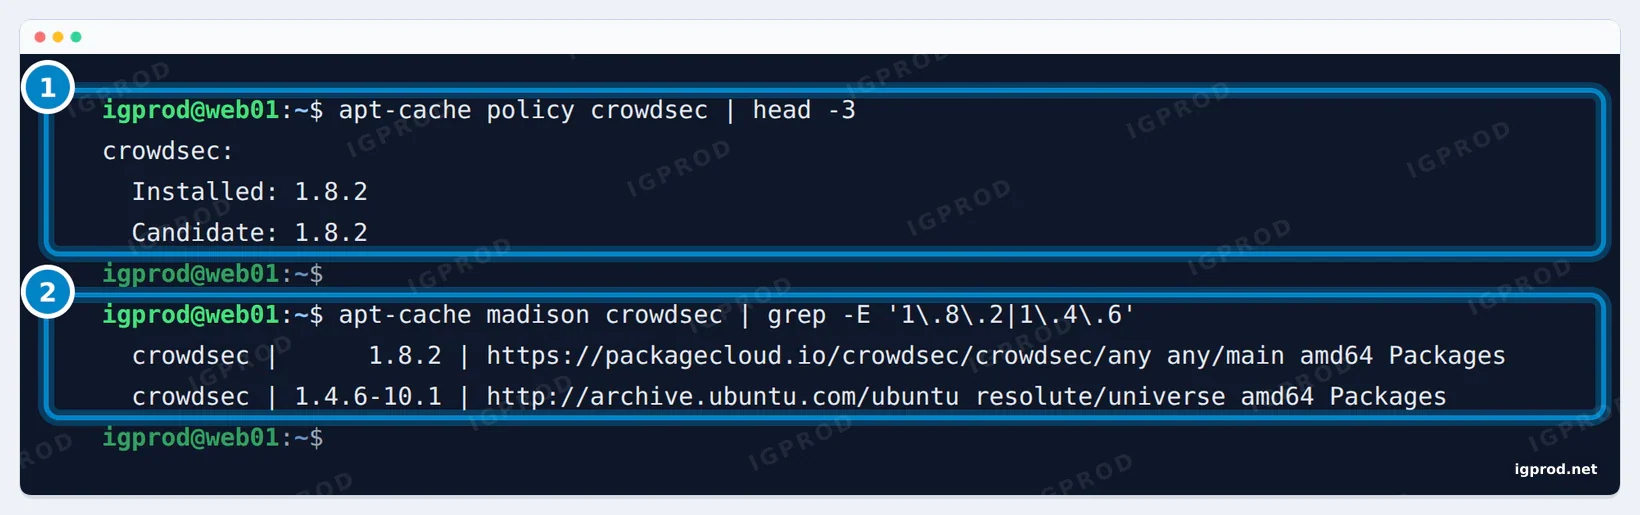
Ubuntu's archive (universe) has CrowdSec 1.4.6 and no firewall bouncer. CrowdSec's documentation recommends its own repository, which a script adds with its signing key. Download the script, read it, then run it:
curl -fsSL https://install.crowdsec.net -o crowdsec-repo.sh
less crowdsec-repo.sh
sudo sh crowdsec-repo.sh
apt-cache policy crowdsec
sudo apt install crowdsec
apt-cache policy must show 1.8.2 or newer as the candidate. The download was 82.8 MB and the whole install took less than 2 minutes. On an Ubuntu Pro machine with ESM, apt can still prefer Ubuntu's 1.4.6. CrowdSec's documentation fixes that with a pin file, /etc/apt/preferences.d/crowdsec, which we also tested:
Package: *
Pin: release o=packagecloud.io/crowdsec/crowdsec,a=any,n=any,c=main
Pin-Priority: 1001
After sudo apt update, apt-cache policy crowdsec showed CrowdSec's repository at priority 1001.
What the installer set up
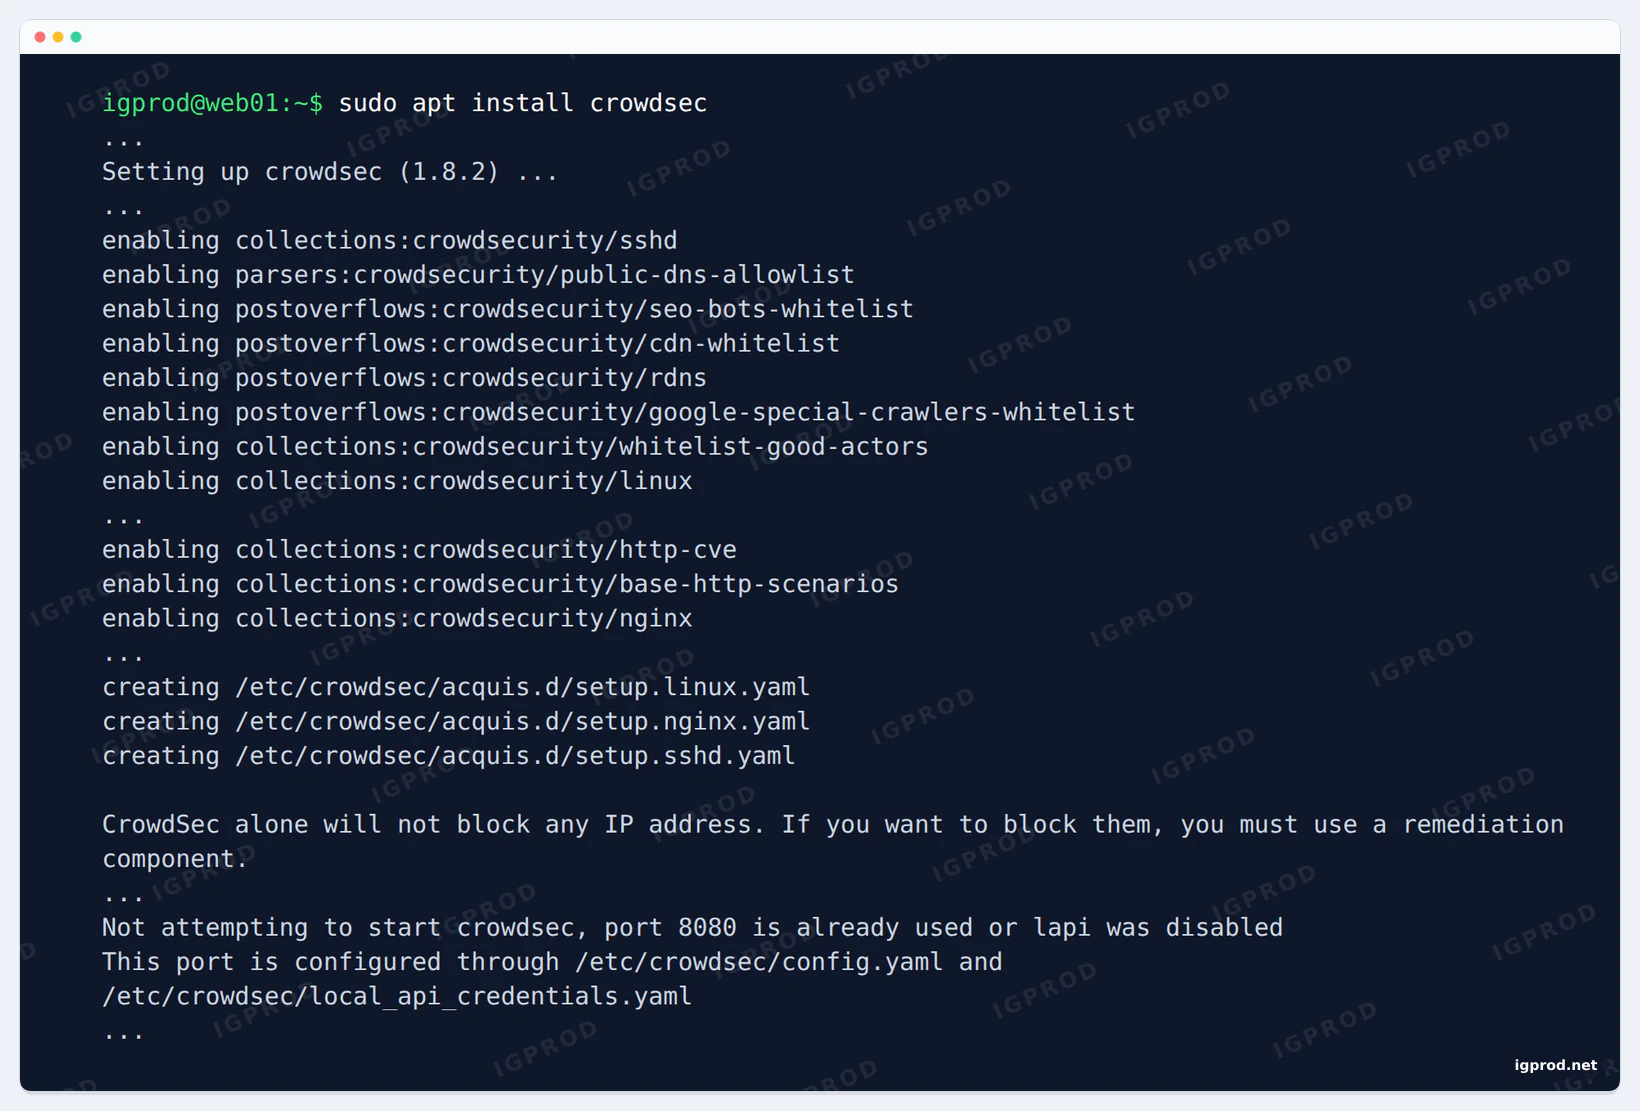
sudo apt install crowdsec on our server: the collections it enabled, the acquisition files it wrote, the reminder about blocking, and why it did not start (the next step fixes that).The installer checked the server and installed collections for what it found: crowdsecurity/sshd, crowdsecurity/nginx, crowdsecurity/base-http-scenarios, crowdsecurity/http-cve, crowdsecurity/linux and crowdsecurity/whitelist-good-actors. It wrote three acquisition files in /etc/crowdsec/acquis.d/, and the one for SSH reads the journal:
journalctl_filter:
  - _SYSTEMD_UNIT=ssh.service
labels:
  type: syslog
source: journalctl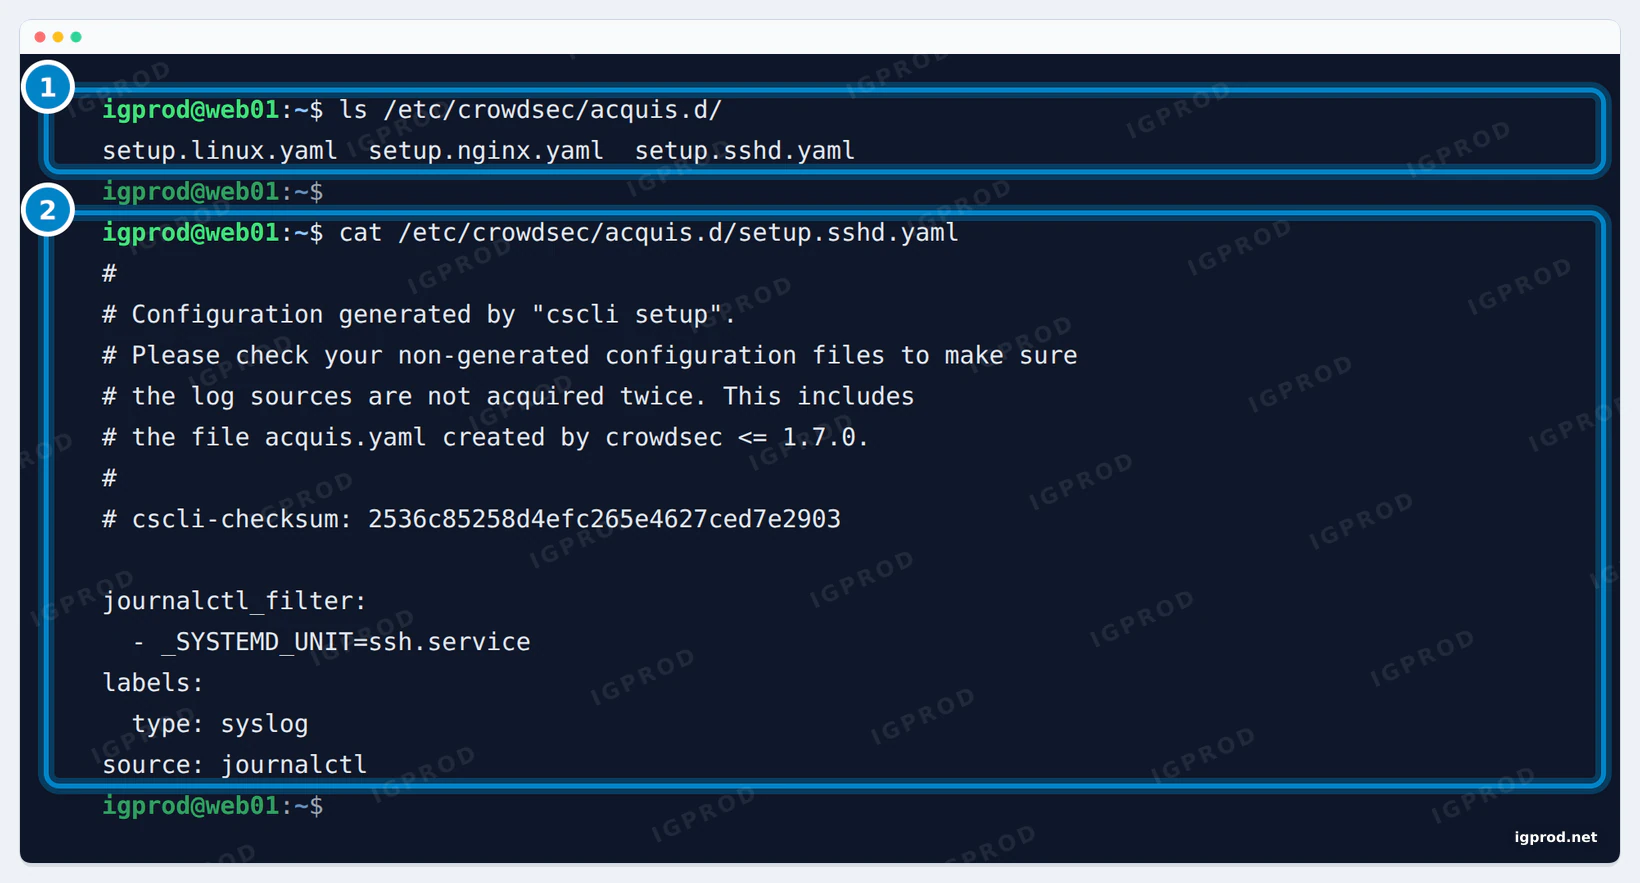
ssh.service.It also printed a line to remember: "CrowdSec alone will not block any IP address. If you want to block them, you must use a remediation component." The firewall bouncer, installed below, does the blocking.
Port 8080 is often taken by a Docker app
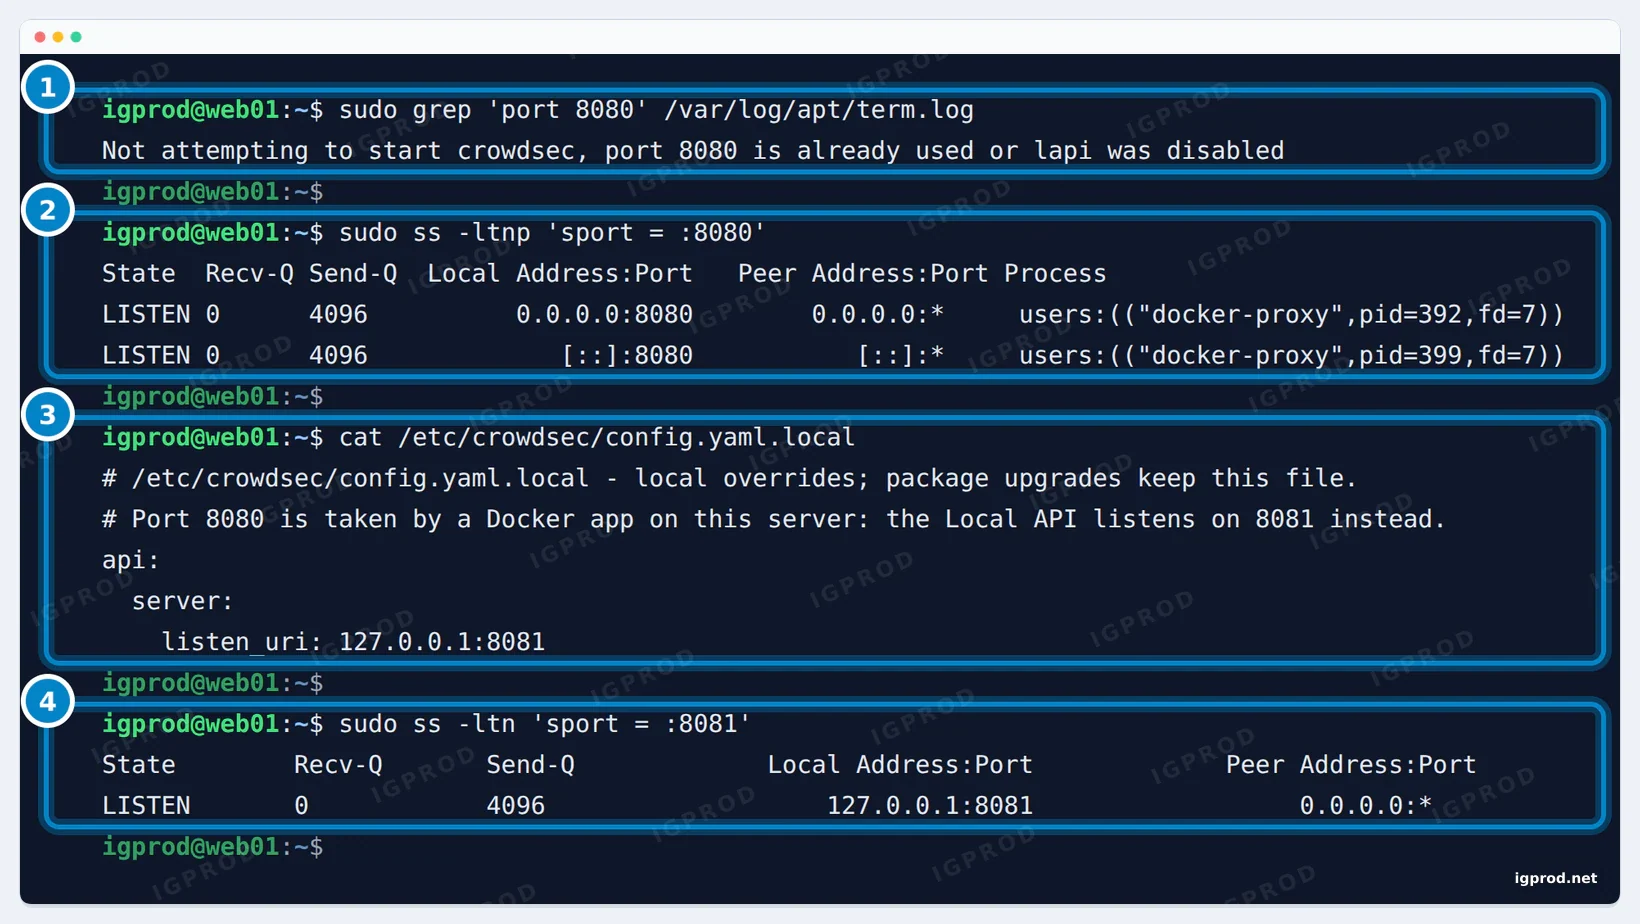
CrowdSec's Local API listens on port 8080 by default, a port many Docker apps publish. On our server the install ended with "Not attempting to start crowdsec, port 8080 is already used or lapi was disabled". Move the Local API to another port in a .local file, which package upgrades keep, and give cscli the new address:
sudo tee /etc/crowdsec/config.yaml.local > /dev/null <<'EOF'
api:
  server:
    listen_uri: 127.0.0.1:8081
EOF
sudo sed -i 's#^url: http://127.0.0.1:8080#url: http://127.0.0.1:8081#' /etc/crowdsec/local_api_credentials.yaml
sudo systemctl restart crowdsec
sudo cscli lapi status
The last command should end with "You can successfully interact with Local API (LAPI)". If nothing uses port 8080 on your server, skip this step.
Install the firewall bouncer
sudo apt install crowdsec-firewall-bouncer-nftables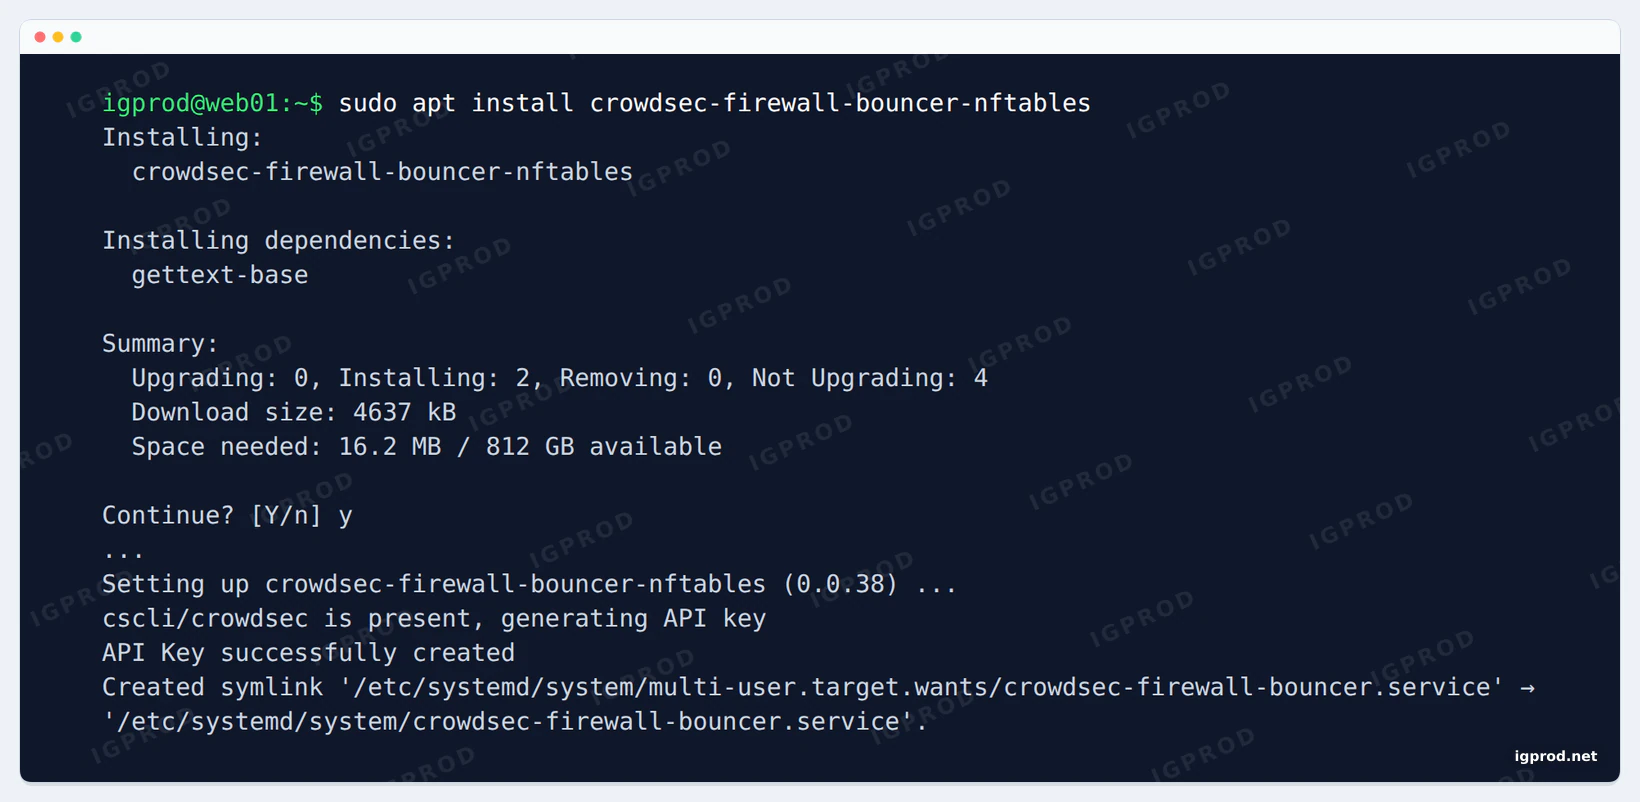
API Key successfully created) and enables its service.The package registered itself with the Local API ("API Key successfully created") and found port 8081 by itself. Its defaults in /etc/crowdsec/bouncers/crowdsec-firewall-bouncer.yaml: drop the packets, ask the Local API for new decisions every 10 seconds, and filter in two nftables hooks, input and forward. Docker's published ports go through the forward hook, so CrowdSec protected our container with no extra setting: the banned attacker timed out on port 80 and on port 8080.
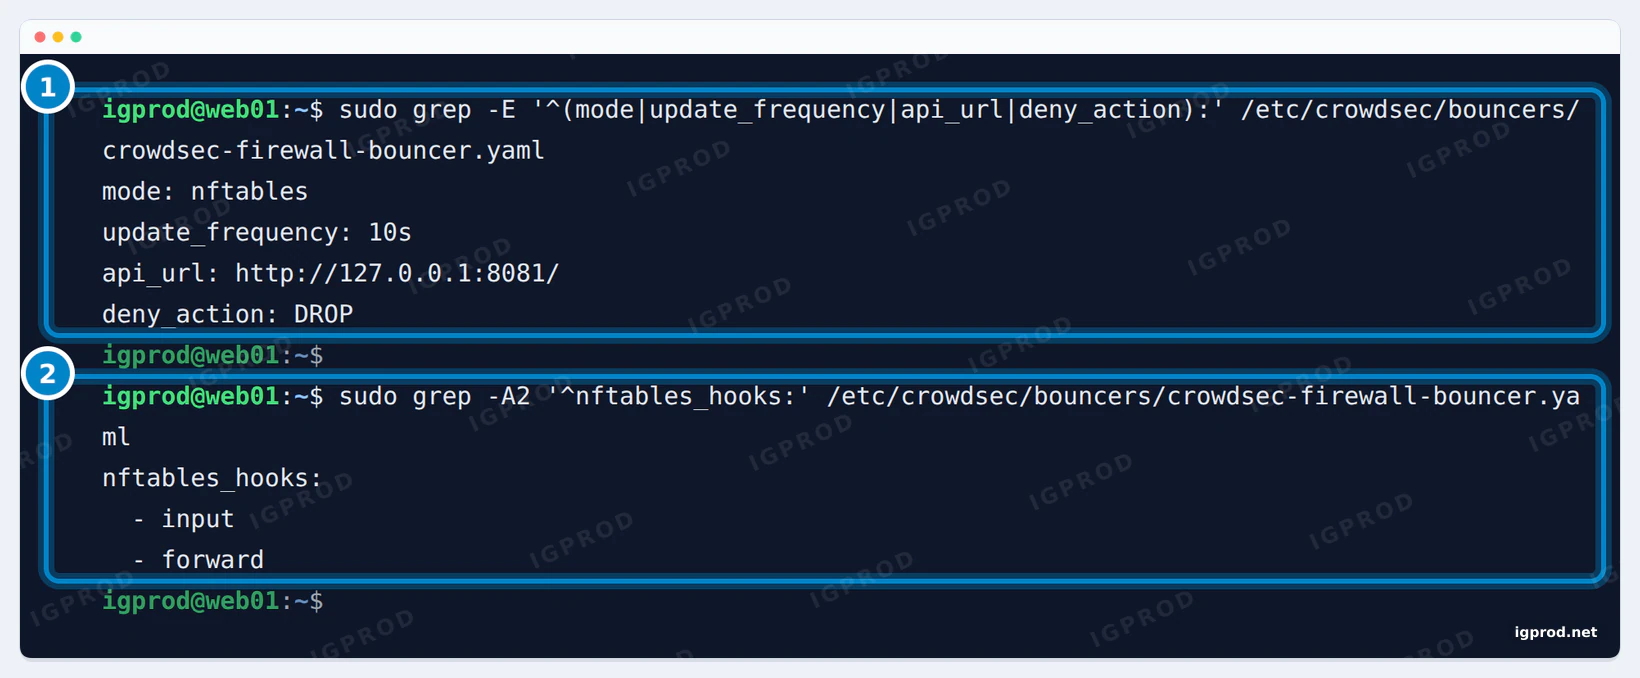
mode: nftables, update_frequency: 10s, the Local API on port 8081, and DROP. 2: the two hooks, input and forward.SSH brute force: the first CrowdSec ban
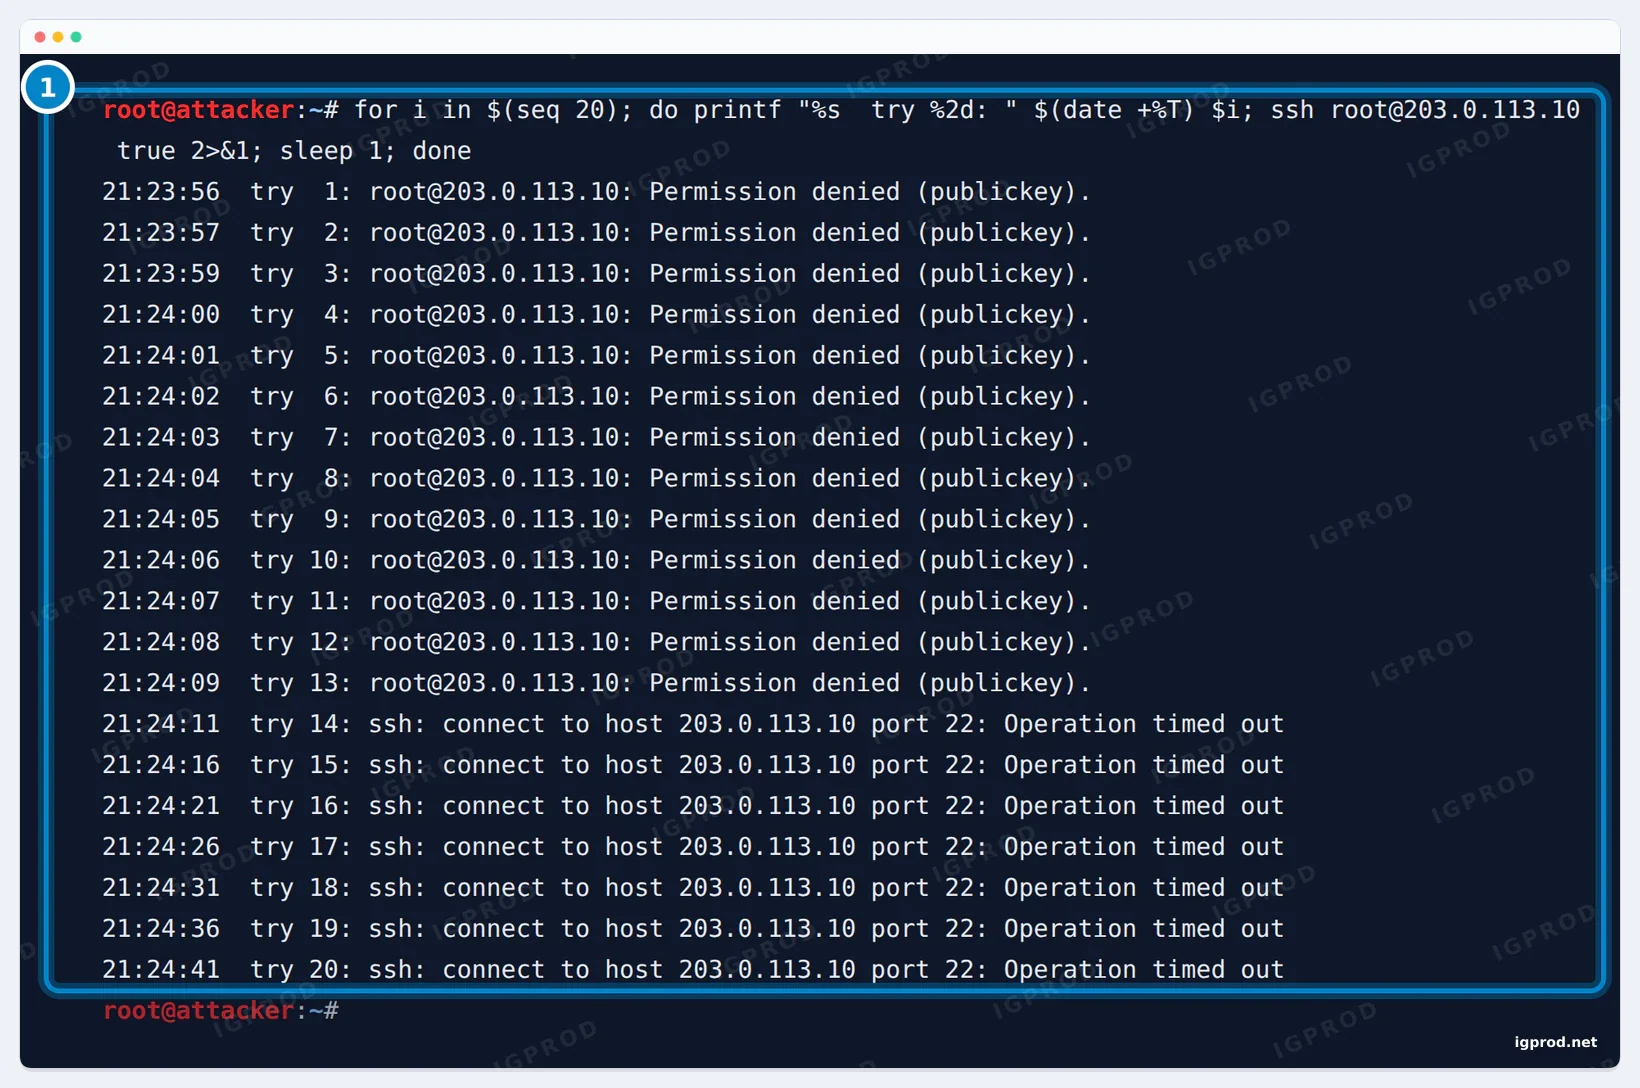
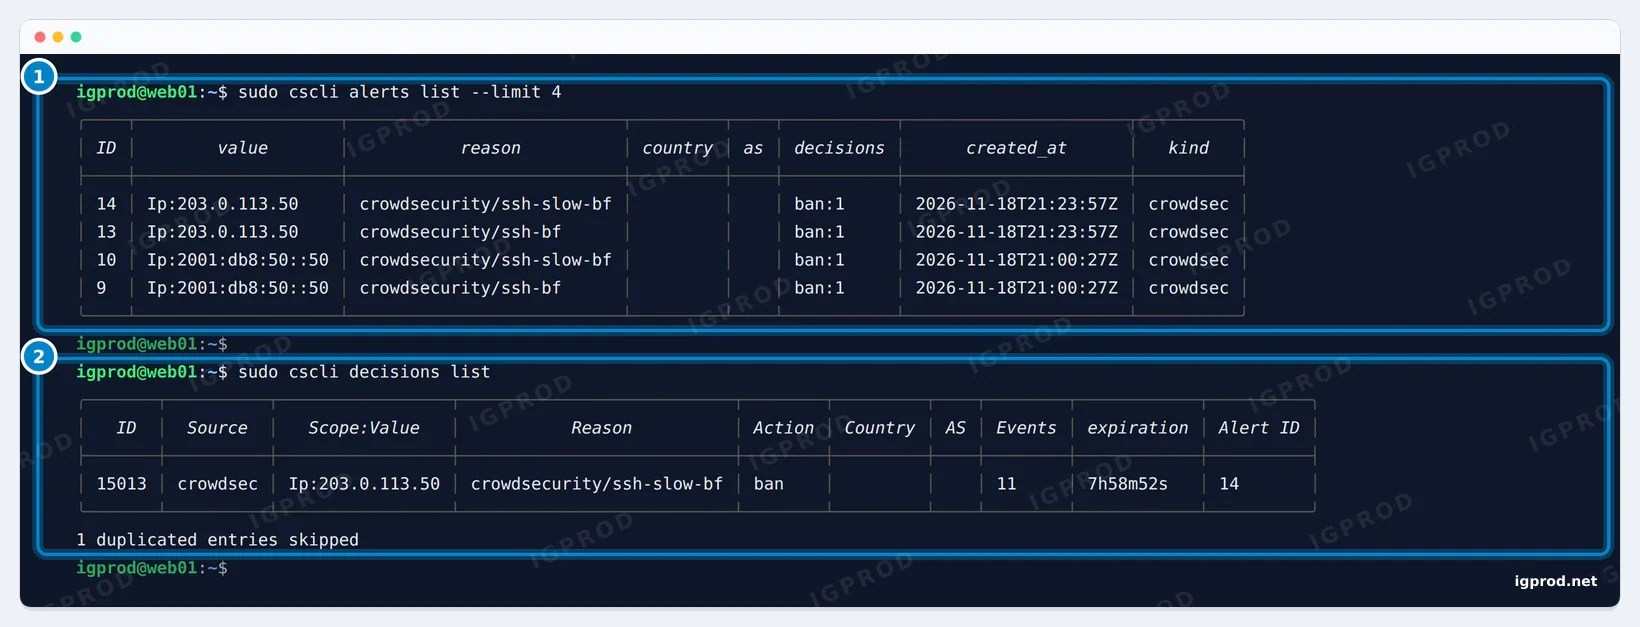
The ssh-bf scenario fired at the 6th failure (21:24:02), and the Local API wrote a 4-hour ban a second later. The bouncer added it to nftables at its next pull, at 21:24:10, so 7 more logins reached SSH. Meanwhile the ssh-slow-bf scenario fired too, at 11 failures:
Make the bouncer block faster
To block sooner, the bouncer must ask more often. Put the setting in a .local file next to its configuration, so upgrades keep it, and check the merged result with -T:
echo 'update_frequency: 2s' | sudo tee /etc/crowdsec/bouncers/crowdsec-firewall-bouncer.yaml.local
sudo crowdsec-firewall-bouncer -c /etc/crowdsec/bouncers/crowdsec-firewall-bouncer.yaml -T | grep update_frequency
sudo systemctl restart crowdsec-firewall-bouncer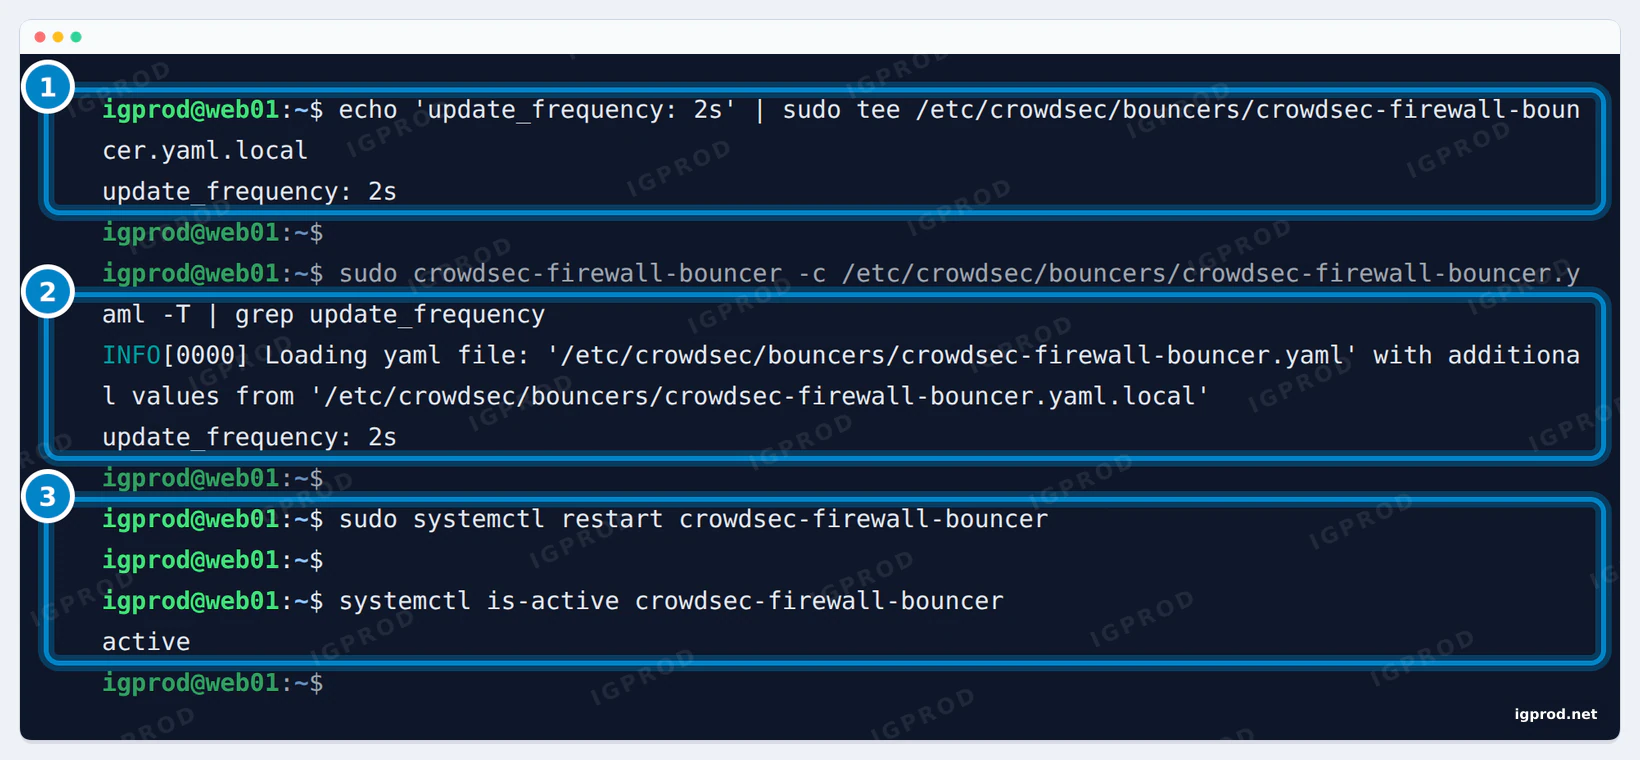
.local file. 2: -T shows the merged value, 2s. 3: restart, and the bouncer is active.With 2 seconds, the same attack was blocked one second after the decision, and only one extra login got through. The next try did not fail: it hung for about 2 minutes, because the ban arrived in the middle of its SSH handshake, and a drop rule also stops the packets of a connection that is already open.
A web scan
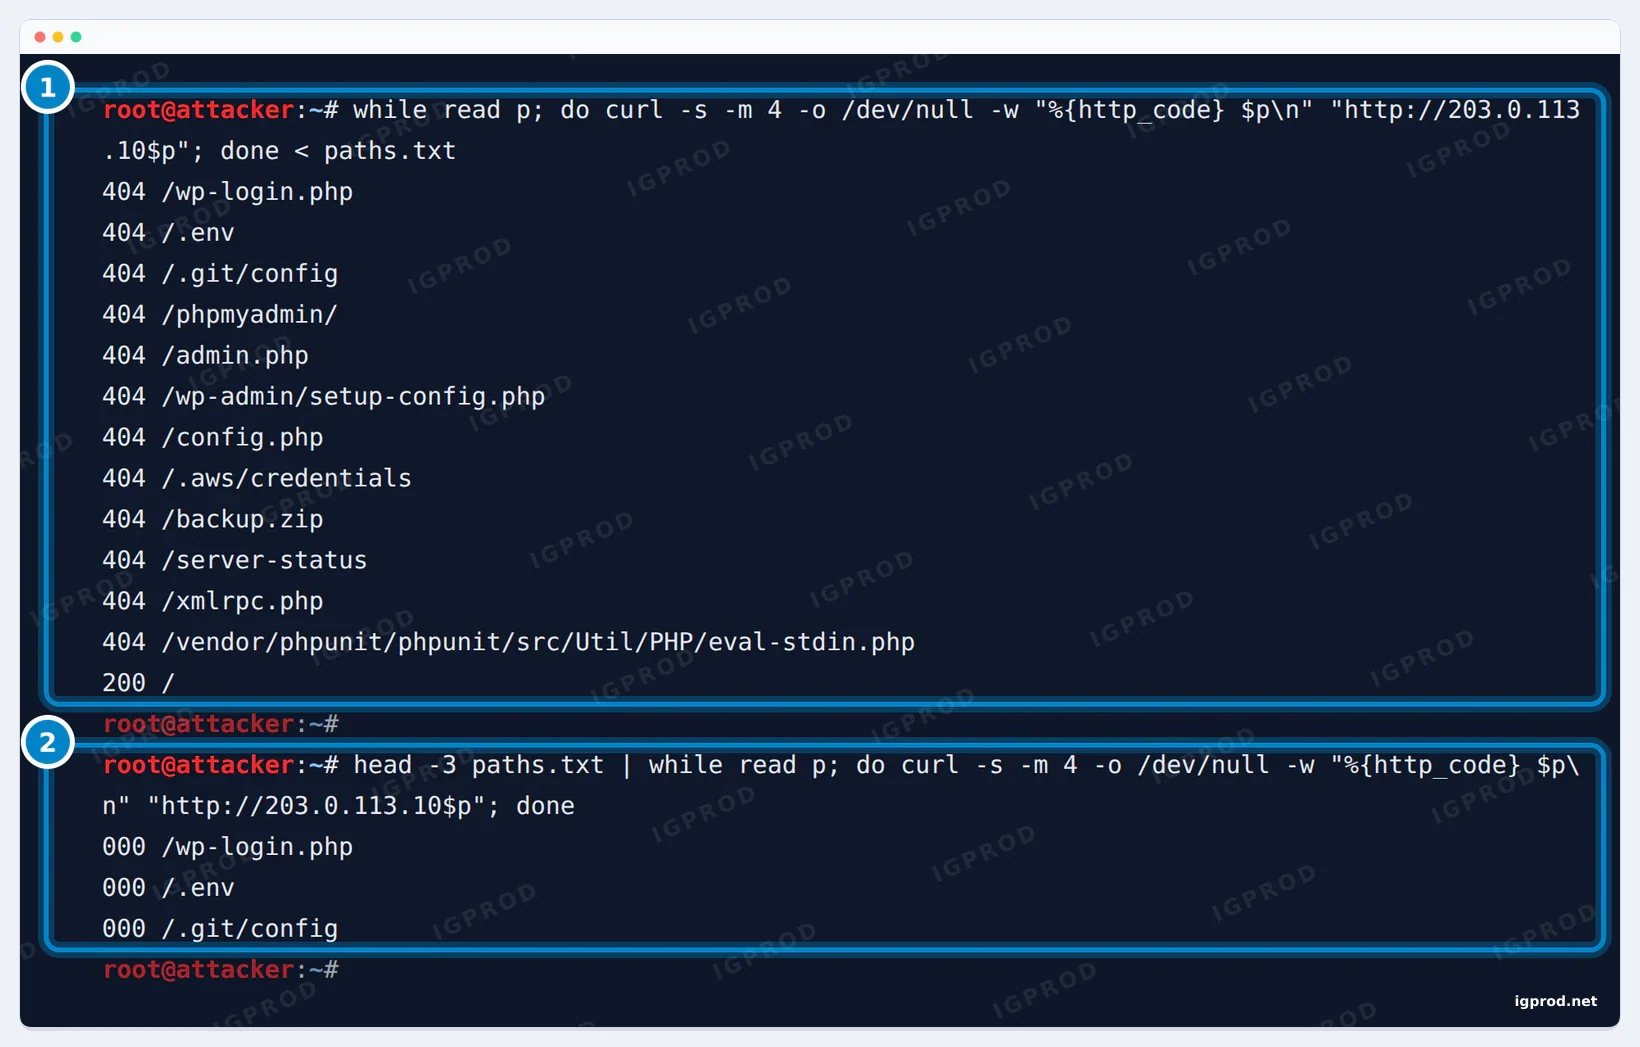
CrowdSec read the nginx access log, and three scenarios fired within 36 milliseconds: http-probing (11 requests for missing files), http-admin-interface-probing and CVE-2017-9841 (the PHPUnit exploit path). The firewall bouncer can only stop the requests that come after the ban: the first scan was answered in full. To stop bad requests before your app answers them, CrowdSec also has bouncers for nginx, Traefik and Cloudflare, and an application firewall (AppSec), which we did not test here. Our guide to choosing an open-source web application firewall compares the options.
The community blocklist
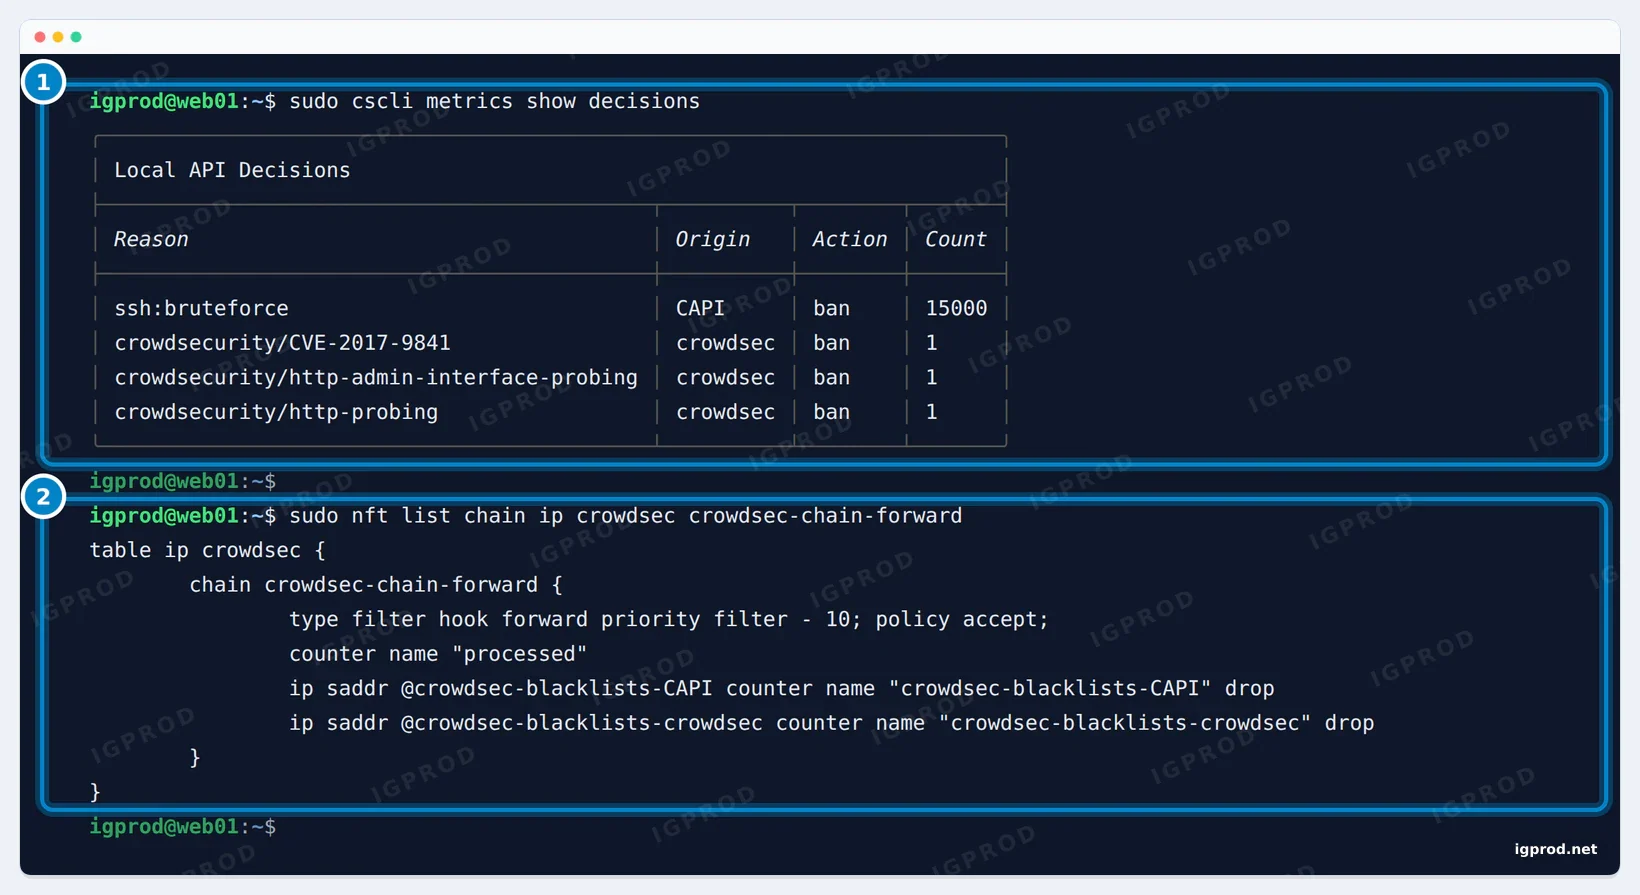
Right after the install, the first pull from CrowdSec's Central API returned nothing; the log said "received 0 new entries (expected if you just installed crowdsec)". When we restarted CrowdSec 7 minutes later, the next pull "added 15000 entries", and nftables held 14,914 IPv4 and 86 IPv6 addresses. Without a restart, the list arrives at the next pull, about 2 hours later, and refreshes every 2 hours after that. The input hook has the same rules as the forward hook above.
In return, your engine shares what it detects. CrowdSec's Central API documentation lists the data sent for each alert: the scenario name with its hash and version, the time of the decision, your machine ID and the attacking IP with its location when known. Your log lines are not on that list. Alerts of your own scenarios and of locally modified ones are sent too: sudo cscli console status shows these options, and sudo cscli console disable custom and sudo cscli console disable tainted turn them off.
Never ban yourself: private ranges and allowlists
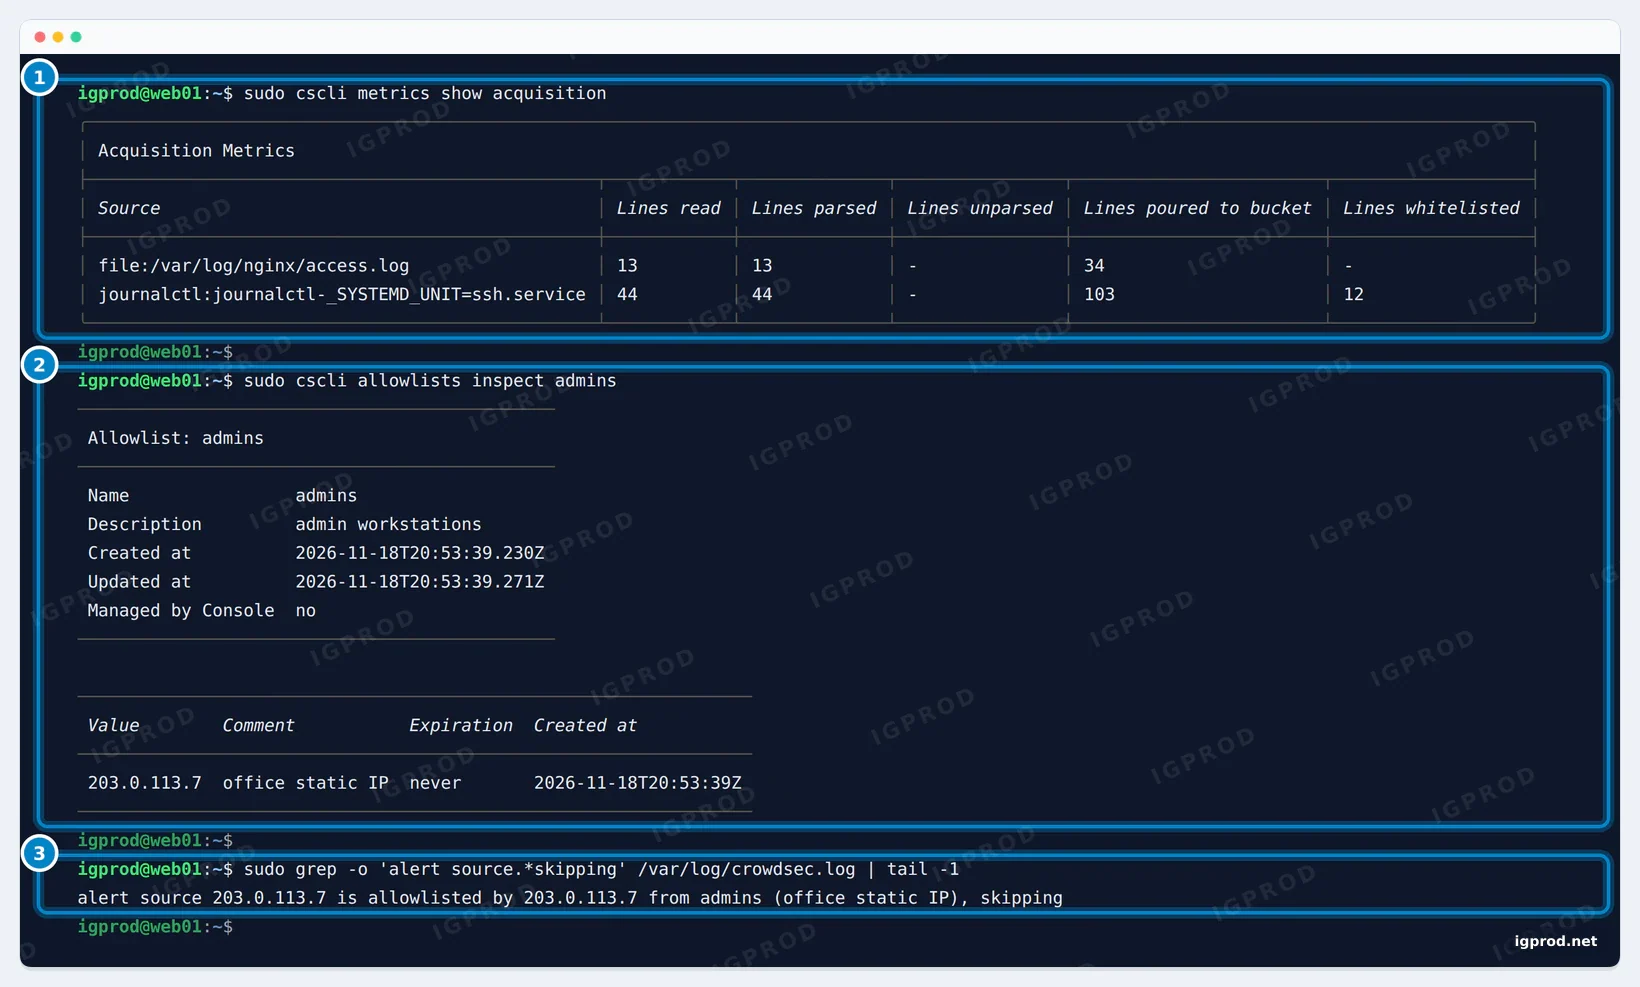
By default, CrowdSec does not ban private addresses: the crowdsecurity/whitelists parser drops events from 127.0.0.0/8, 10.0.0.0/8, 172.16.0.0/12, 192.168.0.0/16 and ::1. Our LAN laptop failed 12 logins without a ban. This has a production side effect: behind a reverse proxy, if your web logs show the proxy's private address instead of the visitor's, CrowdSec ignores those lines, and Fail2ban bans the proxy's address instead of the attacker's. Log the real client address first; our guide to the real IP behind Nginx Proxy Manager and Cloudflare shows how.
For your own public address, create an allowlist:
sudo cscli allowlists create admins -d "admin workstations"
sudo cscli allowlists add admins 203.0.113.7 -d "office static IP"
Our admin PC then failed 8 logins on purpose. The scenario fired at the 6th, and CrowdSec logged "alert source 203.0.113.7 is allowlisted by 203.0.113.7 from admins (office static IP), skipping".
Longer CrowdSec bans for repeat offenders
CrowdSec bans for 4 hours by default. The first profile of /etc/crowdsec/profiles.yaml has a commented duration_expr line that adds 4 hours for each earlier decision against the same address. Uncomment the first one, test, and restart:
sudo sed -i '0,/^#duration_expr:/s//duration_expr:/' /etc/crowdsec/profiles.yaml
sudo crowdsec -t && sudo systemctl restart crowdsec
The profile then starts like this. duration_expr stays at the start of its line: it belongs to the profile, not to the decisions list.
name: default_ip_remediation
#debug: true
filters:
 - Alert.Remediation == true && Alert.GetScope() == "Ip"
decisions:
 - type: ban
   duration: 4h
duration_expr: Sprintf('%dh', (GetDecisionsCount(Alert.GetValue()) + 1) * 4)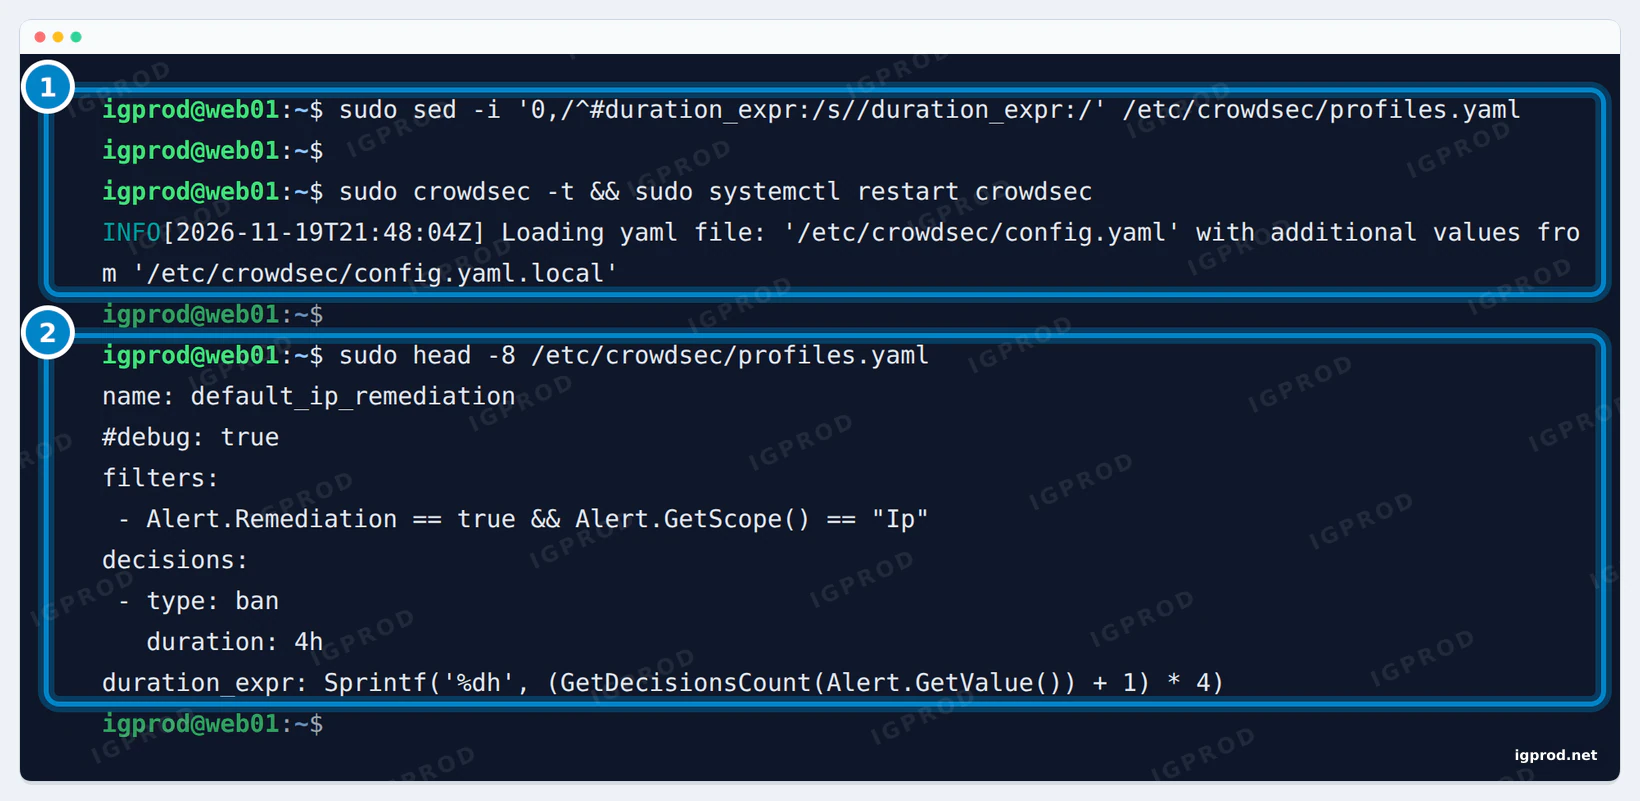
duration_expr line.In our test, with no earlier decisions, the attacker got a 4-hour ban, and its second decision, 5 seconds later, 8 hours. The count includes expired and deleted decisions that the database still holds; with the default flush settings (max_age: 7d in config.yaml), it covers about a week.
Reboots, updates and monitoring
After a reboot, CrowdSec's decisions were still there, nftables held the community list again (14,914 IPv4 addresses), the Docker app came back and the attacker was still blocked. The package also sets up:
crowdsec-hubupdate.timer, a daily timer that runs/usr/libexec/crowdsec/hubupdate.shto keep parsers and scenarios current.- A configuration test before each start (
ExecStartPrewithcrowdsec -t) andRestart=alwaysin the service. - Prometheus metrics on
127.0.0.1:6060, reachable from the server only.sudo cscli metricsshows the same numbers in the terminal.
Engine and bouncer updates come with sudo apt upgrade, from CrowdSec's repository.
Running both, and switching from Fail2ban to CrowdSec
We ran both on the same server and attacked SSH again. Fail2ban banned at the 5th failure. CrowdSec's ssh-bf needs 6, so it saw only 5 events and made no decision: no alert, nothing shared. Two tools that write firewall rules also make a ban harder to explain. Run both only while you switch:
- Make sure you can reach the server without SSH, for example with your provider's web console.
- Install CrowdSec and the firewall bouncer, and add your own address to an allowlist. Fail2ban's
ignoreipalready has it. - Run
sudo cscli metrics show acquisition: each log source must show lines read and parsed. While Fail2ban bans first, CrowdSec sees few SSH attacks, so do not wait for SSH alerts. - Turn Fail2ban off for good. Its nftables table goes away with it, and CrowdSec's tables stay:
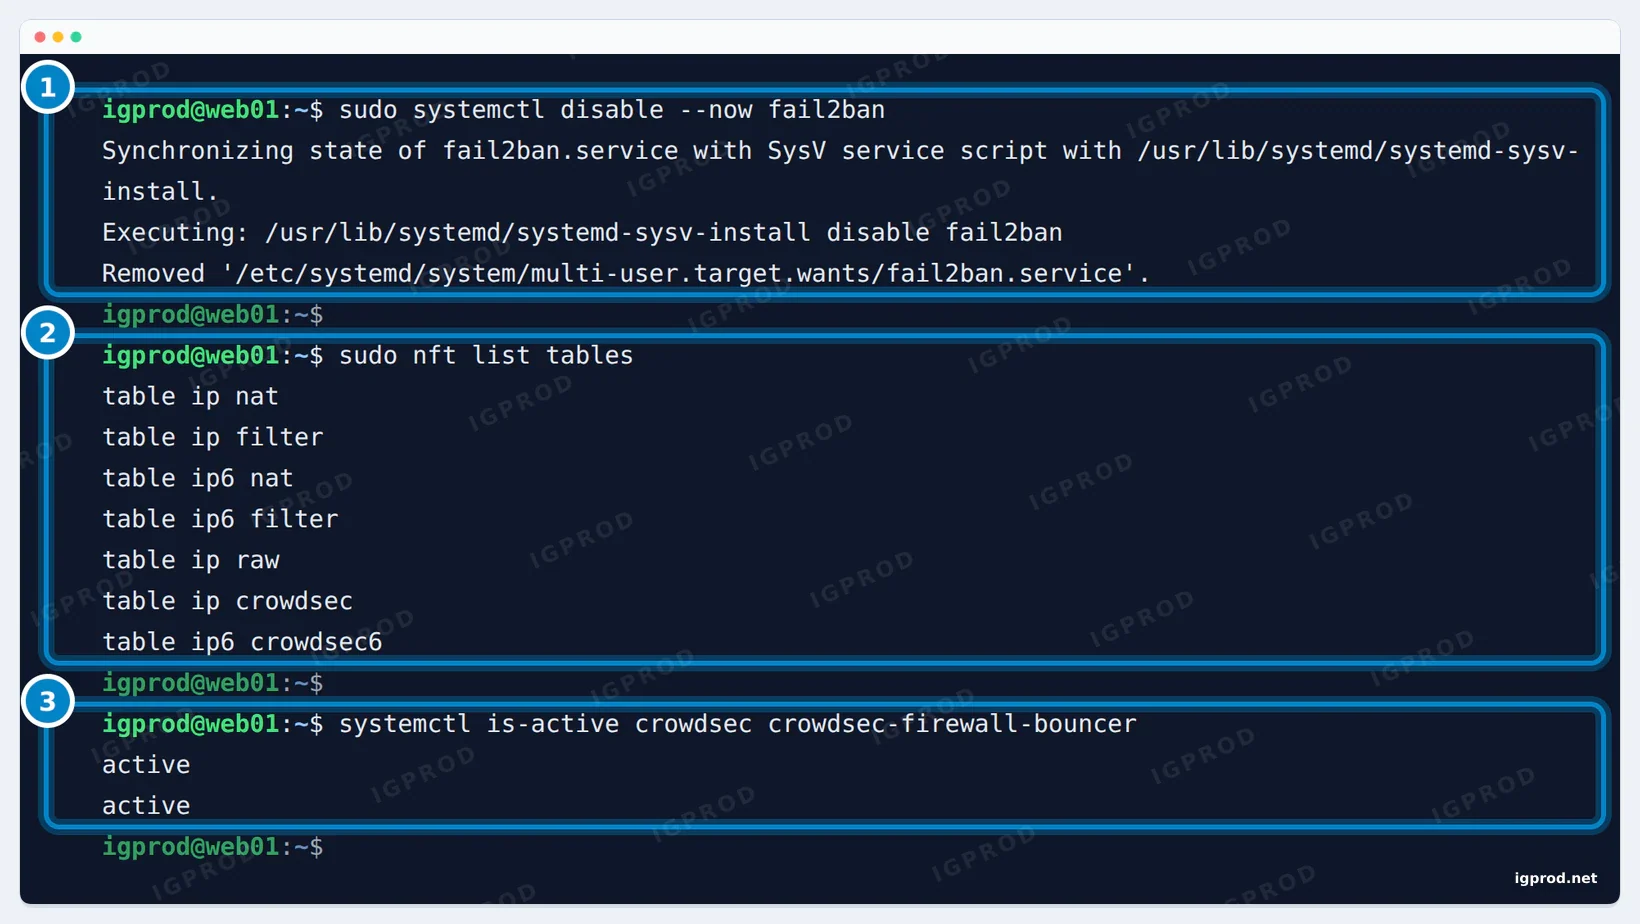
To go back, run sudo systemctl disable --now crowdsec-firewall-bouncer and sudo systemctl enable --now fail2ban. Your jail.local is untouched.
Memory and disk use
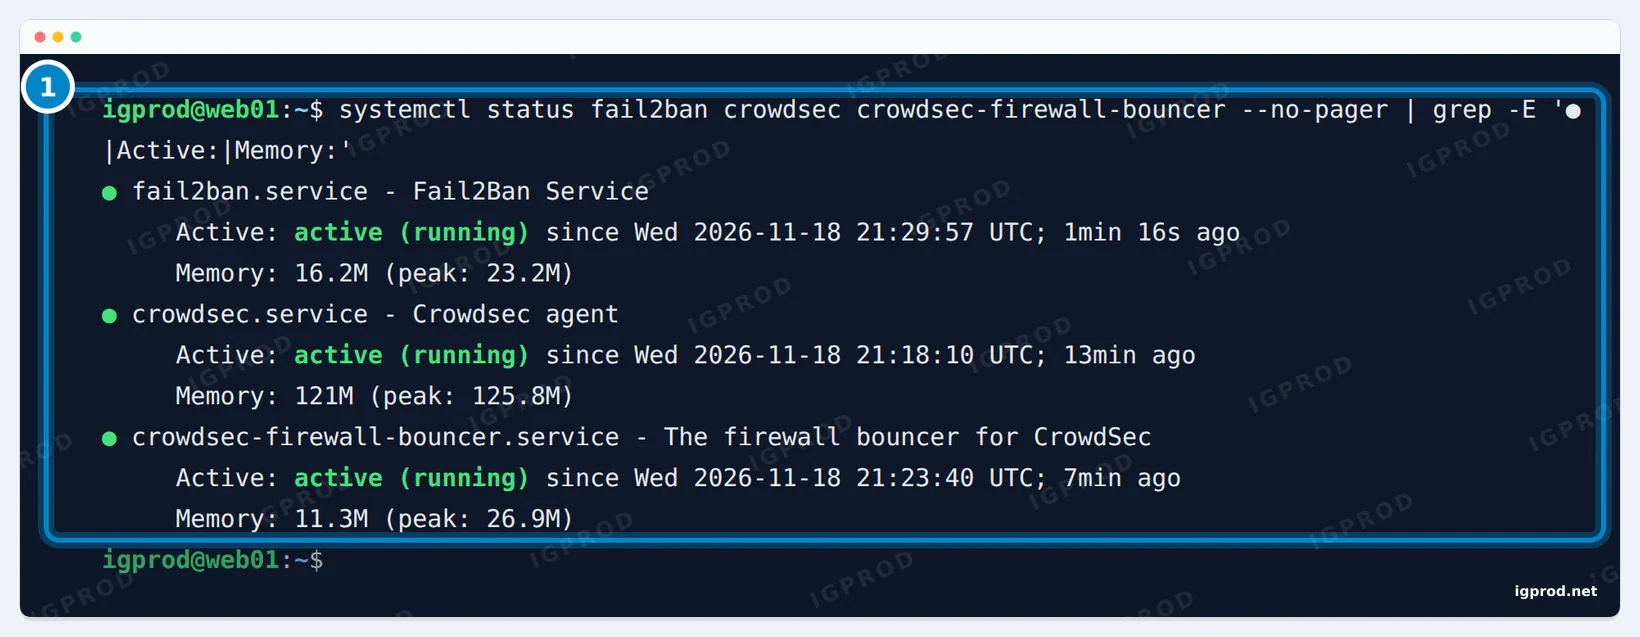
The resident memory of the processes was 31.4 MiB for fail2ban-server, 183.5 MiB for crowdsec and 21.2 MiB for the bouncer. On disk, CrowdSec takes 330 MiB and the bouncer 15 MiB, against 2.1 MiB for Fail2ban. On a 512 MB machine, that difference matters. On a server with 2 GB or more, it rarely does.
Production checklist
- SSH keys only, and your own fixed address in
ignoreipor a CrowdSec allowlist before the first restart. - A way in without SSH (provider console) before you change any firewall setting.
- Docker hosts: check that a banned address cannot reach a published port. CrowdSec's bouncer does it by default; Fail2ban needs the prerouting
banaction. - Logs with the real client address behind a reverse proxy or a CDN.
- Longer bans for repeat offenders:
bantime.incrementorduration_expr. - Test bans from a second machine, over IPv4 and IPv6, after every change.
- One tool enforcing at a time.
- Fewer open ports means less to defend: a Cloudflare Tunnel can publish web apps without opening any.
Troubleshooting
Not attempting to start crowdsec, port 8080 is already used or lapi was disabled
Another program, often a Docker app, uses port 8080. Move the Local API to 8081 with config.yaml.local and update local_api_credentials.yaml, as shown above.
Fail2ban bans the attacker, but a Docker app still answers
The ban rule is in the input hook, and published ports go through prerouting and forward. Use banaction = nftables[type=allports, chain_hook=prerouting, blocktype=drop] and test from the banned address.
nginx-botsearch never finds anything
On Ubuntu's default site, missing files leave no line in error.log. Set logpath = %(nginx_access_log)s in the jail.
Fail2ban ignores failed SSH logins of real users
On a key-only server, these failures end with Connection closed by authenticating user ... [preauth], which only mode = aggressive counts.
An address stays blocked after cscli alerts delete
cscli alerts delete --ip removes the alert and its decisions from the database, but the firewall bouncer is not told. In our test the address stayed in the nftables set with its old 36-hour timeout while cscli decisions list showed nothing. Remove bans with sudo cscli decisions delete --ip 203.0.113.50, which the bouncer sees. If an address is already stuck, sudo systemctl restart crowdsec-firewall-bouncer rebuilds the sets from the Local API.
received 0 new entries (expected if you just installed crowdsec)
Normal on a new install. The community list comes with the next pull, at the latest 2 hours later.
A banned client's SSH session hangs instead of closing
Drop rules stop every packet from the address, also on a connection that is already open, so the client waits for its own timeout. That is the expected effect of a ban.
You locked yourself out
Log in through your provider's console and remove the ban with sudo fail2ban-client unban 198.51.100.20 or sudo cscli decisions delete --ip 198.51.100.20, using your own address. Then add it to ignoreip or to a CrowdSec allowlist.
Frequently asked questions
Is CrowdSec better than Fail2ban?
For a server that faces the internet, yes in our tests: it caught a web scan that Fail2ban's default nginx jail missed, protected Docker's published ports by default and loaded 15,000 known attackers. Fail2ban blocked faster (0.13 s against 1 to 10 s) and used 16 MB of memory against 132 MB.
Can I run CrowdSec and Fail2ban at the same time?
Only while you switch. In our test Fail2ban banned the SSH attacker at the 5th failure, before CrowdSec's 6-failure scenario could fire, so CrowdSec made no decision and shared nothing.
Does CrowdSec send my logs to the cloud?
No. For each alert it sends signal data to its Central API: the scenario, the time of the decision, your machine ID and the attacking IP. Your log lines stay on your server, and you receive the community blocklist in return.
How much RAM does CrowdSec use?
On our server, with the 15,000-address community list loaded, systemd counted 121 MB for crowdsec and 11.3 MB for the firewall bouncer (183.5 MiB and 21.2 MiB resident). Fail2ban used 16.2 MB.
Does Fail2ban protect Docker containers?
Not with its default action. Our banned attacker still got HTTP 200 from a container on port 8080. banaction = nftables[type=allports, chain_hook=prerouting, blocktype=drop] in jail.local blocks the published ports too.
How long does CrowdSec ban an IP address?
4 hours by default. With the duration_expr line of profiles.yaml, each earlier decision against the same address adds 4 hours: 4, 8, 12 hours and so on. Fail2ban's default ban is 10 minutes.
How do I unban an IP address?
Fail2ban: sudo fail2ban-client unban 203.0.113.50. CrowdSec: sudo cscli decisions delete --ip 203.0.113.50. Do not use cscli alerts delete for this: the firewall bouncer keeps the address blocked until it restarts.
Do Fail2ban and CrowdSec block IPv6 attackers?
Yes. Both banned our IPv6 attacker, 2001:db8:50::50: Fail2ban in an IPv6 set of its nftables table, CrowdSec in its ip6 crowdsec6 table.
Related guides
- Choosing an Open-Source Web Application Firewall for a Self-Hosted App
- Fix Nginx Proxy Manager Real IP Behind Docker and Cloudflare
- Install Docker Compose on Ubuntu using Docker’s repository
- How to Create Let’s Encrypt SSL Certificates on Linux
- How to create cloudflare tunnel and expose your services with-synology
Sources

Leave a comment
Your email address will not be published. Required fields are marked *