
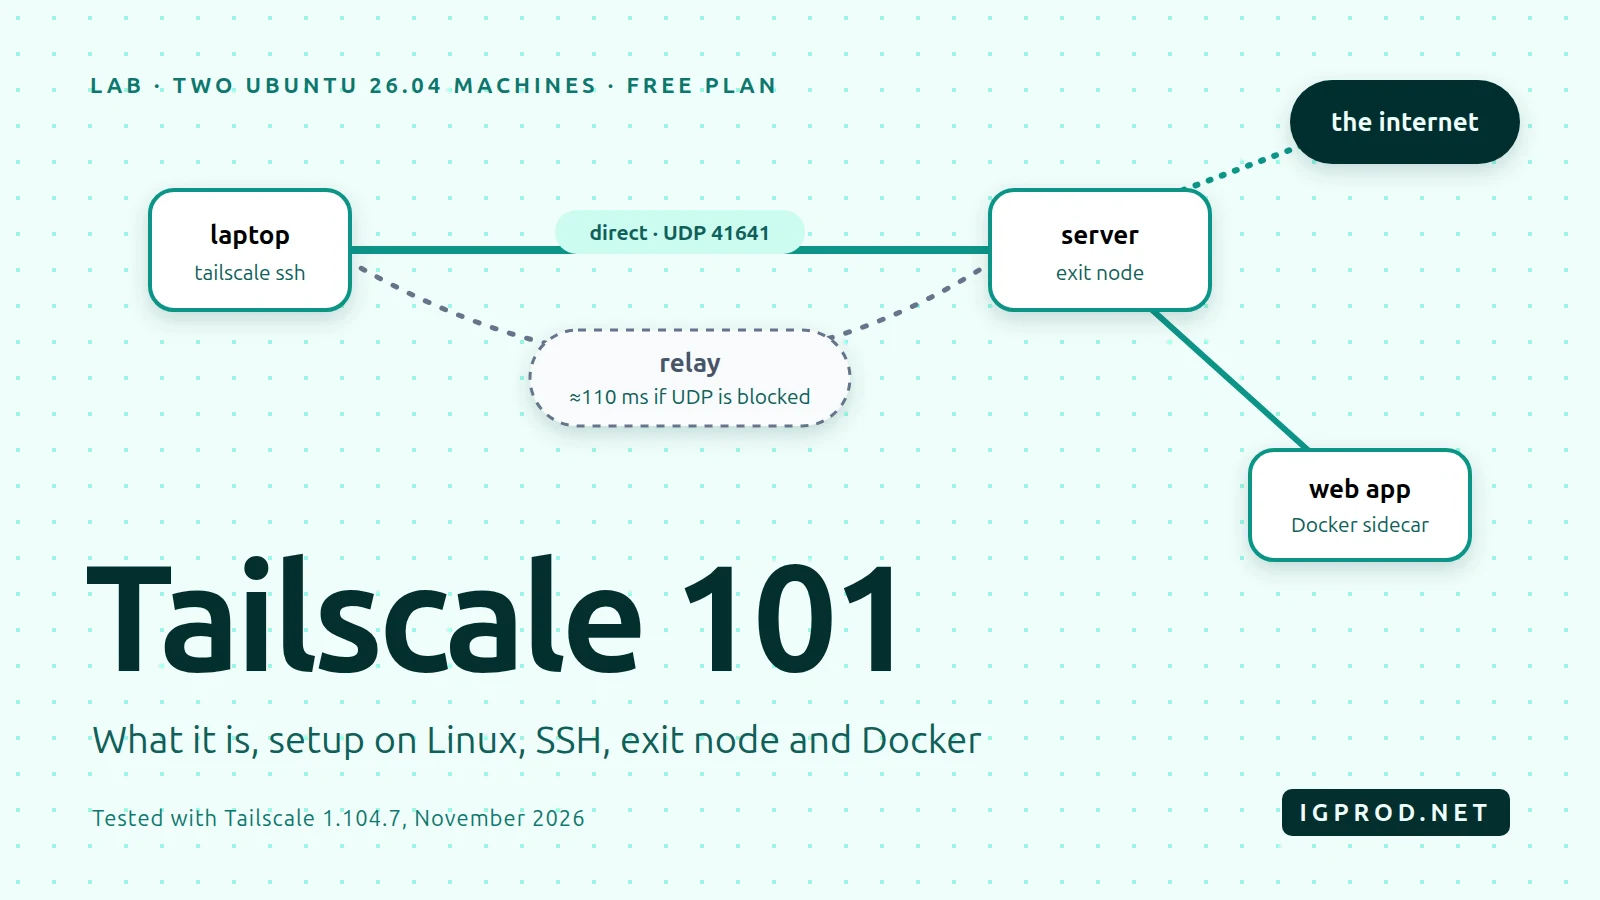
Tailscale gives each of your devices a private address and a name, and connects them to each other wherever they are: at home, on a VPS, behind a mobile network. You open no port on your router, and the traffic is encrypted with WireGuard from one device to the other. This guide explains what Tailscale is, then sets it up step by step on Linux and goes further than most tutorials: what happens when a network blocks the direct path, how to log in to a server over SSH without keys, how to send your internet traffic through your own server, and how to put a Docker app on your network with a real HTTPS certificate and no open port.
The policy of a new tailnet lets every device reach every port of every other device. The last step replaces it with a least-privilege policy and tests it, so a container that is ever compromised cannot reach the rest of your network.
We tested every step on 18 November 2026 with Tailscale 1.104.7 on two Ubuntu 26.04 test machines, a server and a laptop on the same local network, and Docker Engine 29.10.0 with Docker Compose 5.8.0 on the server. The tailnet is a new account on the free Personal plan. Every command output, timing and screenshot below comes from that test, errors included.
Quick answer: Tailscale in five minutes
In plain words: Tailscale puts your computers, phones and servers on one private network, as if they were on the same home Wi-Fi, wherever they are. You install it, sign in, and your devices reach each other by name. You open no port on your router.
- Sign in on tailscale.com with a Google, Microsoft or GitHub account. This creates your private network, called a tailnet. It is free for personal use.
- On a Linux server, run
curl -fsSL https://tailscale.com/install.sh | sh, thensudo tailscale up, and open the link it prints. - On your laptop or phone, install the Tailscale app from tailscale.com/download and sign in with the same account.
- Check with
tailscale status: each device has an address that starts with 100. Then reach the server by its name, for examplessh server. - Optional:
sudo tailscale set --sshfor Tailscale SSH (Step 4), and an exit node to browse safely on public Wi-Fi (Step 5).
Each step has a full, tested section below, with the outputs you should see.
What is Tailscale?
Tailscale is a mesh VPN built on WireGuard. A classic VPN sends everything through one central server; with Tailscale, each device connects straight to the device it talks to. The parts you meet in this guide:
- Tailnet: your private network. Each device in it gets an address in the 100.64.0.0/10 range, such as 100.100.156.19 for our server.
- Coordination server: Tailscale's service gives every device the public keys of the others and your access policy. It does not carry your traffic.
- MagicDNS: every device gets a name, so you type
ssh serverinstead of an IP address. - DERP relays: when two devices cannot reach each other directly, their encrypted packets go through a relay run by Tailscale. The relay cannot read them.
- Policy file: rules called grants that decide which person or device may reach which device and port.
- Features on top: Tailscale SSH, exit nodes, subnet routers, and Serve and Funnel to share a web app.
Is Tailscale free?
For personal use, yes. The Personal plan costs $0, and Tailscale's pricing page calls it "Free forever". On 18 November 2026 it included:
- Unlimited user devices and up to 6 users.
- Up to 3 ACL groups, and up to 50 tagged resources to start: devices that belong to a tag instead of a person, like the Docker container in Step 6.
- 1,000 minutes a month for ephemeral resources, short-lived devices such as CI runners.
Teams pay for Standard, at $8 per user per month, or Premium, at $18. Everything in this guide works on the free plan: we used no trial and entered no payment details.
What you need
- An existing Google, Microsoft or GitHub account to sign in with. It becomes the key to your whole network, so protect it with two-step verification.
- Two devices or more. We used two Ubuntu 26.04 machines; Tailscale also has apps for Windows, macOS, iOS and Android.
- Admin rights (sudo) on the Linux machines.
- For Step 6, Docker Engine with Docker Compose. Our guide to install Docker Compose on Ubuntu covers it.
Step 1: Create your tailnet
On tailscale.com, select Get started and sign in with your Google, Microsoft or GitHub account. Tailscale asks a short survey question about how you will use it (we picked "Personal or at-home use"), then opens the admin console. Your tailnet exists now, empty until the first device joins. It also gets a DNS name such as tailbe27a8.ts.net, which you can see on the DNS page of the console.
Step 2: Install Tailscale on Linux and run tailscale up
On Linux, the official script detects the distribution and installs Tailscale from Tailscale's own package repository:
curl -fsSL https://tailscale.com/install.sh | sh
tailscale version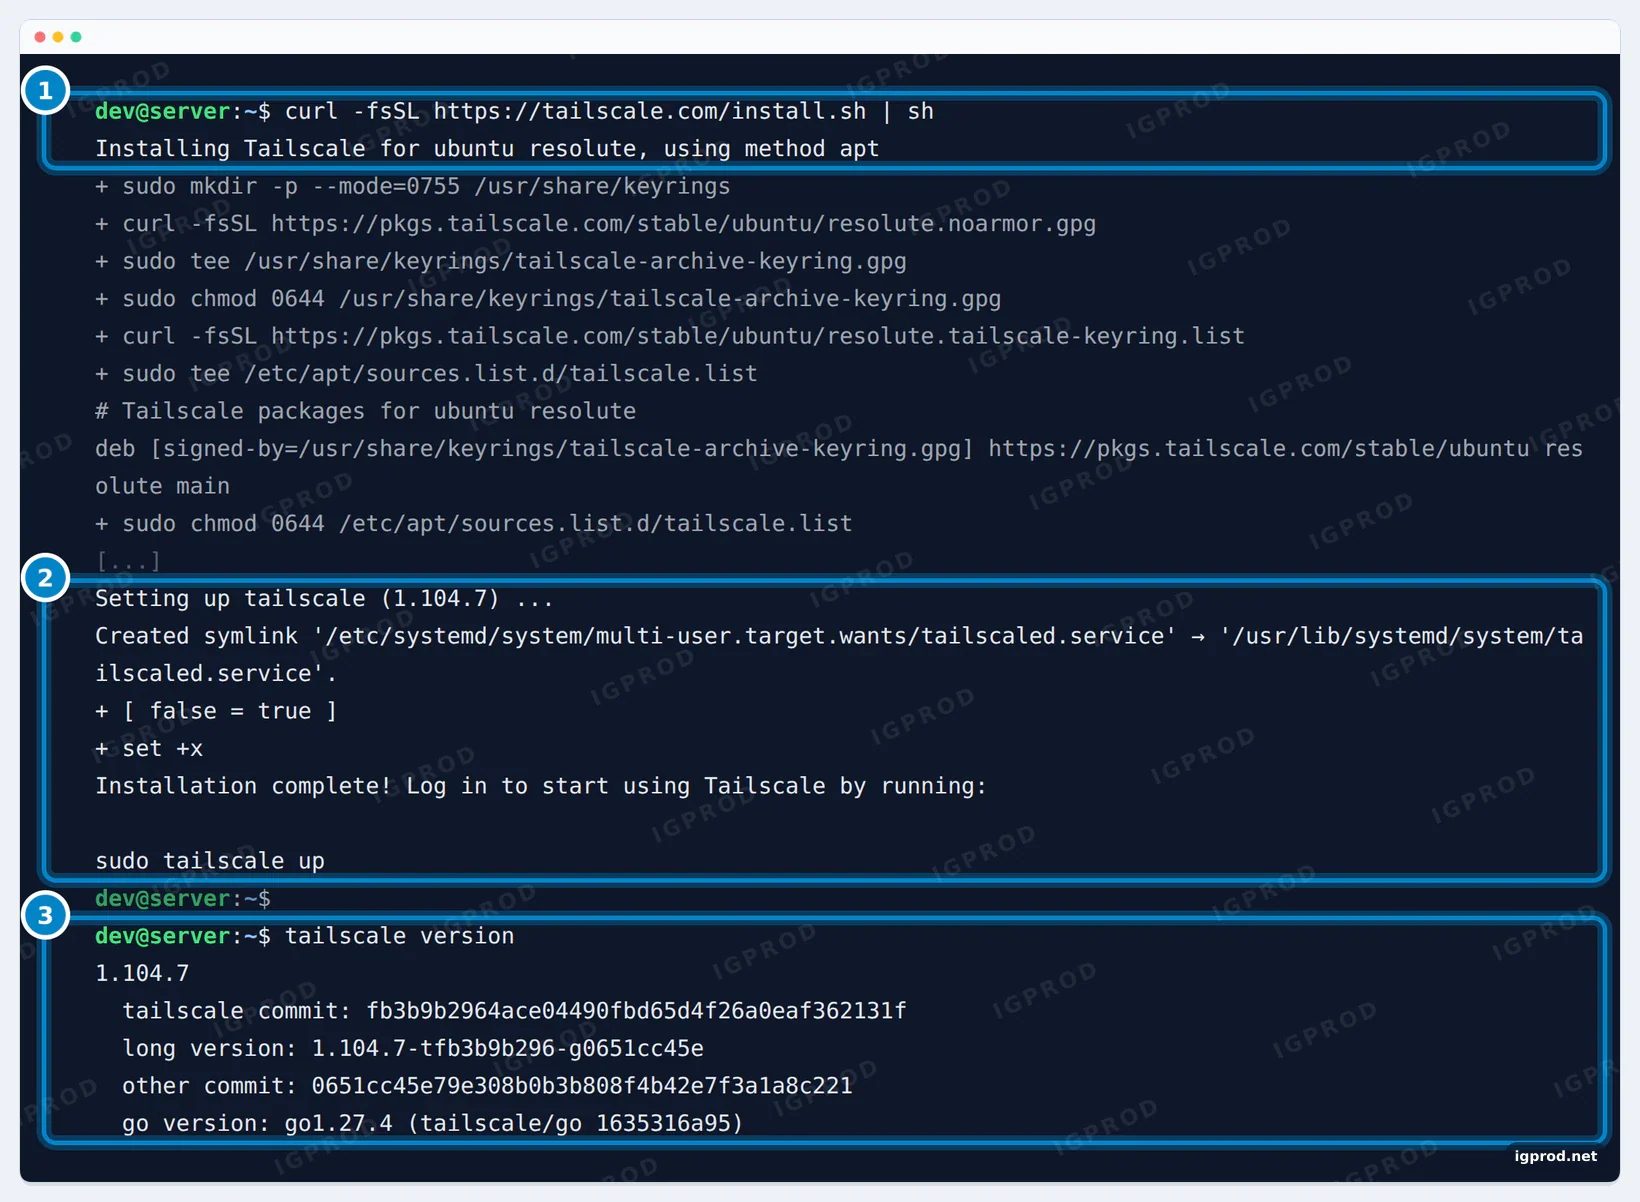
The script added Tailscale's signing key and apt repository, installed version 1.104.7 and enabled the tailscaled service, in 28 seconds. Because the package comes from a repository, sudo apt upgrade keeps it up to date with the rest of the system. If you would rather not pipe a script into a shell, Tailscale's package site, pkgs.tailscale.com, gives the manual steps for each distribution.
Now log the machine in:
sudo tailscale upThe command prints a login link and waits. Open the link in a browser where you are signed in to Tailscale, and approve the device:
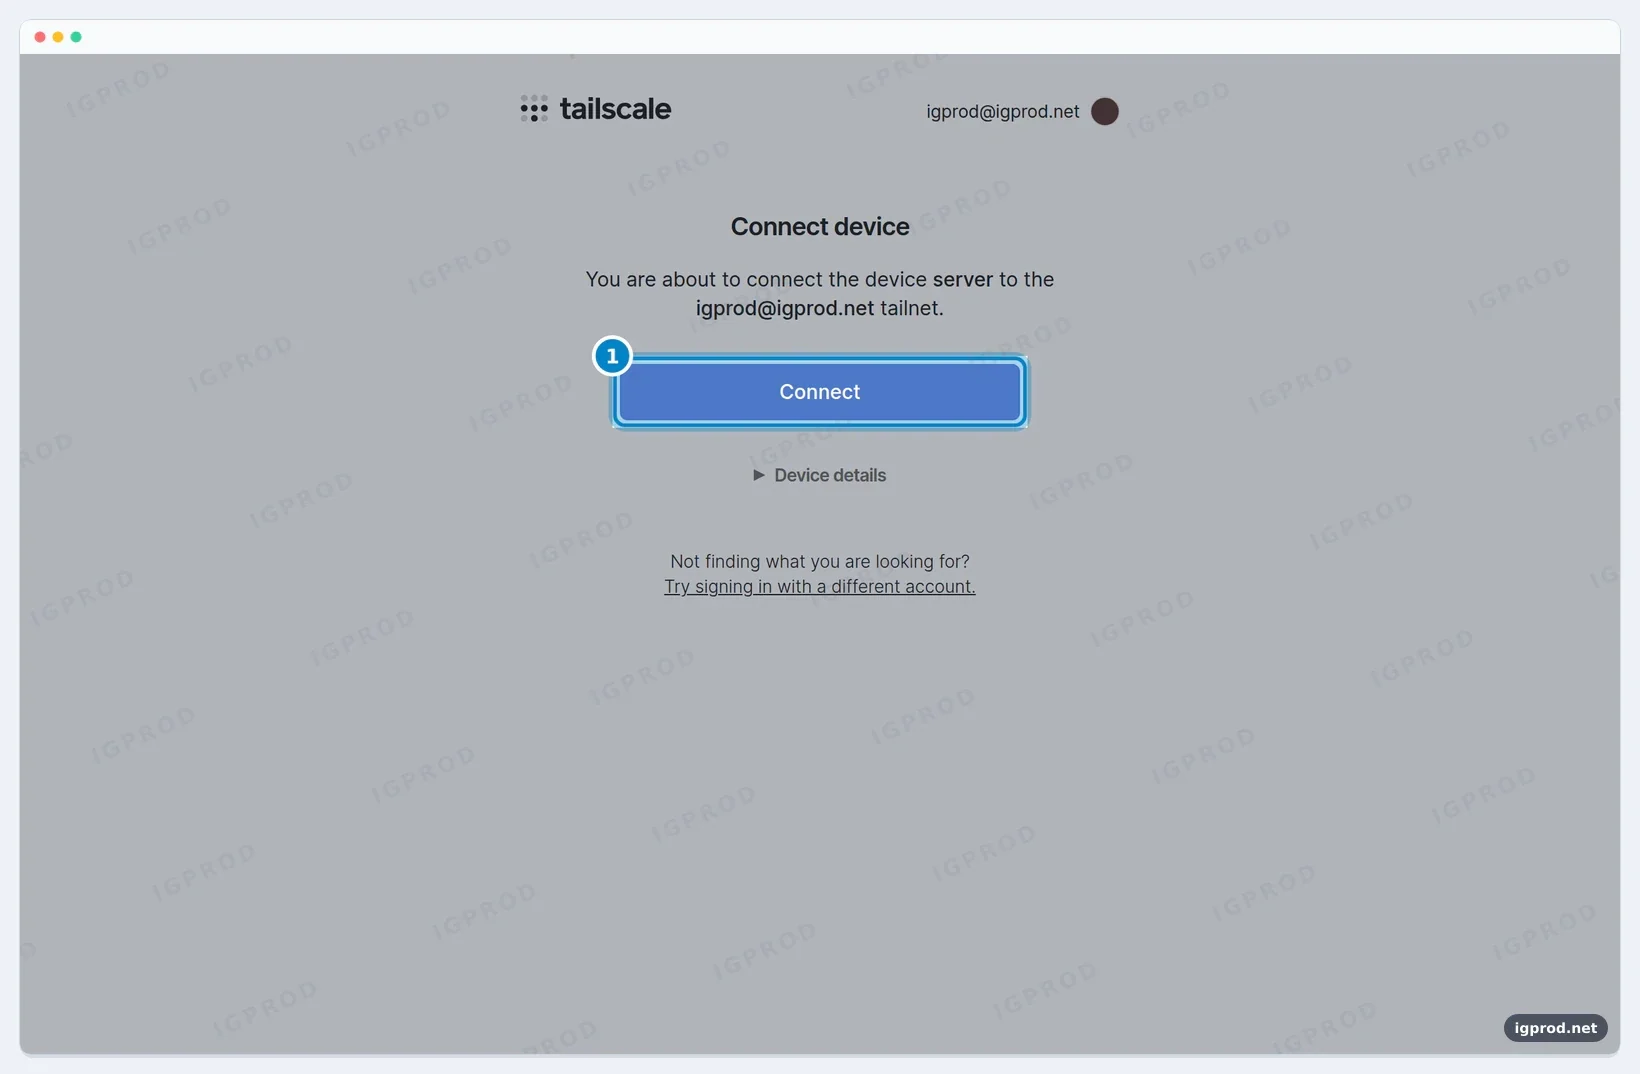
sudo tailscale up: click Connect to add the device to your tailnet.The command then prints "Success." Check the address the machine got and the devices in your tailnet:
tailscale ip -4
tailscale status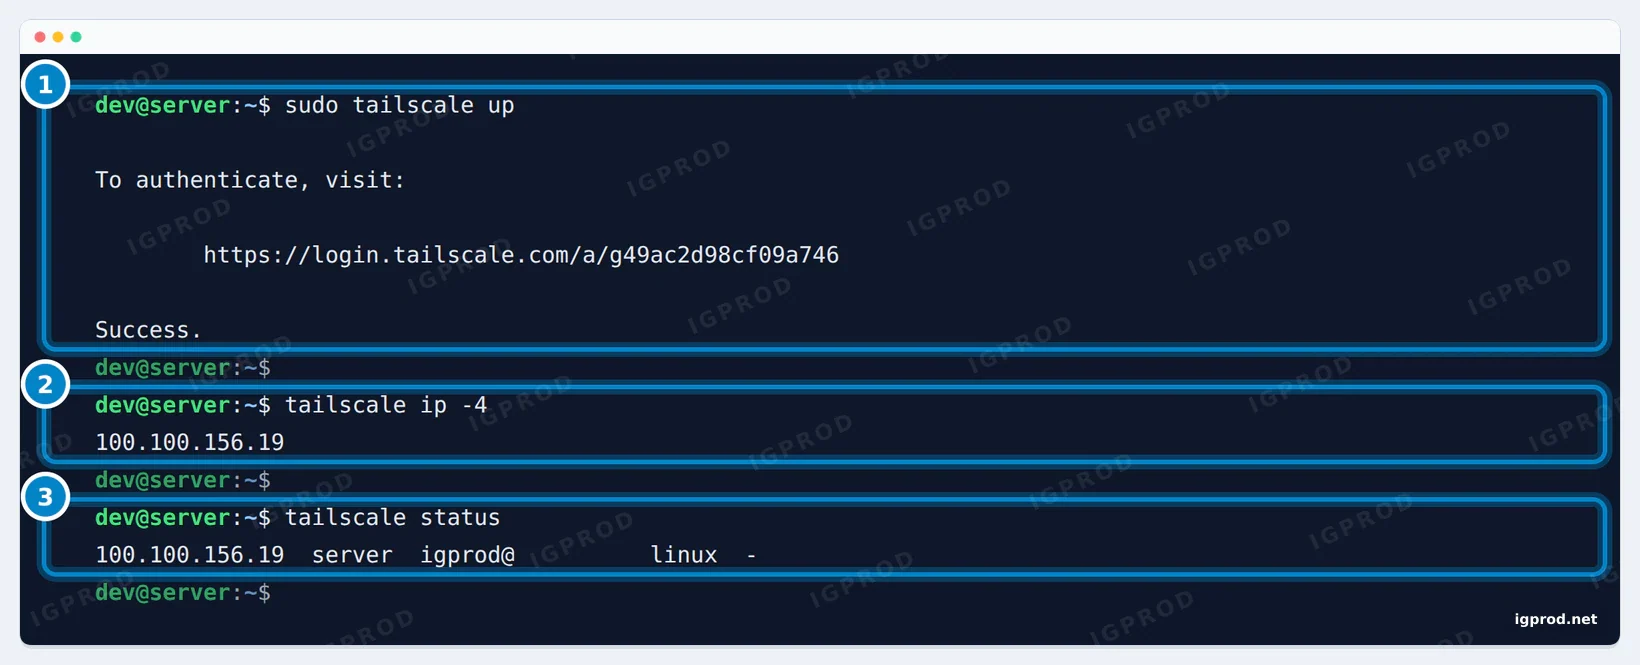
Our server got 100.100.156.19. tailscale status shows each device's address, name, owner and system; the dash means that no connection to it is active yet. The login took 54 seconds, most of it the time to open the link and click Connect. On Windows, macOS, iOS and Android, install the app from tailscale.com/download and sign in with the same account instead.
A device you log in this way has a key that expires after 180 days by default, and then has to sign in again. That is a good default for a laptop or a phone. For a server that must stay connected, open the Machines page of the admin console, then the server's menu, and select Disable key expiry. Do this only for machines you trust and keep physically safe.
Step 3: Connect a second device and use MagicDNS names
Install Tailscale on a second device and log in with the same account. We used a Linux laptop on the same local network as the server; its sudo tailscale up took 12 seconds. Then, from the laptop:
tailscale ping server
ping -c 3 server
tailscale status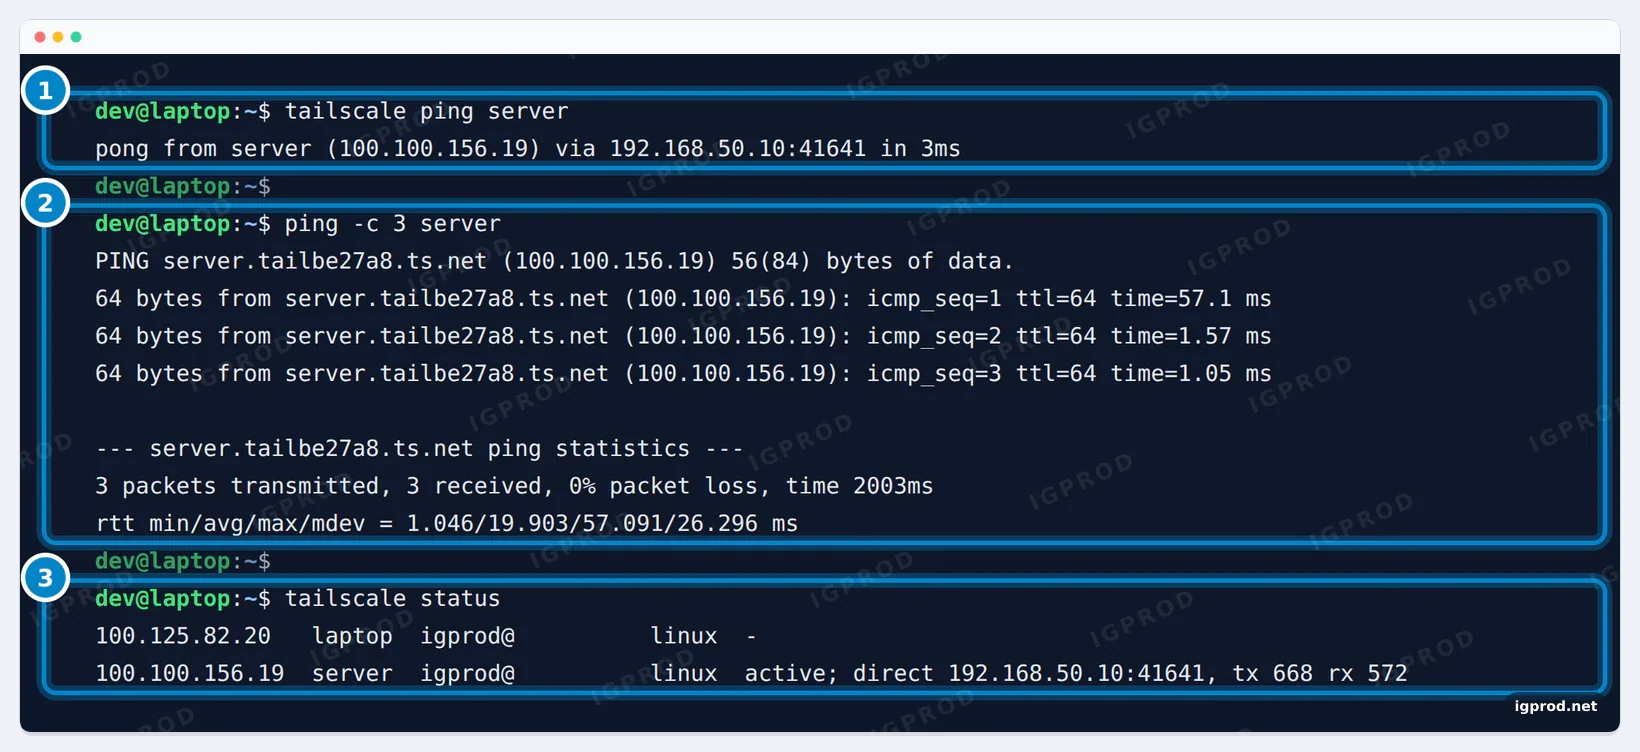
server into its tailnet address. 3: the connection is "active; direct".tailscale pinganswered "via 192.168.50.10:41641" in 3 ms: a direct path to the server's local address, on UDP port 41641. It tests the Tailscale path itself, from one tailscaled to the other.- The plain
pingworked with the short nameserver: MagicDNS resolved it toserver.tailbe27a8.ts.net, its full name in our tailnet. The first reply took 57.1 ms while the path was set up, the next ones about 1 ms. tailscale statusnow says "active; direct" for the server.
MagicDNS is on by default in tailnets created since October 2022, so there was nothing to configure.
Direct or relayed? DERP and tailscale netcheck
Tailscale first tries to connect two devices directly, using NAT traversal, which is why it usually works behind home routers without any port forwarding. When no direct path is possible, the packets go through a DERP relay server run by Tailscale. Both kinds of connection are encrypted end to end with WireGuard; the difference is speed. tailscale netcheck shows what your network allows:
tailscale netcheck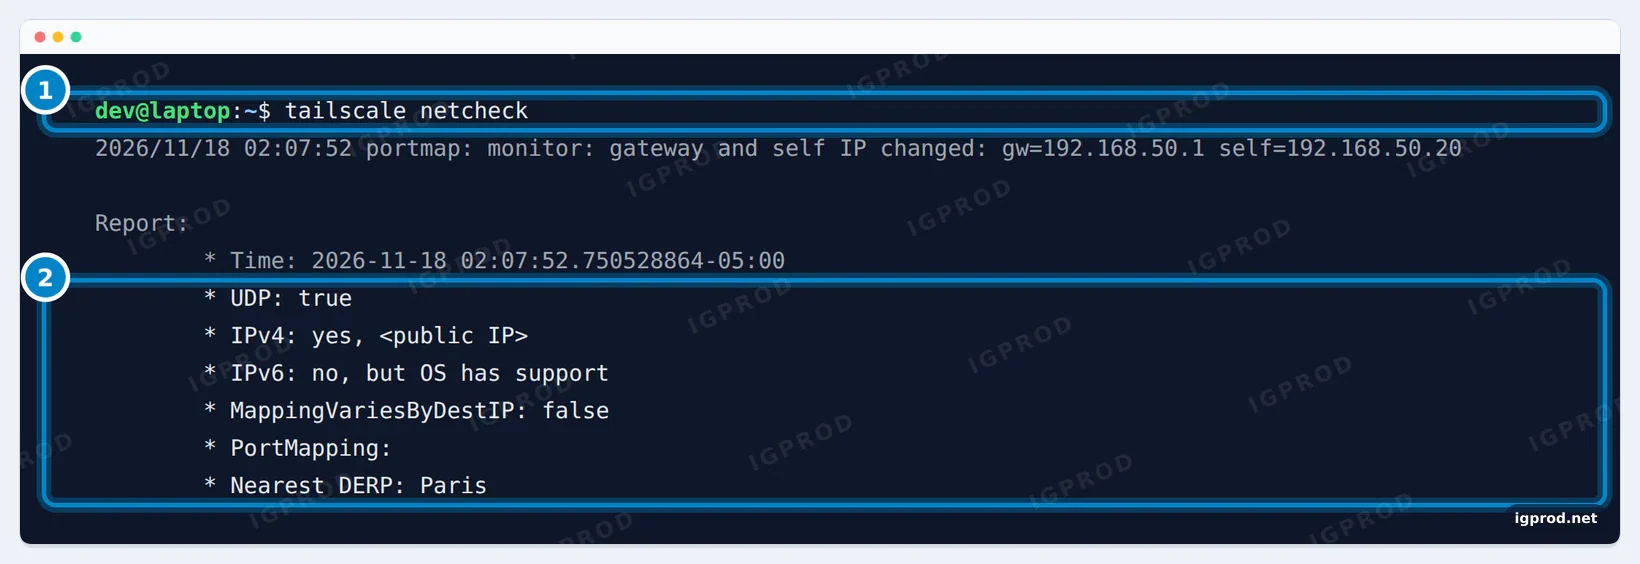
- UDP: true means the network lets UDP out. Direct connections need it.
- MappingVariesByDestIP: false means the router keeps the same public address and port whatever the destination. Tailscale's docs describe "true" as a difficult NAT, where relays are more likely.
- Nearest DERP is the relay region with the lowest latency from this device. We cut the latency list from the picture.
What happens when a network blocks UDP
Many office, school and hotel networks block UDP. To see Tailscale's fallback, we blocked all outgoing UDP on the laptop except DNS, pinged the server, then removed the rule:
sudo iptables -I OUTPUT -p udp ! --dport 53 -j DROP
tailscale ping server
tailscale status
sudo iptables -D OUTPUT -p udp ! --dport 53 -j DROP
tailscale ping server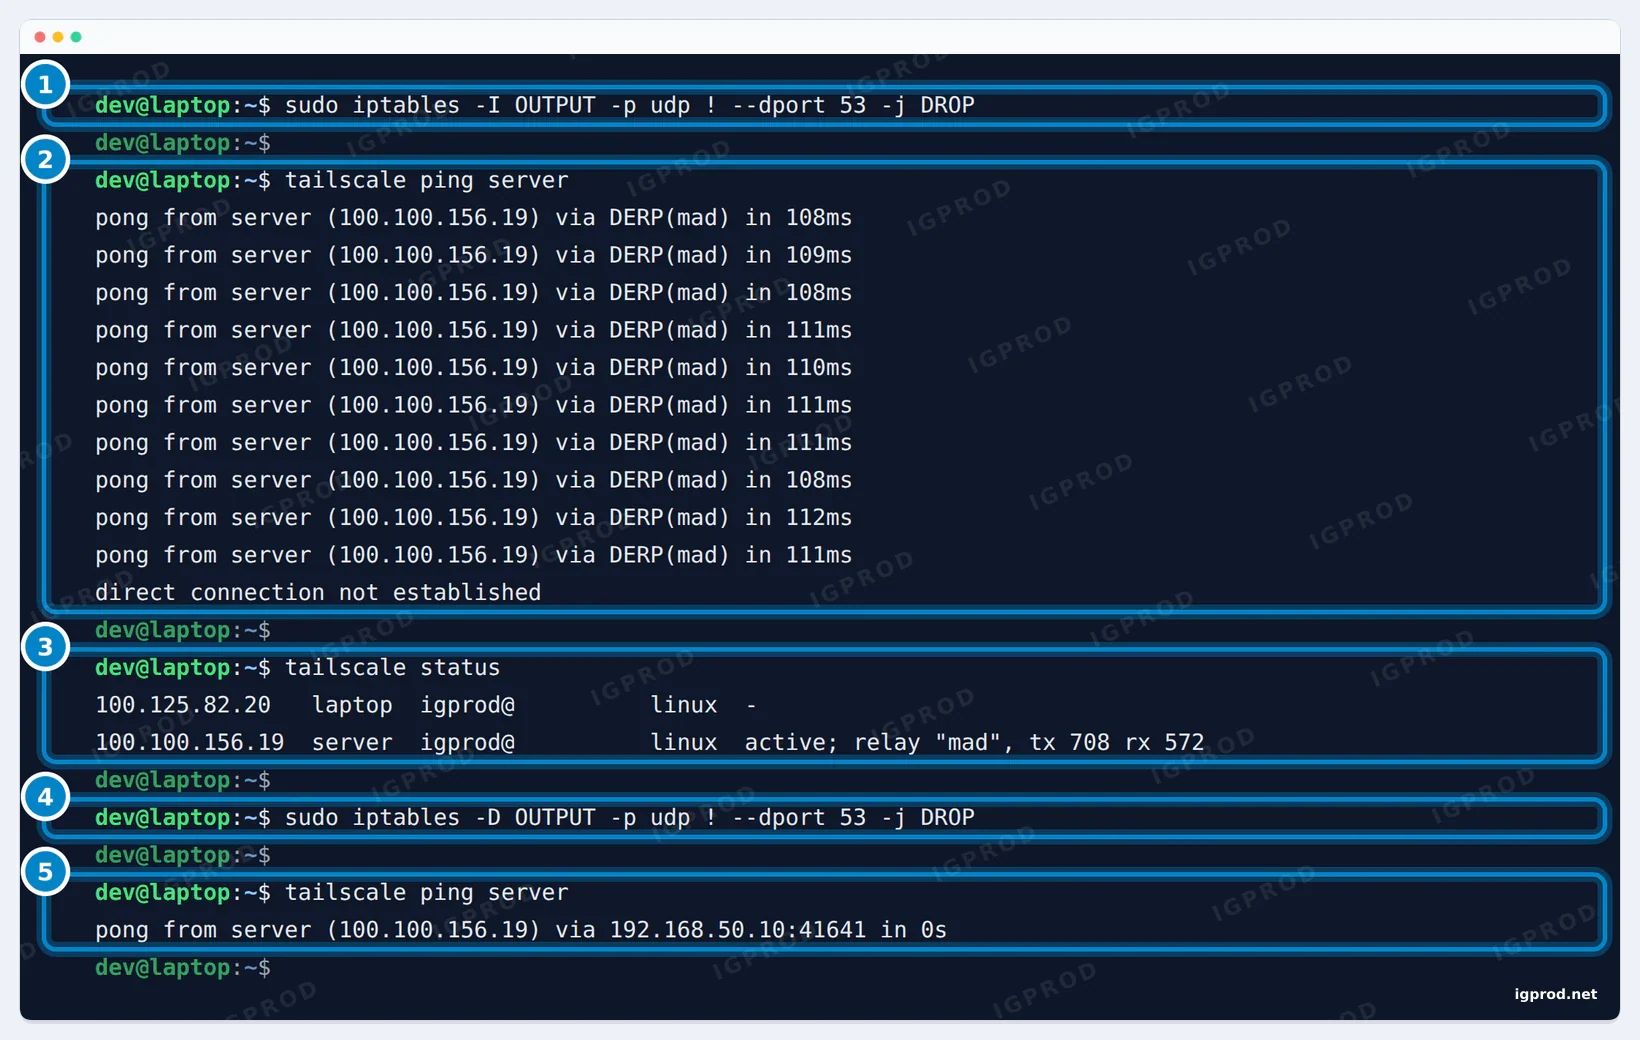
relay "mad". 4: allow UDP again. 5: direct once more.The connection kept working, but every reply came "via DERP(mad)", the Madrid relay region, in about 110 ms instead of 3 ms. After 10 replies, tailscale ping stopped with "direct connection not established", and tailscale status showed relay "mad" instead of "direct". As soon as UDP was allowed again, the next ping was direct.
Why Madrid, when netcheck named Paris as the nearest region? Each device chooses a home DERP region from its latency measurements and shares that choice with the others. Both our machines had chosen Madrid (tailscale status --json showed "Relay": "mad" for each), so the relayed packets went through Madrid. If a network you control keeps your devices on a relay, allow outgoing UDP; Tailscale's docs also suggest making sure that UDP port 41641 is not blocked.
Step 4: Turn on Tailscale SSH
Tailscale SSH lets you log in to a machine over the tailnet without passwords or SSH keys: Tailscale checks who you are and what the policy allows. Turn it on on the server:
sudo tailscale set --sshThen connect from the laptop with the normal ssh client:
ssh dev@server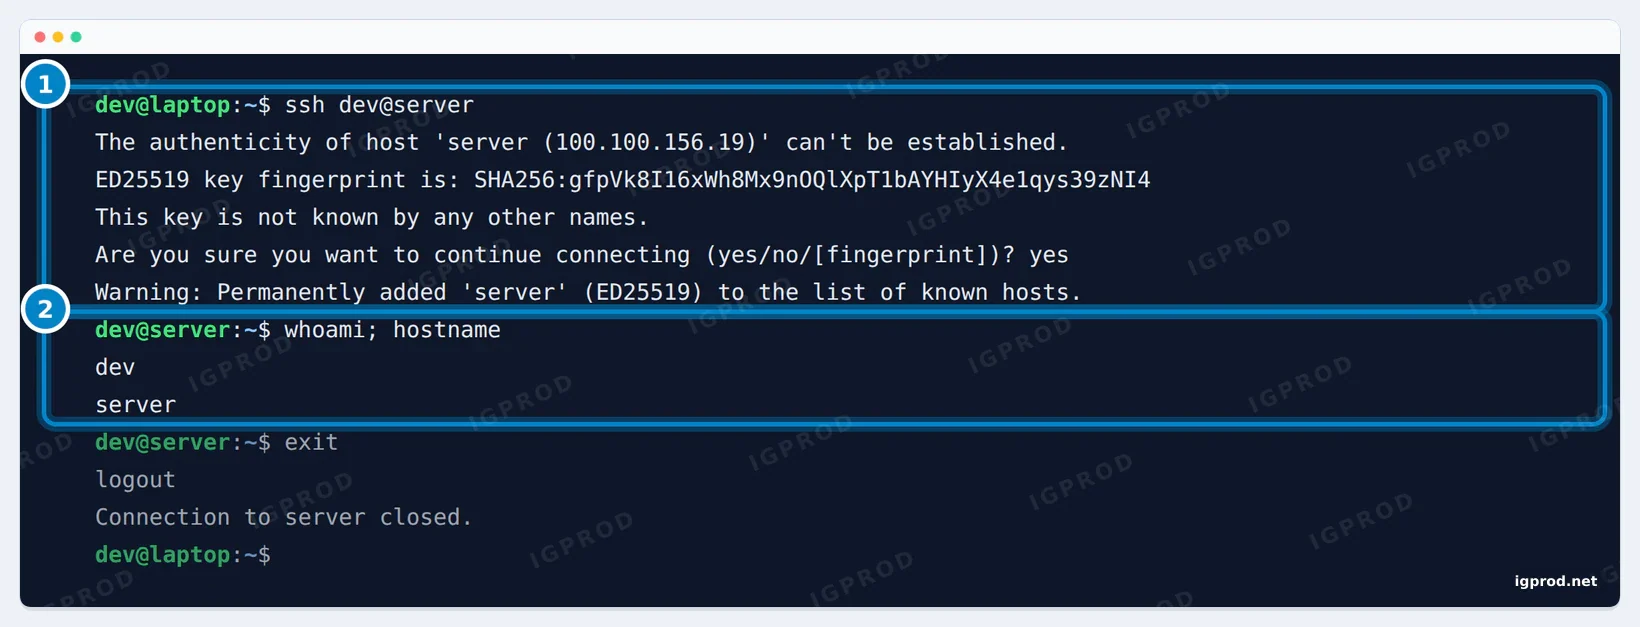
The first connection asked about the host key, as with any new SSH server. After "yes" we were in, with no password and no key in ~/.ssh. Three details matter:
- Tailscale takes over port 22 only for connections that come from the tailnet, according to its docs. An OpenSSH server on the machine keeps answering on the local network, so you do not lock yourself out by turning this on.
- The default policy has an SSH rule with
"action": "check": Tailscale may ask you to sign in again in a browser before the connection opens, and after that it does not ask again for 12 hours by default. We got no check prompt, most likely because we had signed in to the tailnet a few minutes before. - The same rule lets you log in as any user, root included, but only on your own devices (
autogroup:self). Step 7 keeps it unchanged.
Step 5: Send your internet traffic through your server (exit node)
An exit node is a device that forwards the internet traffic of other devices. On public Wi-Fi, your laptop's traffic then leaves from your home server or VPS instead of the café's network. On Linux, turn on IP forwarding first, then offer the machine as an exit node:
echo 'net.ipv4.ip_forward = 1' | sudo tee -a /etc/sysctl.d/99-tailscale.conf
echo 'net.ipv6.conf.all.forwarding = 1' | sudo tee -a /etc/sysctl.d/99-tailscale.conf
sudo sysctl -p /etc/sysctl.d/99-tailscale.conf
sudo tailscale set --advertise-exit-node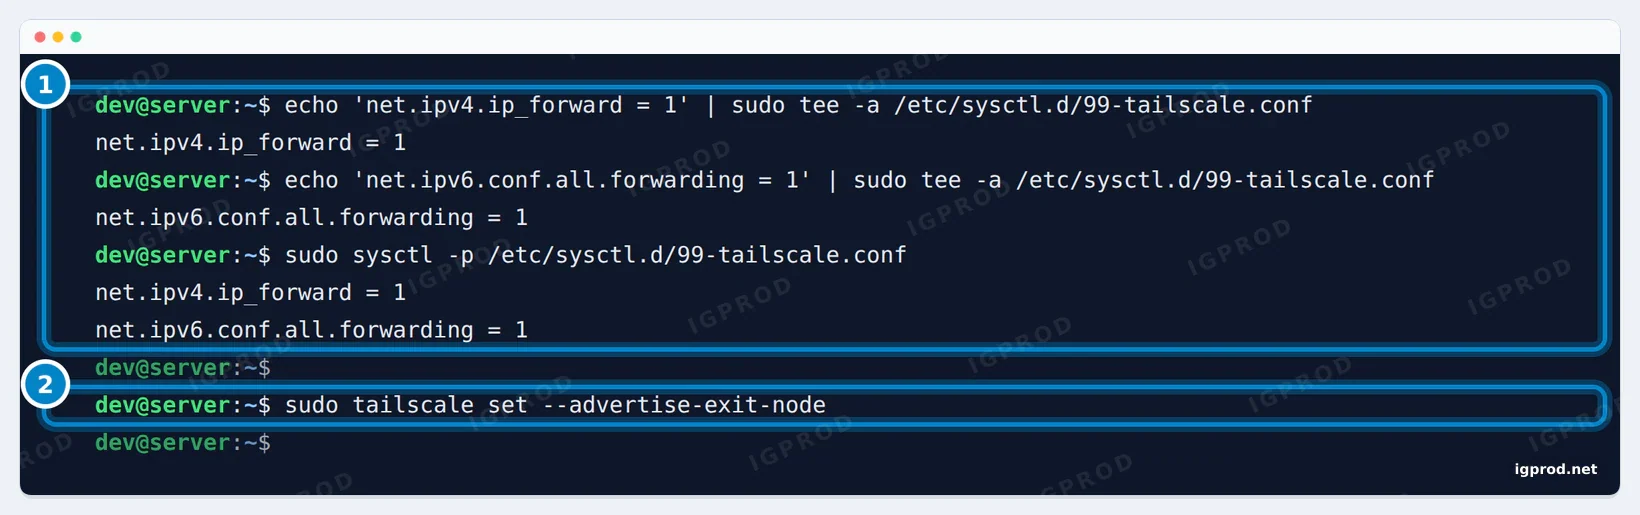
Without the forwarding lines, Tailscale's health check warns: "Subnet routing is enabled, but IP forwarding is disabled. Check that IP forwarding is enabled on your machine." The server is not an exit node yet: an admin has to approve it. On the Machines page, open the server's menu and select Edit route settings:
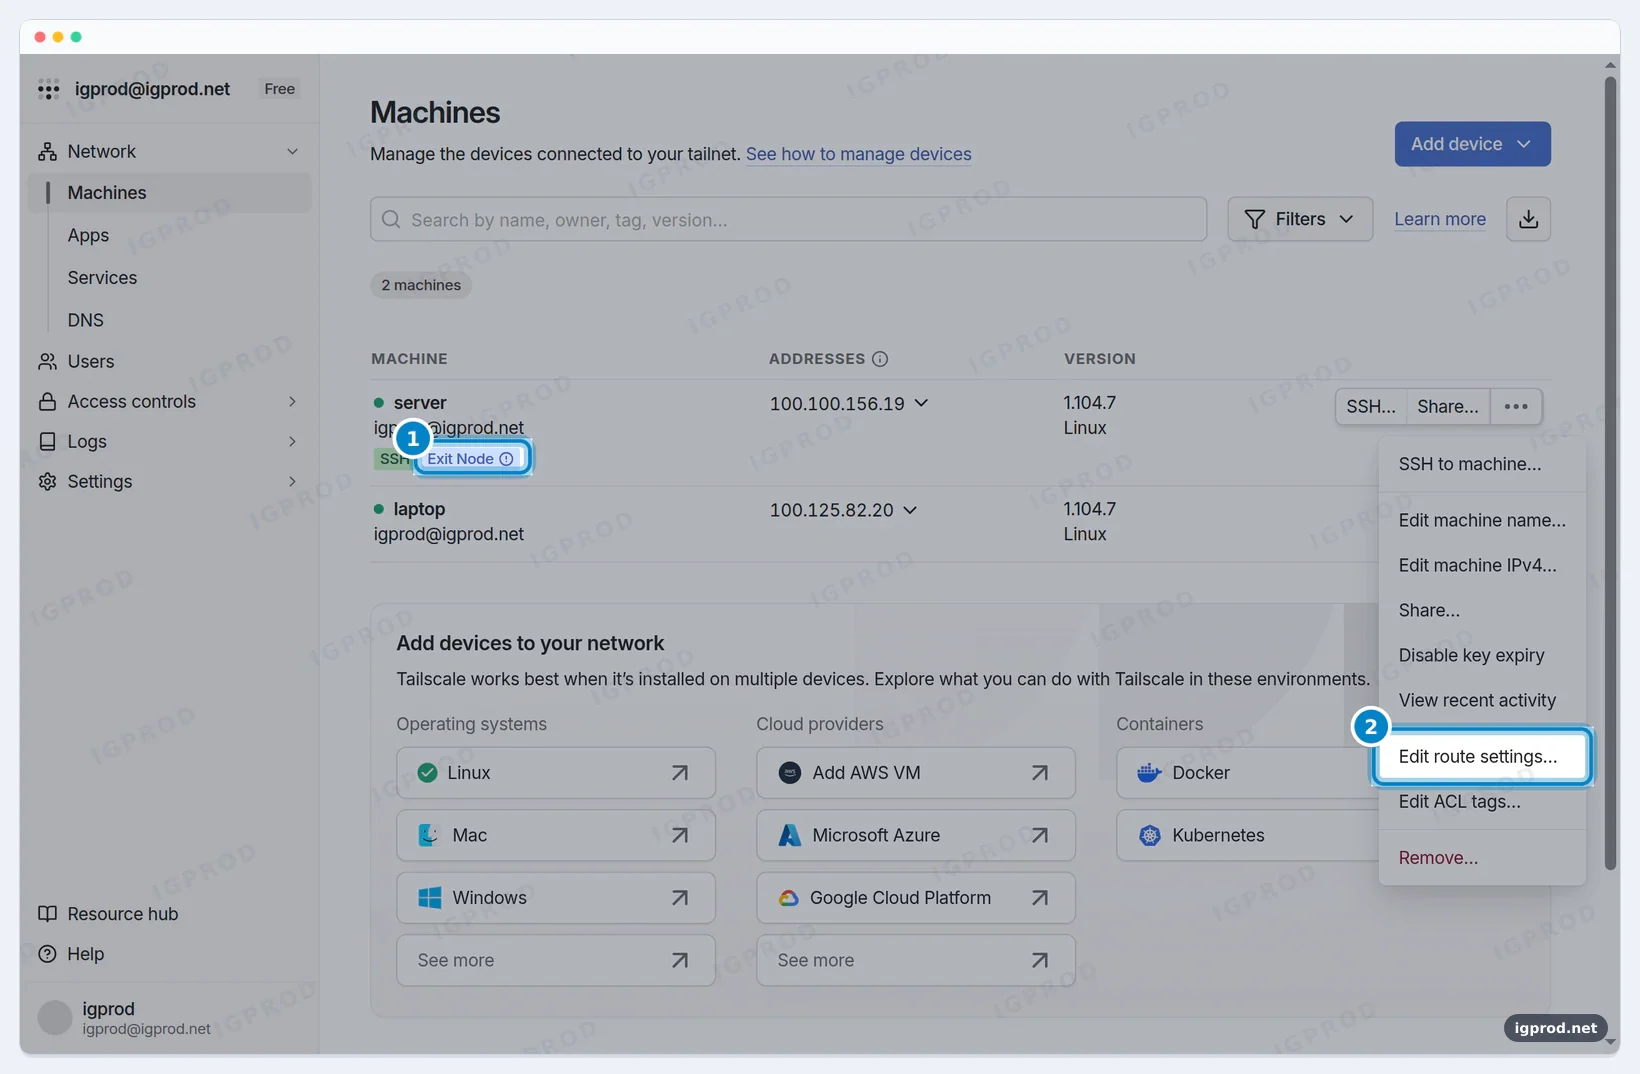
Check Use as exit node, then save:
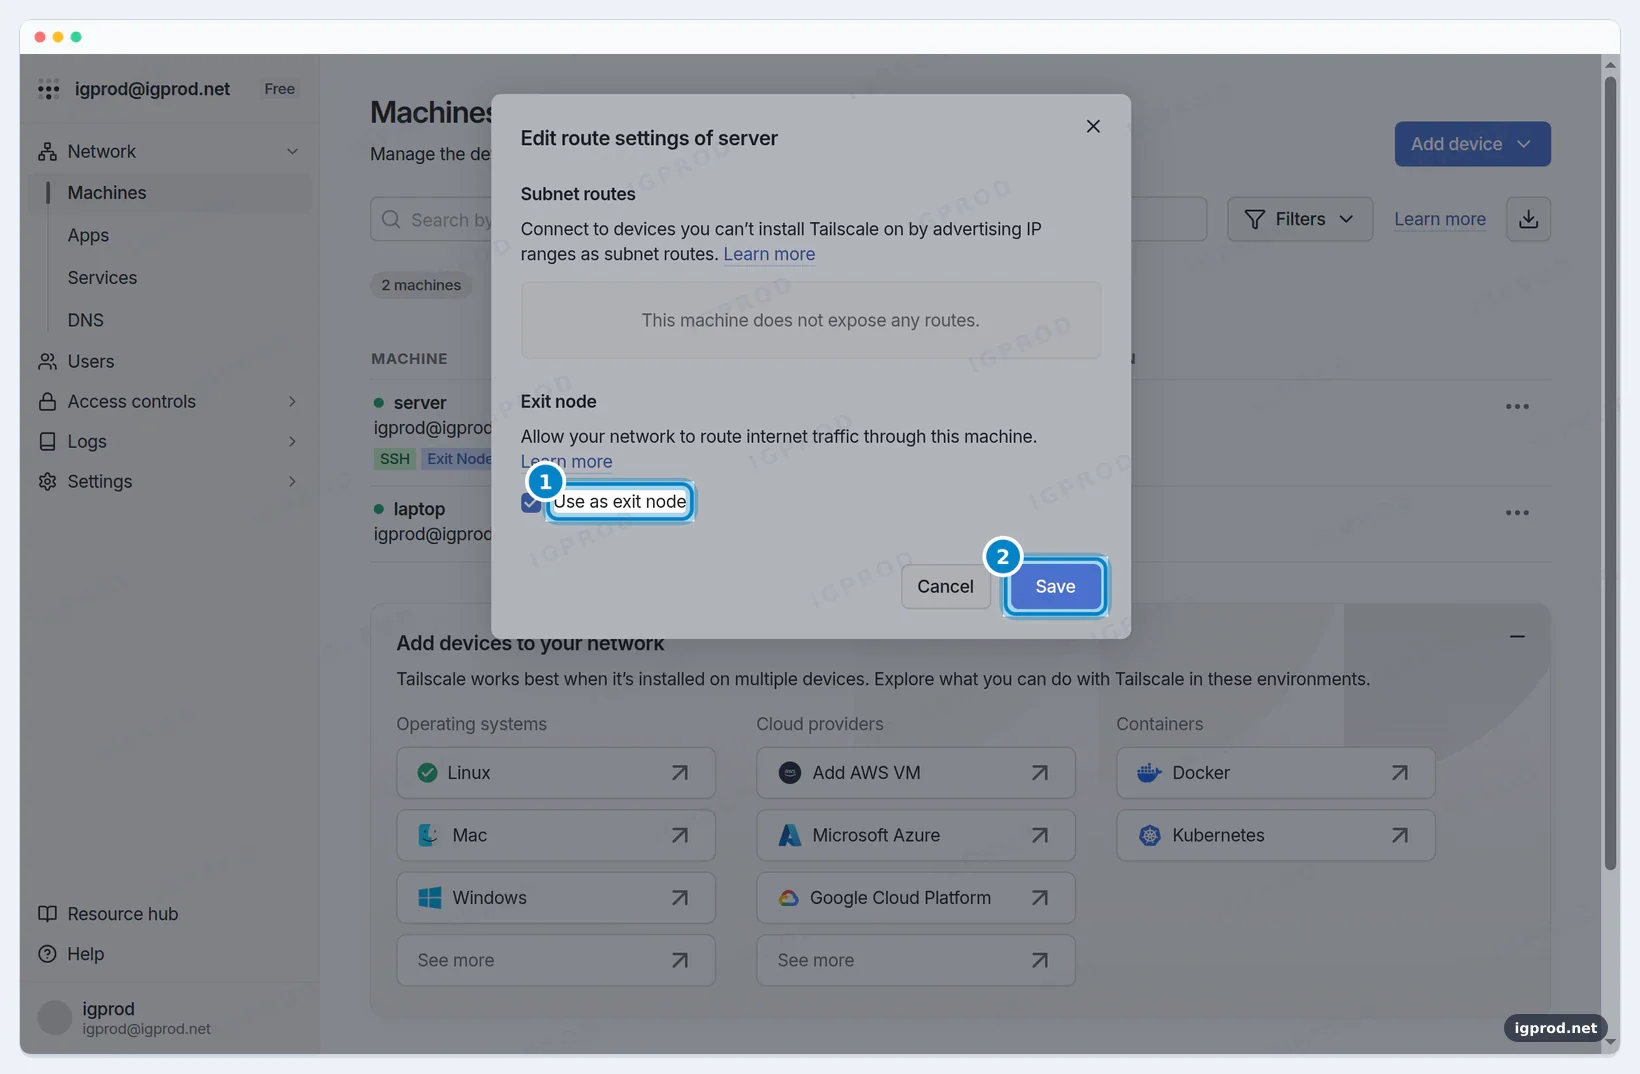
Now choose it on the laptop and check the route to the internet:
tailscale exit-node list
sudo tailscale set --exit-node=server
tailscale status
traceroute -n -q 1 -m 2 1.1.1.1
sudo tailscale set --exit-node=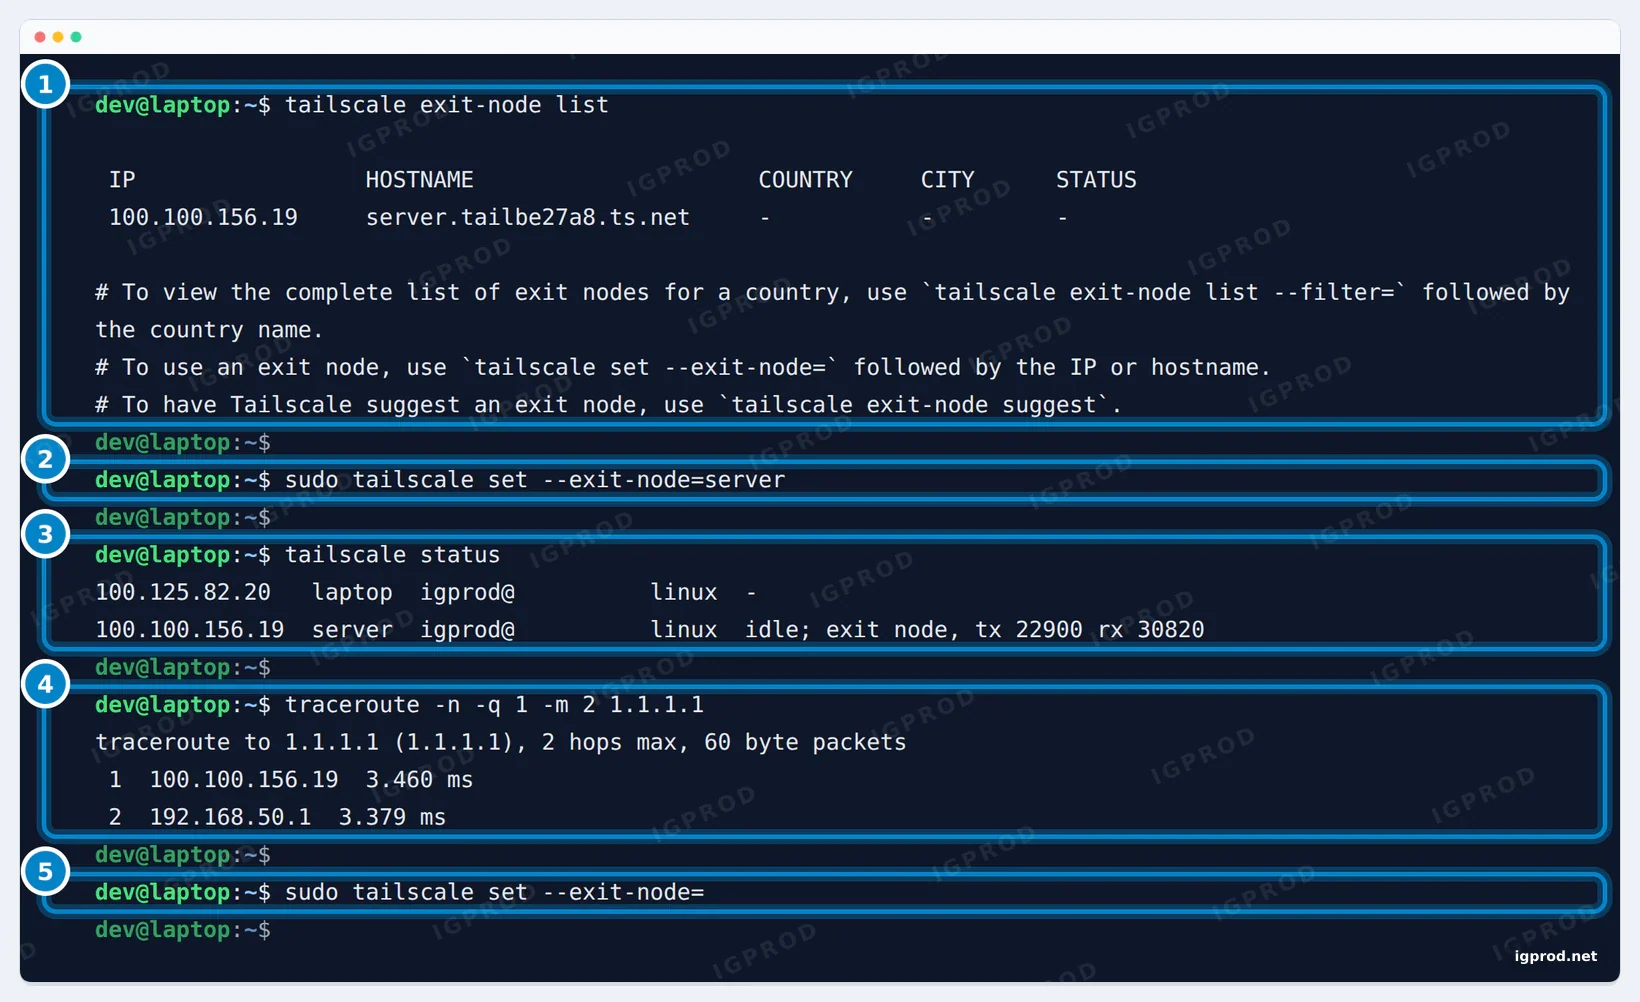
The server's status line says "exit node", and the first hop of the traceroute is the server's Tailscale address, 100.100.156.19: the laptop's traffic now leaves through the server. The last command, with an empty value, stops using the exit node. If you still need printers and other local devices while you use an exit node, add --exit-node-allow-lan-access=true to the set command.
Step 6: Put a Docker app on your tailnet with HTTPS and no open port
You could install Tailscale on the Docker host and publish the app's port, but then the app listens on the host's other networks too. A cleaner pattern gives the app its own Tailscale container, a sidecar: the app shares that container's network, gets its own name and address in the tailnet, and publishes no port at all. It suits any web app you do not want on the internet, such as a password manager like Vaultwarden or the dashboard of an AI agent like OpenClaw. We used nginx; put your own image in its place.
Declare a tag and create an auth key
A container cannot open a browser to log in, so it uses an auth key. Give the key a tag: the device then belongs to the tag instead of to you, which lets the policy in Step 7 treat containers differently from people, and its key expiry is turned off. A tag must be declared in the policy file before you can use it. In the admin console, open Access controls, then the JSON editor, and add this block at the top of the file, inside the outer braces:
"tagOwners": {
	"tag:container": ["autogroup:admin"],
},
Then open Settings, Keys, and select Generate auth key:
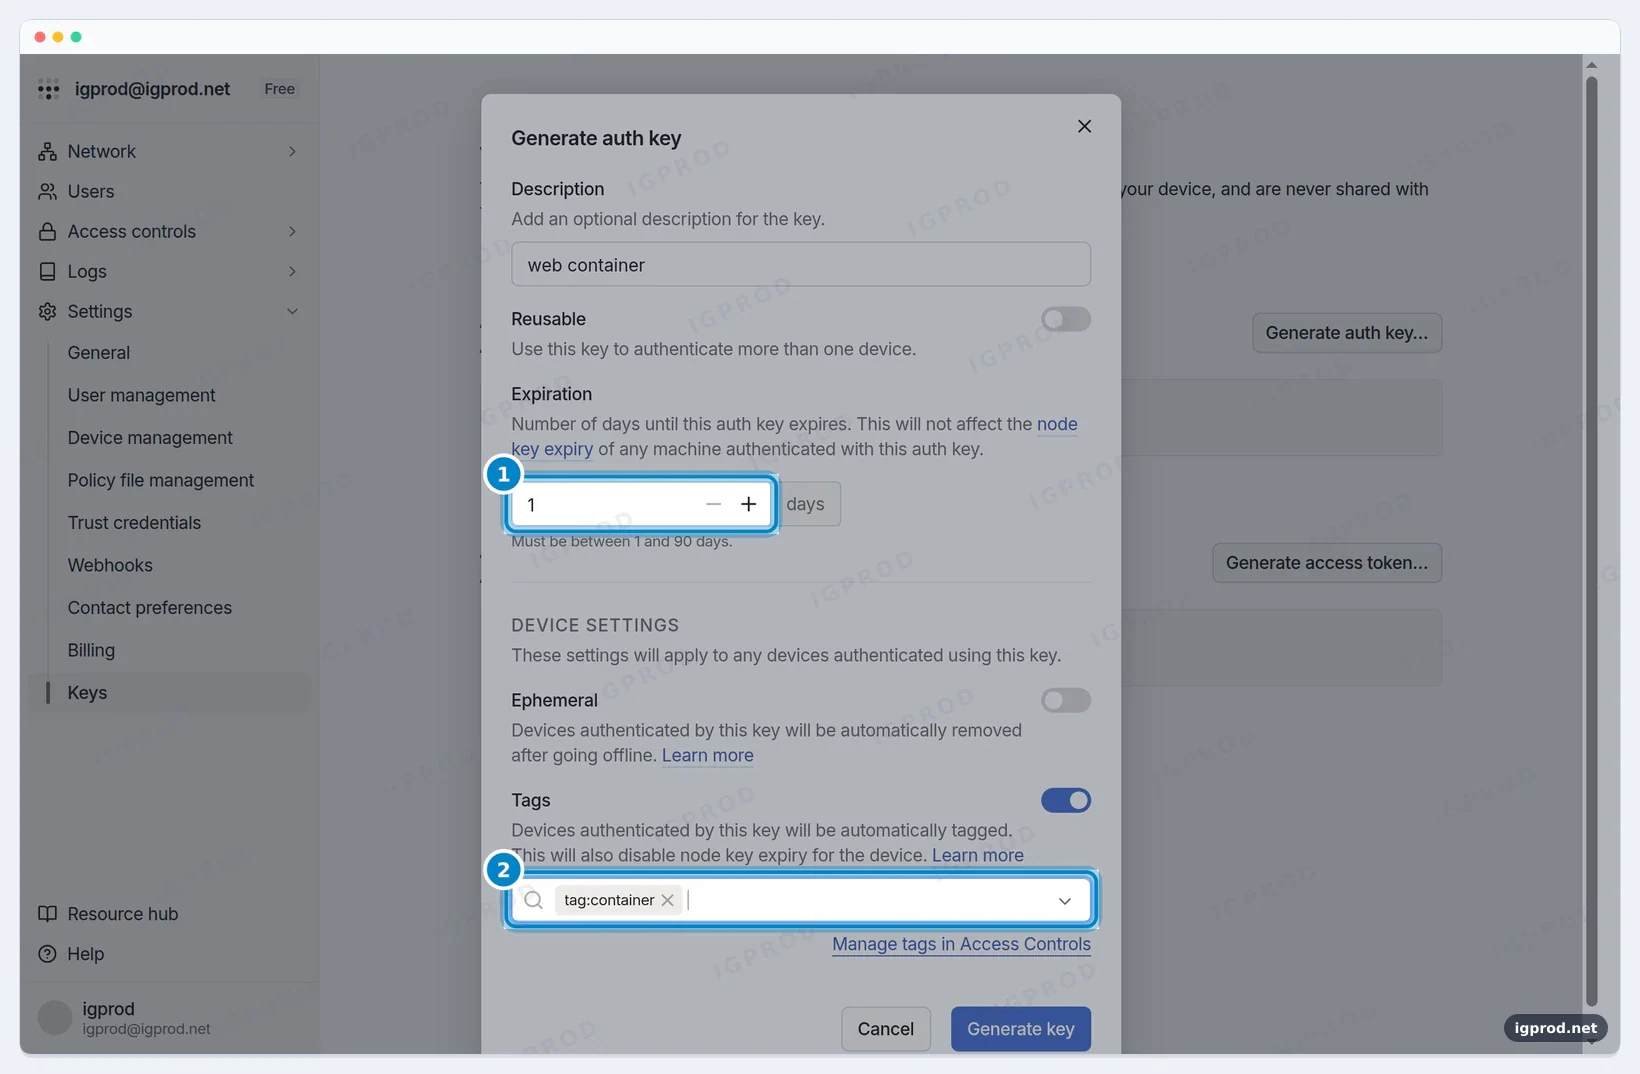
- Reusable: off. A one-off key adds one device, so a copy that leaks later is useless.
- Expiration: 1 day, the shortest (the range is 1 to 90 days). The key only has to live until the container's first start.
- Tags:
tag:container. As the dialog says, a tag also turns off key expiry for the device. - Description: letters, digits and spaces only. Our first try, with "(Docker)" in it, was refused with "Only alphanumeric characters are allowed."
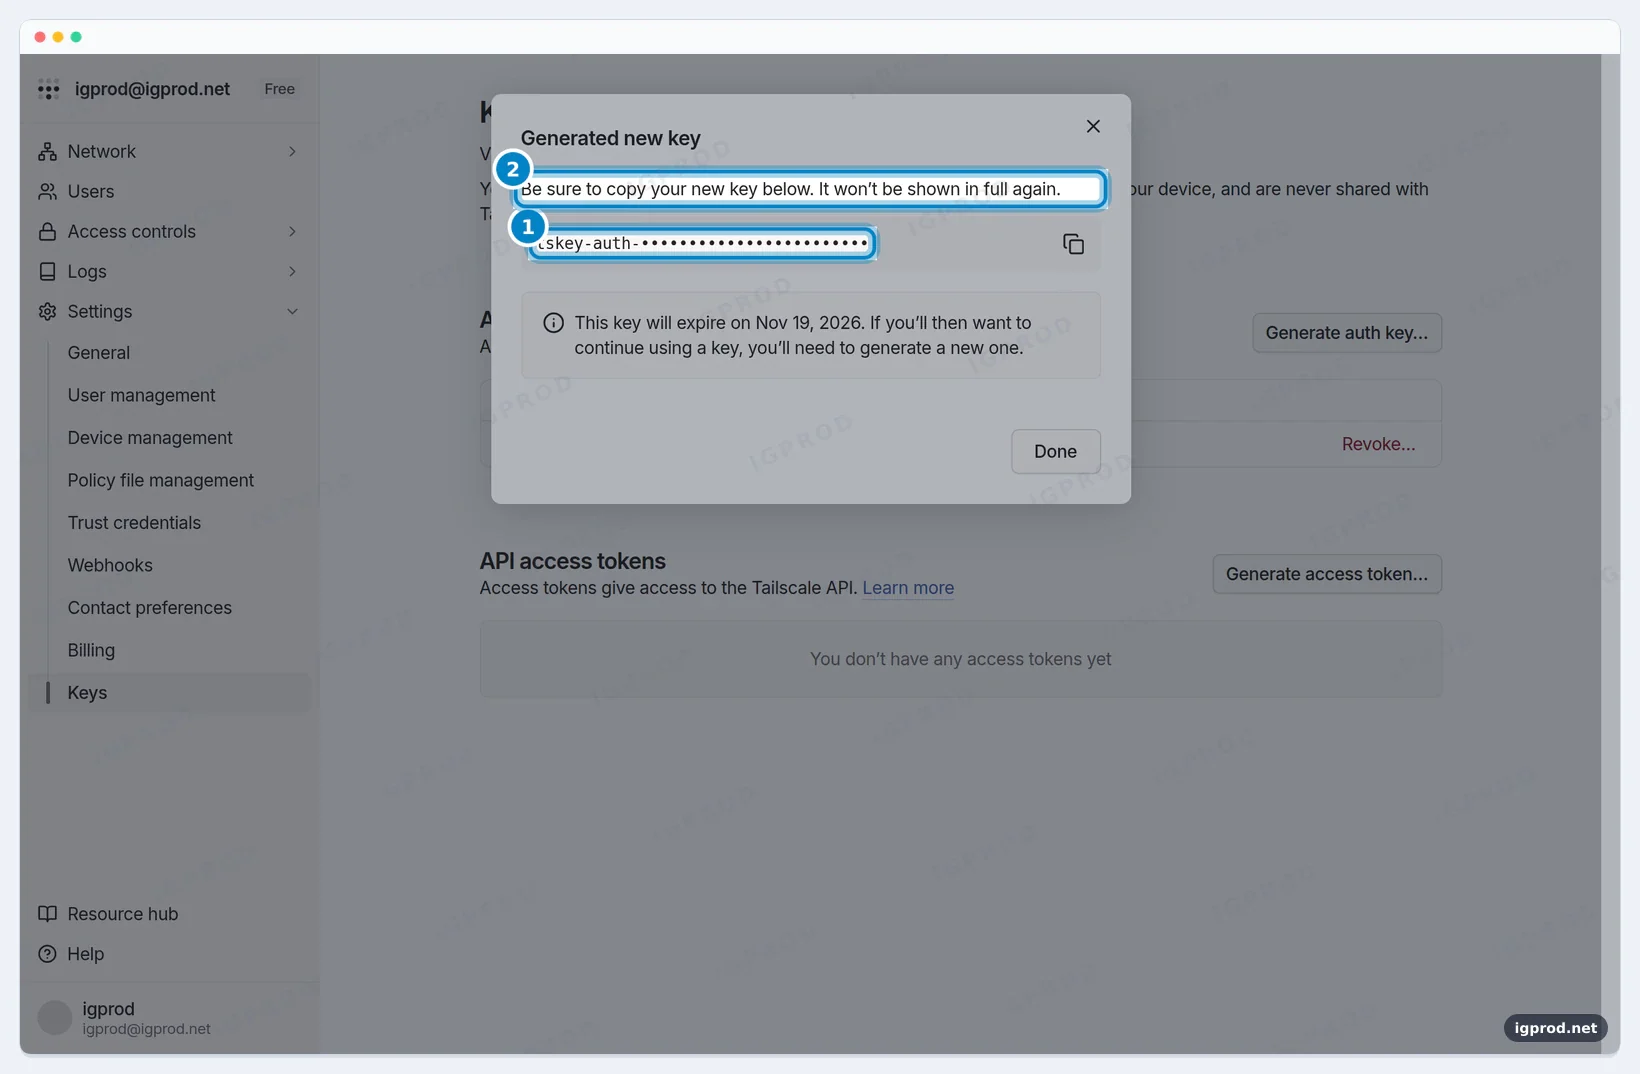
The key is shown once. Put it in a file named .env next to the compose file, readable by you only, and never in compose.yaml:
mkdir -p ~/web && cd ~/web
install -m 600 /dev/null .env
nano .env
The file holds one line, with your key in place of the dots:
TS_AUTHKEY=tskey-auth-...The compose file
Save this as compose.yaml in the same folder:
services:
  tailscale:
    image: tailscale/tailscale:v1.104.7
    hostname: web                       # the machine name in your tailnet: https://web.<tailnet>.ts.net
    environment:
      - TS_AUTHKEY=${TS_AUTHKEY}        # from .env, never written here
      - TS_STATE_DIR=/var/lib/tailscale
      - TS_AUTH_ONCE=true               # use the key once; restarts reuse the saved state
    volumes:
      - ./tailscale-state:/var/lib/tailscale
    restart: unless-stopped

  nginx:
    image: nginx:1.30-alpine
    network_mode: service:tailscale     # no "ports:": reachable only through Tailscale
    depends_on:
      - tailscale
    restart: unless-stopped
hostname: webbecomes the device name in the tailnet.TS_AUTHKEY=${TS_AUTHKEY}takes the key from.env, which Docker Compose reads on its own.TS_STATE_DIRand the./tailscale-statefolder keep the device's identity across restarts and image updates. Without them, every new container would join as a new device.TS_AUTH_ONCE=truelogs in with the key only when the saved state is not logged in yet. The default, false, forces a login every time the container starts, and a one-off key works only once.network_mode: service:tailscaleputs nginx in the network of the Tailscale container. There is noports:section, so nothing is published on the host.- Both images are pinned to a version. The examples in Tailscale's docs use
tailscale/tailscale:latest; with a pinned tag, an update happens only when you change it, after reading the release notes.
Start it and check. If docker compose up -d is new to you, our guide to docker compose up covers detached mode and the common start errors.
docker compose up -d
docker compose ps --format "table {{.Service}}\t{{.Status}}\t{{.Ports}}"
docker compose exec tailscale tailscale status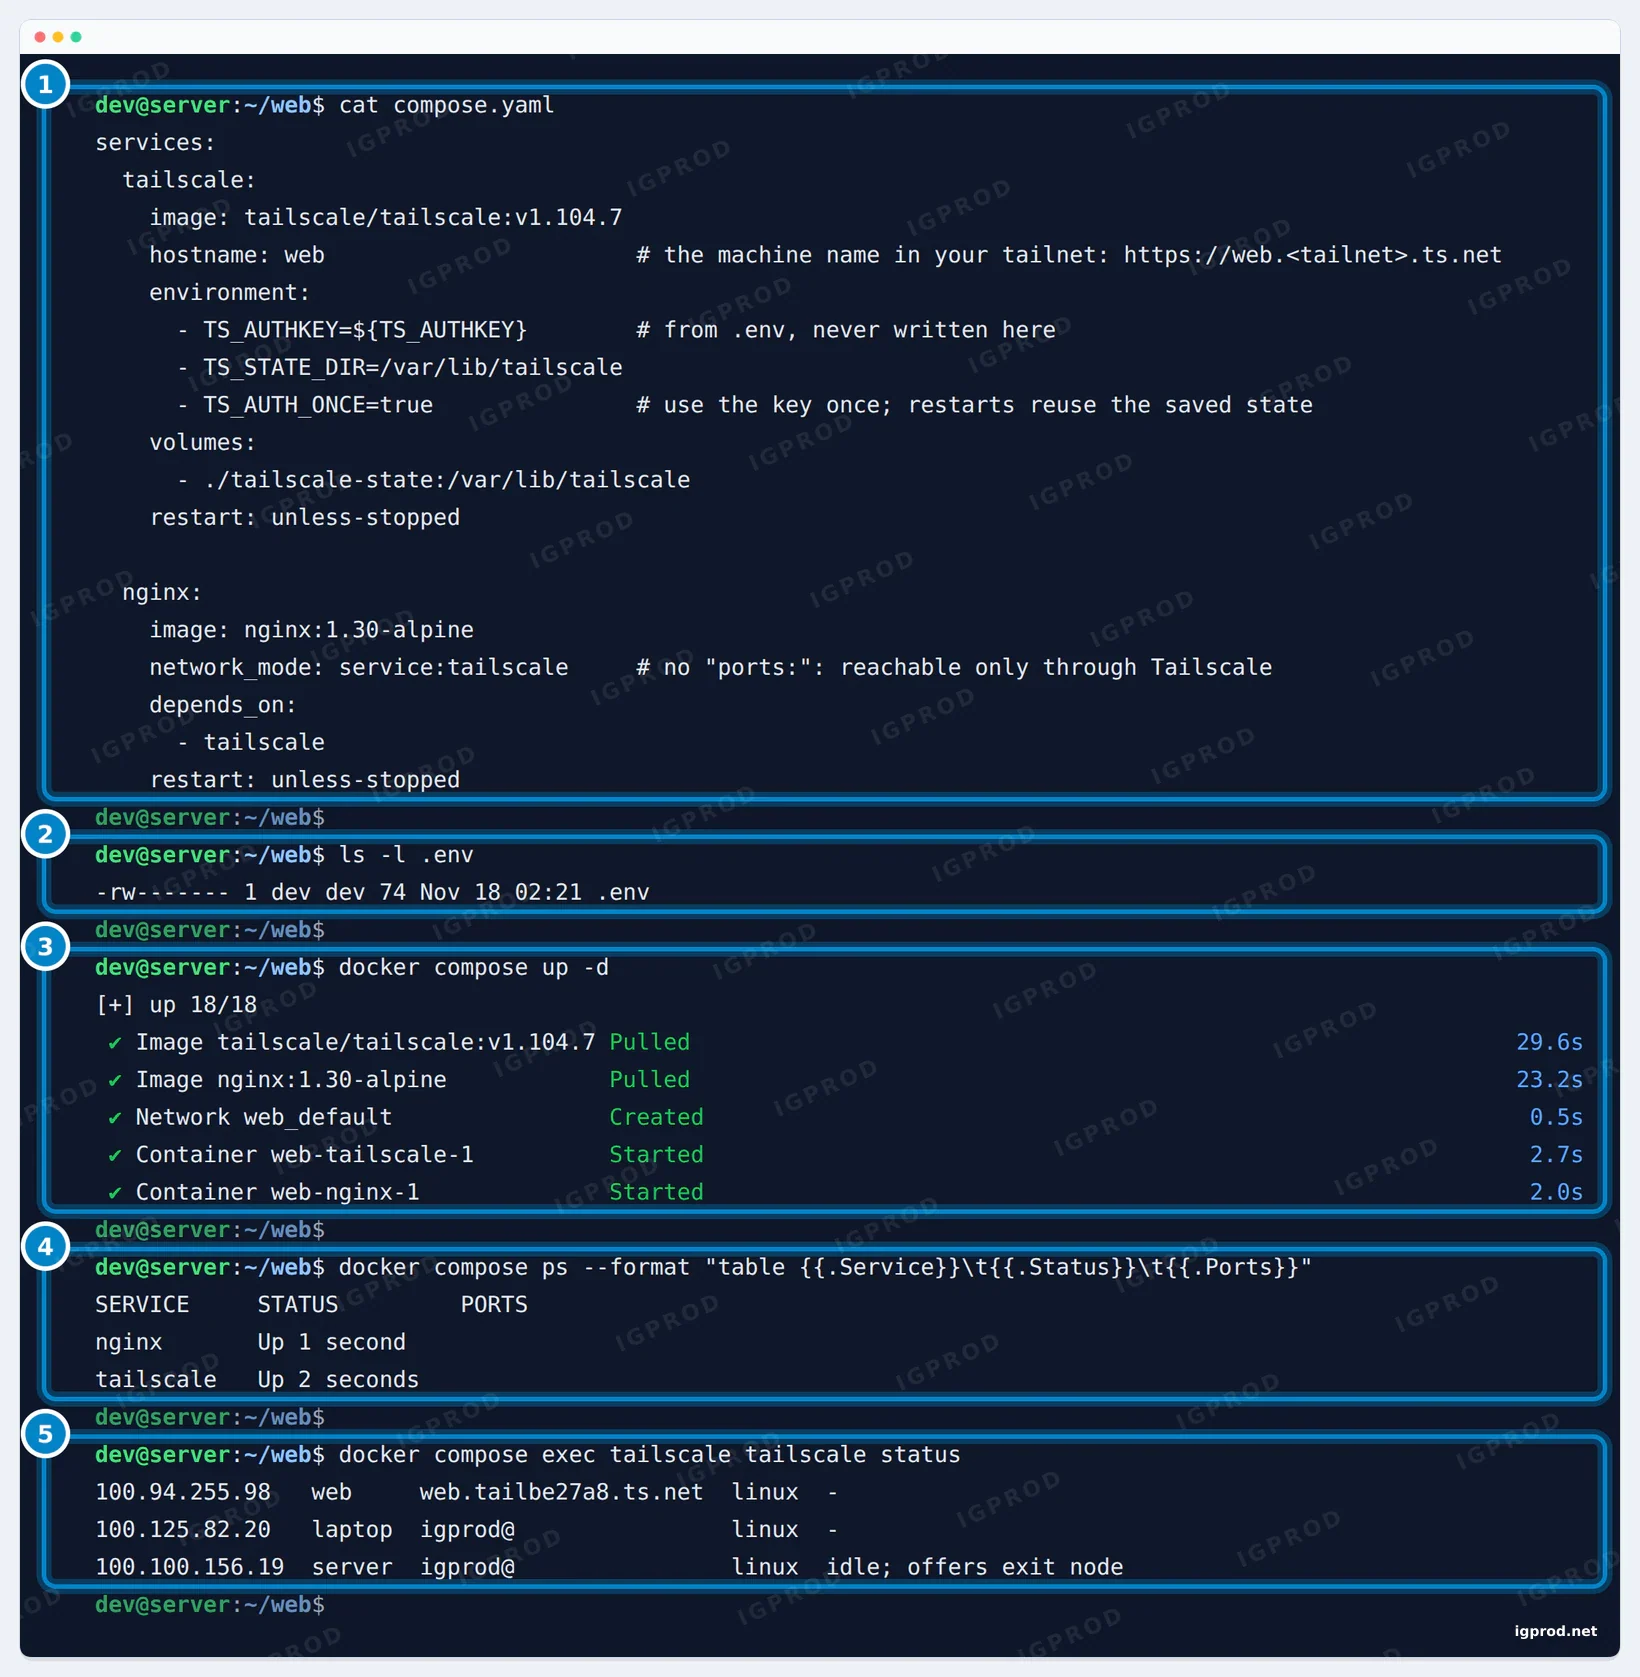
web in the tailnet.The images were pulled and both containers started in 34 seconds. The PORTS column is empty, and the new device web got 100.94.255.98. On the Machines page, it shows its tag where other devices show their owner.
Turn on HTTPS and share the app with Tailscale Serve
Tailscale can get a real Let's Encrypt certificate for each device name. Turn the feature on once, on the DNS page of the admin console, under HTTPS Certificates:
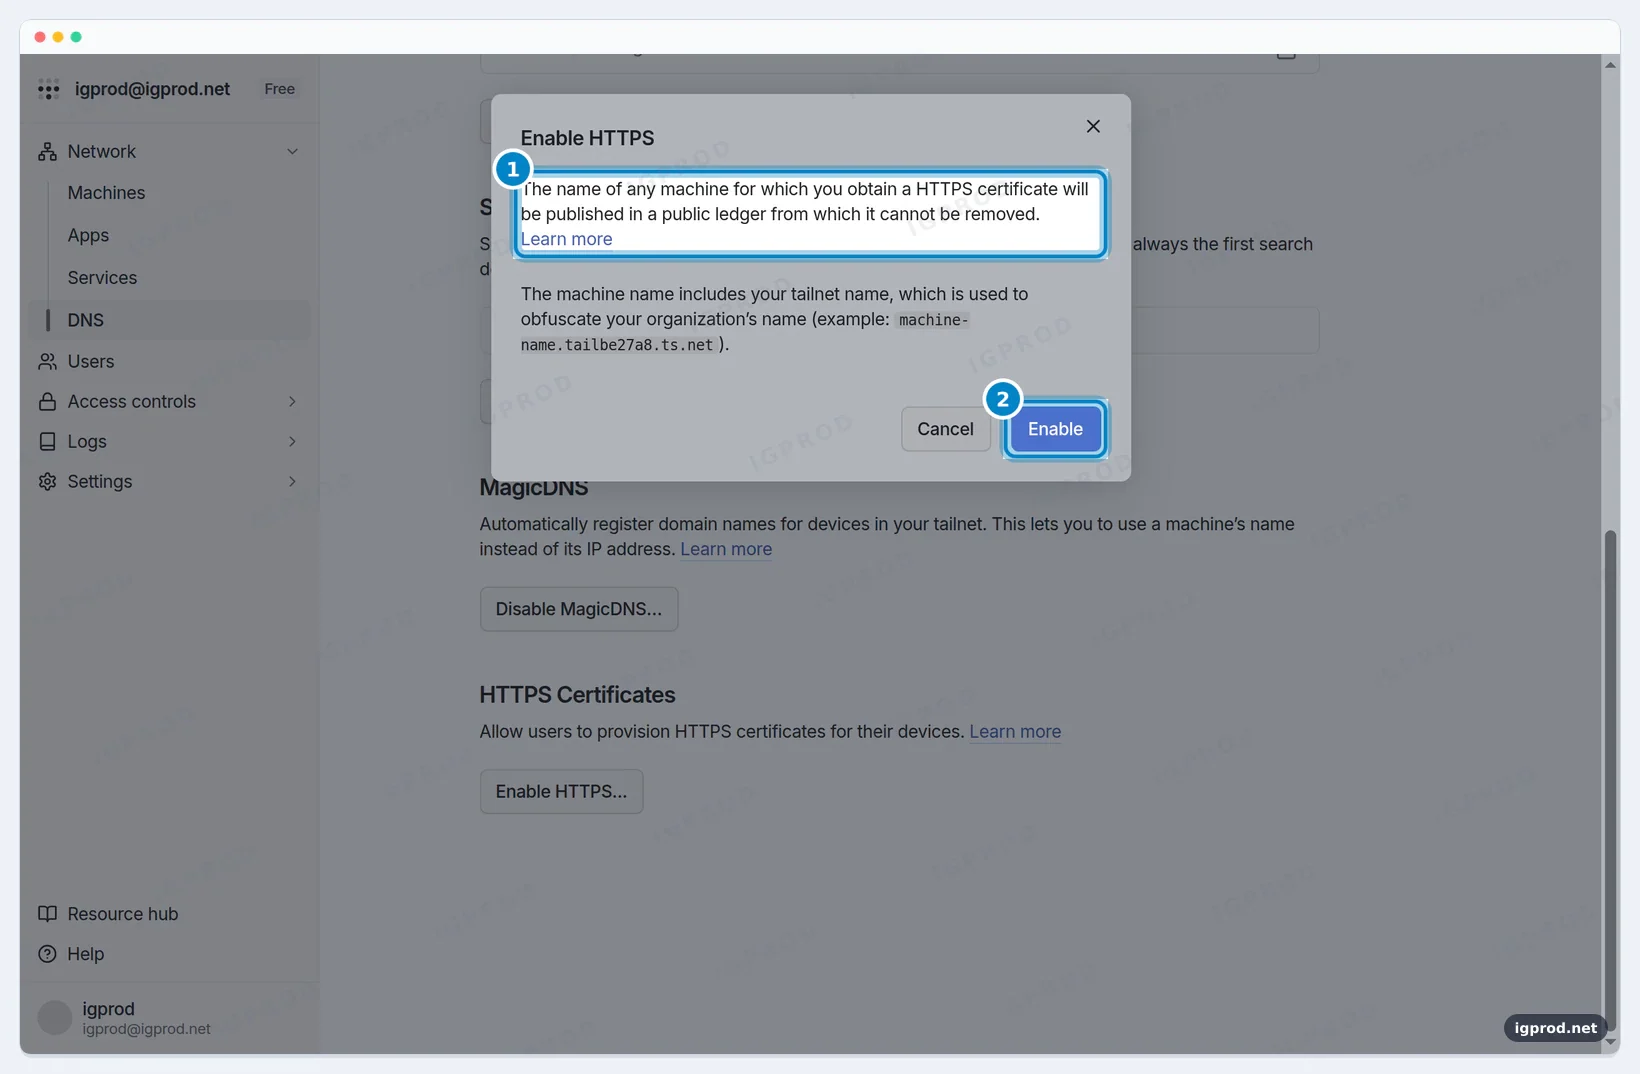
Read the warning before you click: every public certificate is recorded in the Certificate Transparency logs, so the name of each device you get a certificate for, with your tailnet name, becomes public for good. Name devices with that in mind: web is fine, a client's name or a project's code name is not. Then tell the Tailscale container to serve the app over HTTPS:
docker compose exec tailscale tailscale serve --bg 80
docker compose exec tailscale tailscale serve status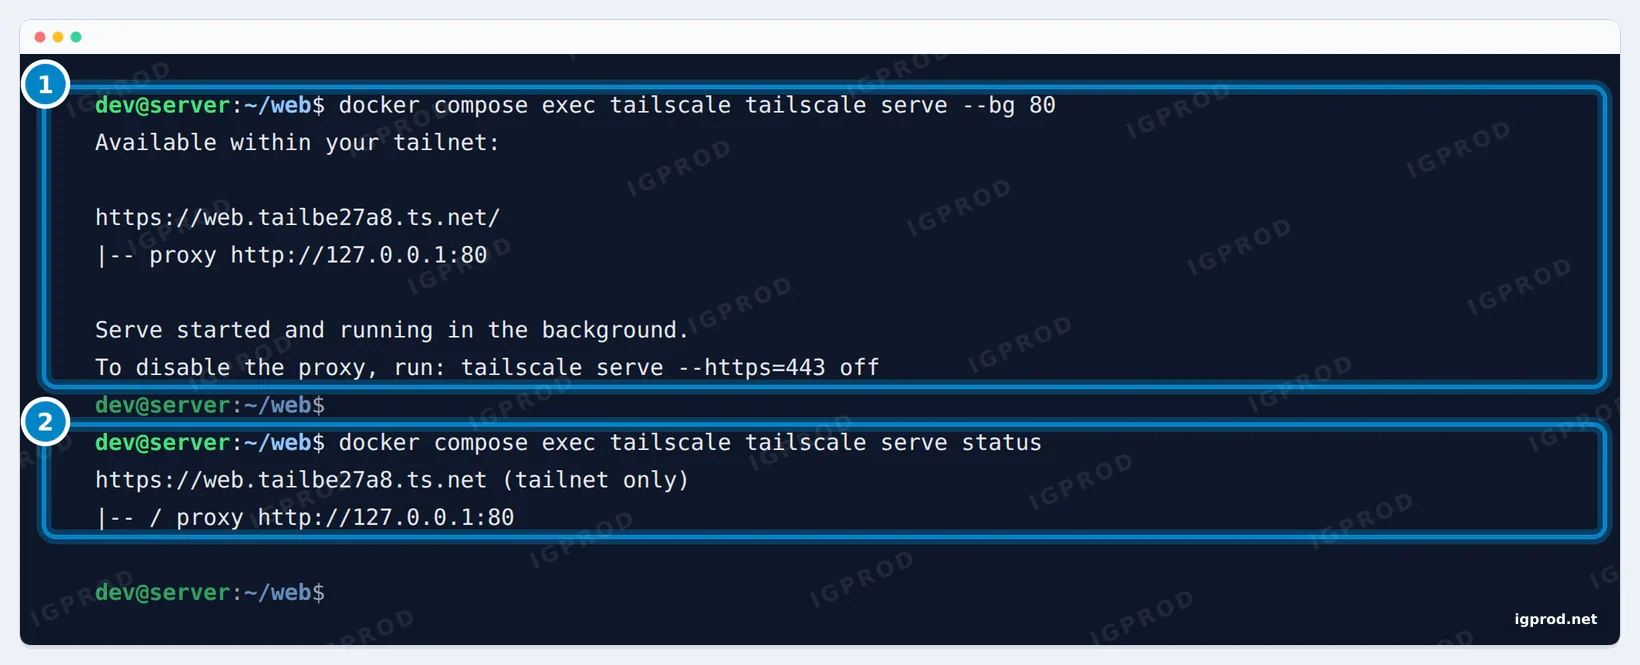
--bg keeps the setting after the command ends. Tailscale stores it with the device's state, and it was still active after we restarted the container. "(tailnet only)" means only devices in your tailnet can open the address. Funnel, Tailscale's other sharing feature, would publish the app on the internet; this guide does not use it. From the laptop:
curl -sI https://web.tailbe27a8.ts.net | head -3
curl -sI --max-time 5 http://web | head -3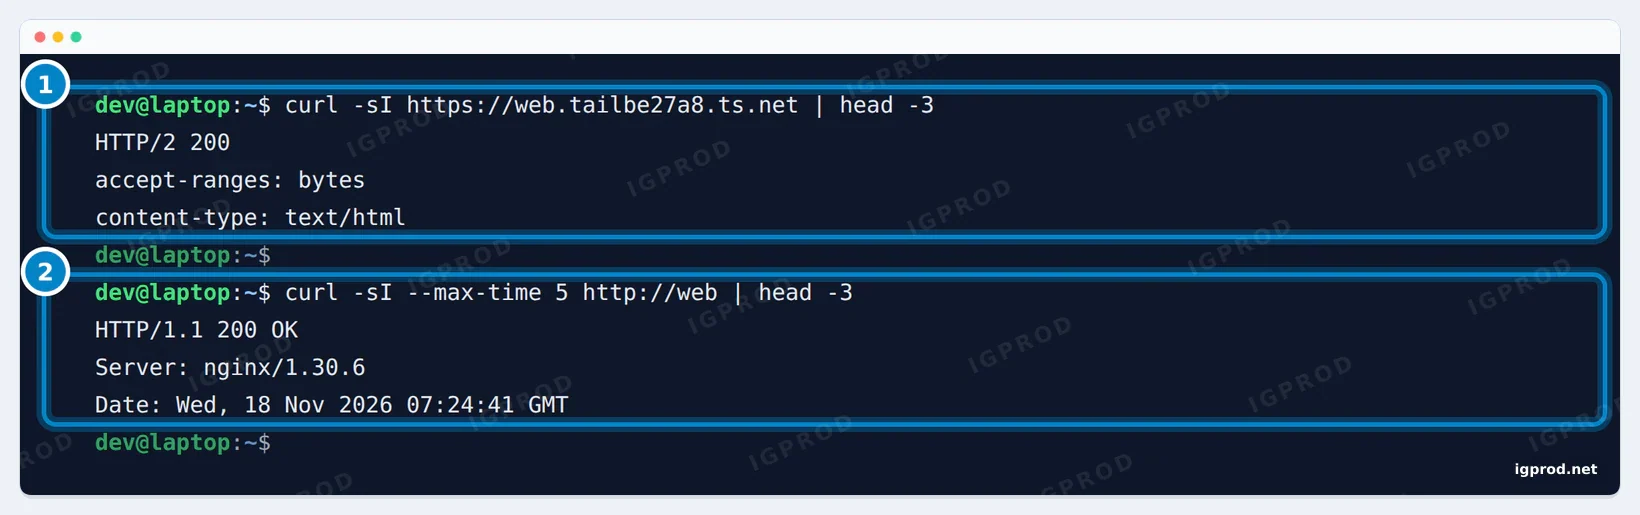
The first HTTPS request took 33.5 seconds while Tailscale got the certificate; the next ones answered at once. The certificate is an ordinary Let's Encrypt one:
curl -svI https://web.tailbe27a8.ts.net 2>&1 | grep -E "subject:|issuer:|expire date:"
Look again at the second command of the previous test: nginx also answered on plain HTTP, port 80. The default policy allows every port between devices. The next step closes that.
Step 7: Replace the allow-all policy with least privilege
The policy file of a new tailnet has one grant that allows everything:
{"src": ["*"], "dst": ["*"], "ip": ["*"]},Every device, tagged containers included, can reach every port of every other device. If the nginx container were ever compromised, it could try your laptop, your NAS and your SSH servers. This is the policy we saved instead, in Access controls, JSON editor:
{
	// Who may give a tag to a device. Tags are for machines that are not a person's: apps in containers, servers.
	"tagOwners": {
		"tag:container": ["autogroup:admin"],
	},

	"grants": [
		// Your own devices reach each other on every port.
		{"src": ["autogroup:member"], "dst": ["autogroup:self"], "ip": ["*"]},
		// Apps in containers: HTTPS only, and only from people's devices. A container itself gets no access.
		{"src": ["autogroup:member"], "dst": ["tag:container"], "ip": ["tcp:443"]},
		// Exit nodes: needed as soon as the allow-all rule is gone.
		{"src": ["autogroup:member"], "dst": ["autogroup:internet"], "ip": ["*"]},
	],

	"ssh": [
		{
			"action": "check",
			"src":    ["autogroup:member"],
			"dst":    ["autogroup:self"],
			"users":  ["autogroup:nonroot", "root"],
		},
	],
}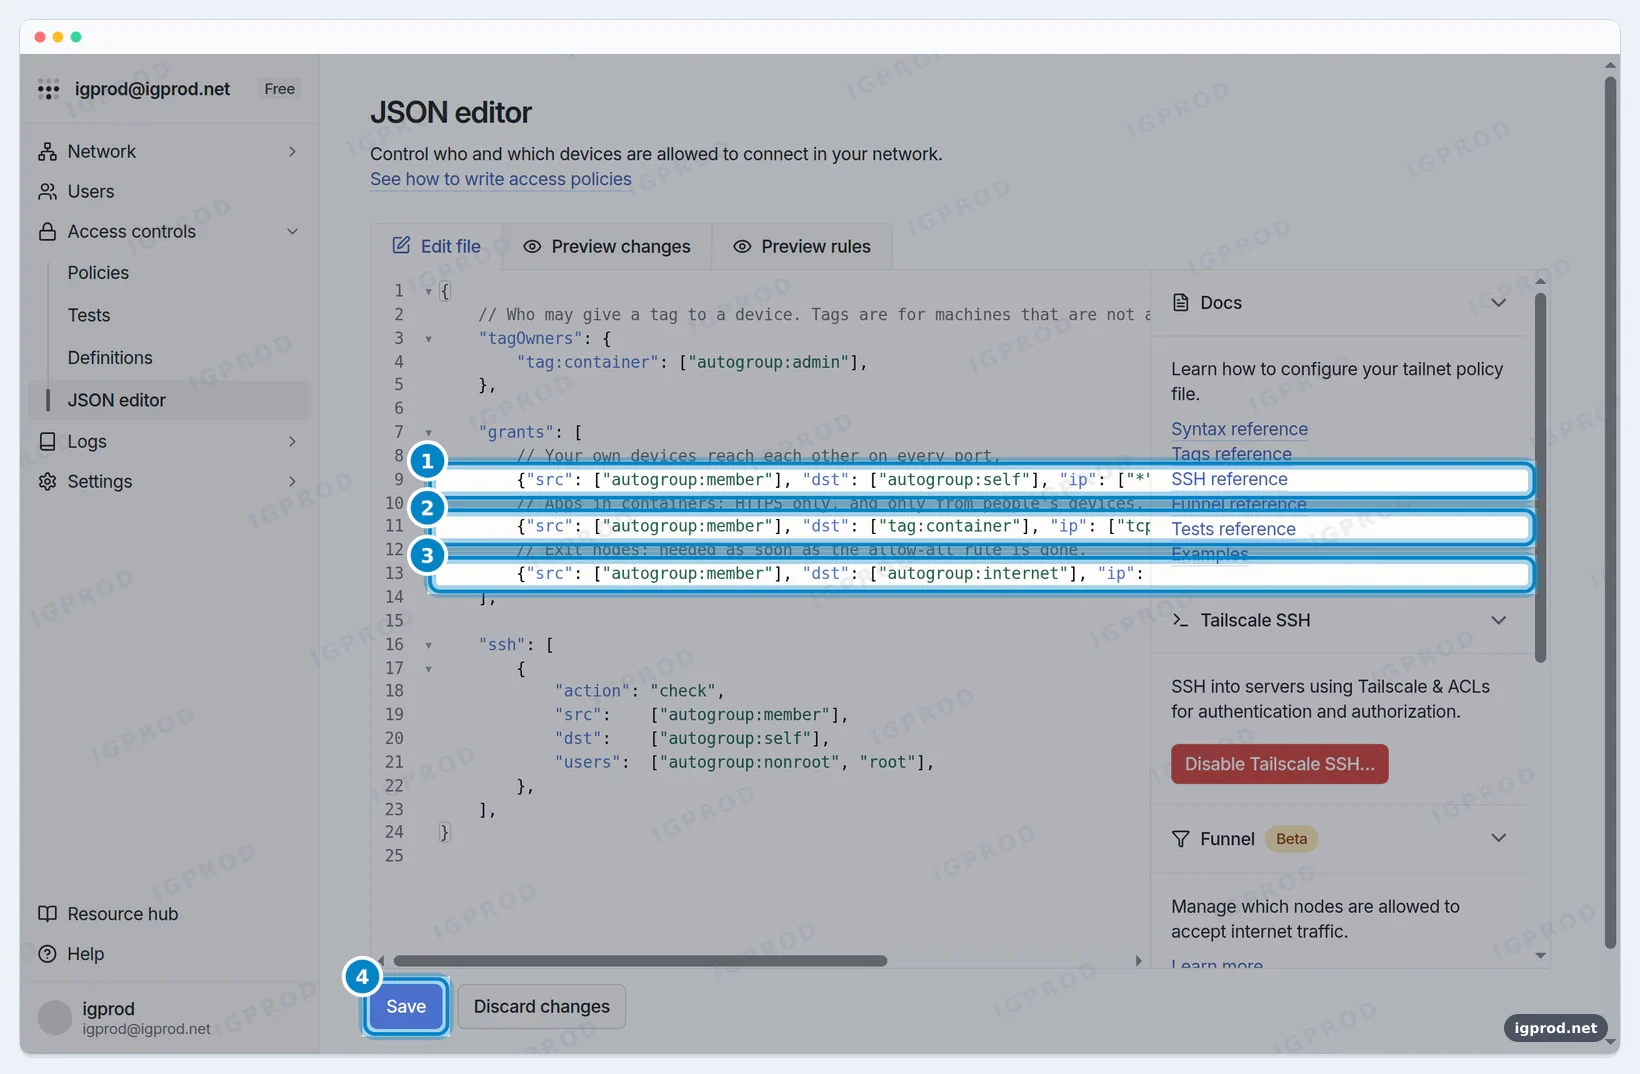
- Your own devices reach each other on every port (
autogroup:selfmeans the devices of the same person). - People's devices reach containers on TCP 443 only, the port Serve uses. Port 80 is closed, and a container gets no access to anything, because no grant has a tag as its source.
autogroup:internetkeeps exit nodes working. Without the allow-all rule, nothing else lets a device send its internet traffic through an exit node.- The SSH rule is the default one, unchanged.
Test it from the laptop:
curl -sI https://web.tailbe27a8.ts.net | head -1
curl -sI --max-time 5 http://web; echo "curl exit code: $?"
tailscale ping -c 2 web
ssh dev@server hostname
sudo tailscale set --exit-node=server
traceroute -n -q 1 -m 1 1.1.1.1
sudo tailscale set --exit-node=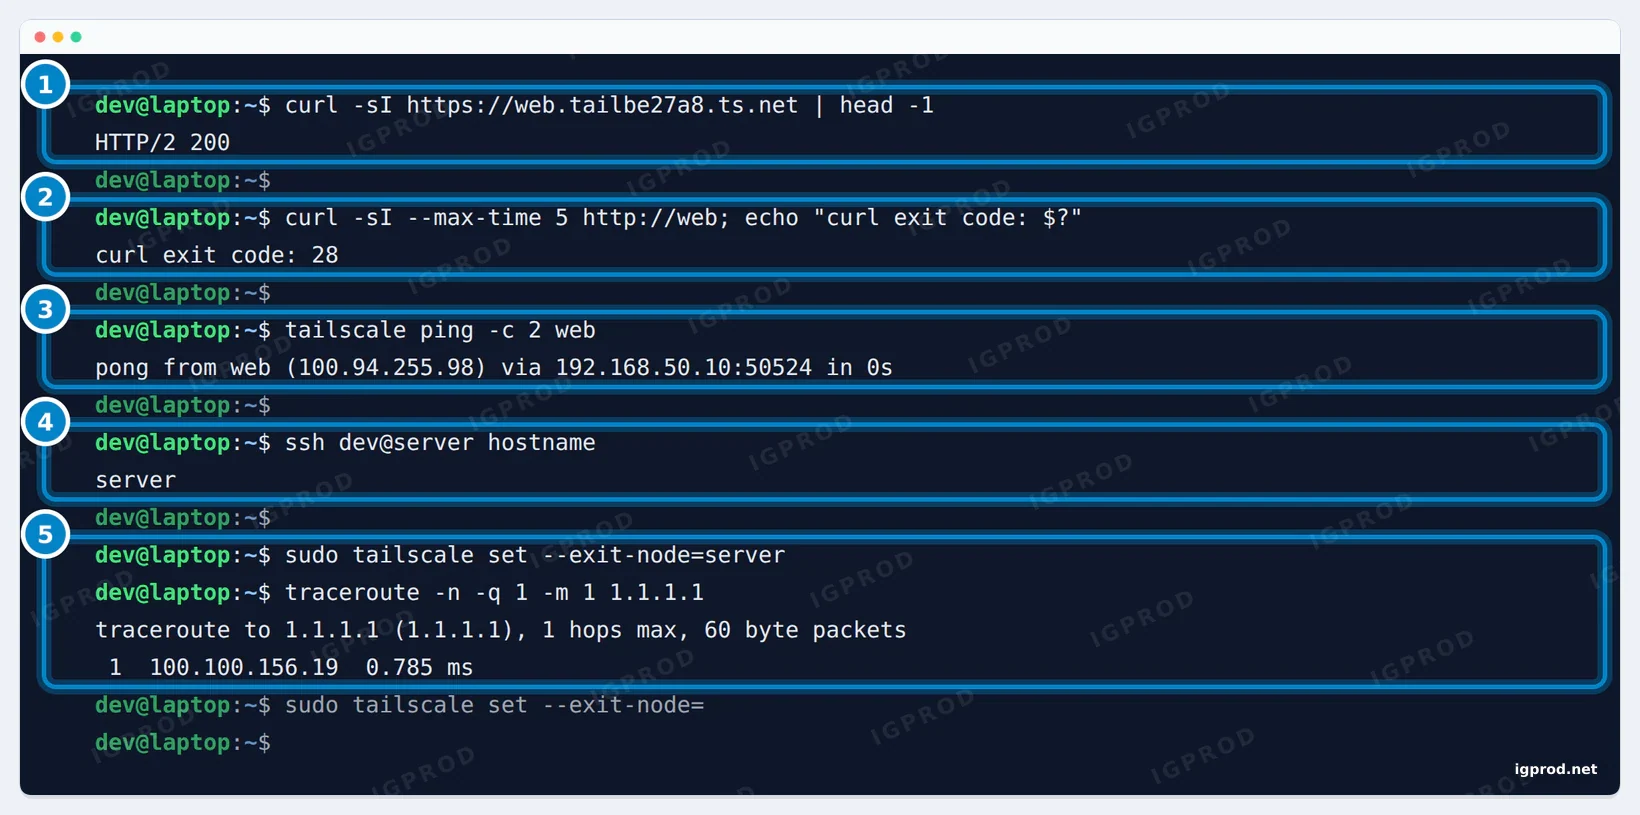
tailscale ping still answers. 4: SSH to your own server works. 5: so does the exit node.- HTTPS still answers with HTTP/2 200.
- Port 80 now times out: curl exit code 28.
tailscale pingstill answers. It tests the path between the devices, not the policy, so do not use it to test rules.- SSH to the server still works, and so does the exit node: the first hop is still 100.100.156.19.
As the policy grows, add a "tests" section to it: Tailscale checks those tests before it saves a change, and refuses a change that breaks one.
Keep servers connected and up to date
Two settings finish the job. Key expiry stays on for laptops and phones; we turned it off on the server only, as described in Step 2, and the tag already did it for the container. On Linux servers, let Tailscale update itself:
sudo tailscale set --auto-update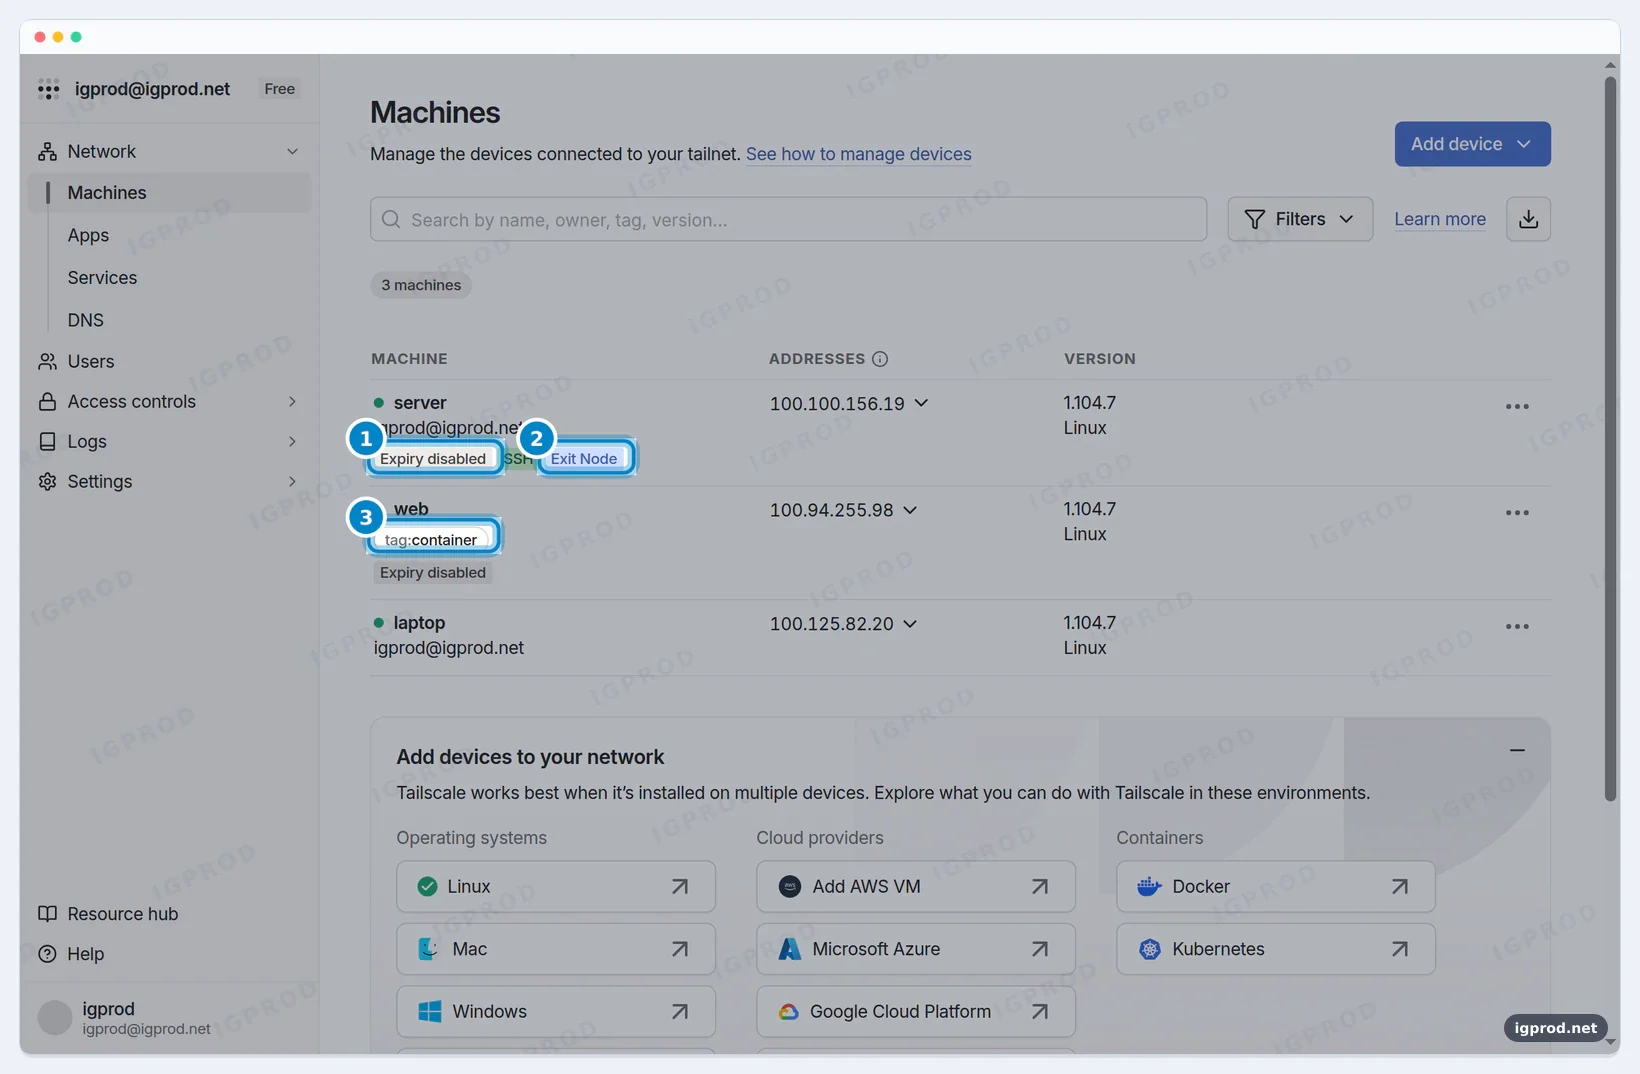
Tailscale on a Synology NAS
Tailscale publishes a package for Synology DSM. We did not install it on a NAS for this guide: the points below come from Tailscale's Synology documentation (last validated 5 January 2026), and they are the ones that trip people up.
- Do not install it from Package Center: Tailscale says that package is no longer supported and lags behind its releases. Download the DSM package for your model's architecture from Tailscale's package server, then install it with Manual Install.
- After you log in, your other devices can reach the NAS. On DSM 7, though, the NAS's own apps cannot reach other tailnet devices, because the package may not create a TUN device. To allow it, create a triggered task in Task Scheduler that runs as root at boot-up with
/var/packages/Tailscale/target/bin/tailscale configure-host; synosystemctl restart pkgctl-Tailscale.service, and run it again after each Tailscale update. - With TUN on, Tailscale traffic goes through DSM's firewall. If you use the firewall, add a rule that allows 100.64.0.0/10.
- For updates, a scheduled task that runs
tailscale update --yesas root does the job.
The CLI works over SSH as on any Linux machine; our guide shows how to SSH into a Synology NAS.
Troubleshooting
"direct connection not established" and a slow connection
Something between the devices blocks UDP, so the traffic goes through a DERP relay, as in our test above. It works, only slower. Run tailscale netcheck: "UDP: false" confirms it. On networks you control, allow outgoing UDP.
"Subnet routing is enabled, but IP forwarding is disabled"
The machine offers an exit node or subnet routes, but the kernel does not forward packets. Add the two sysctl lines from Step 5 and apply them with sudo sysctl -p /etc/sysctl.d/99-tailscale.conf.
"backend error: invalid key: API key does not exist"
The Tailscale container logs this when TS_AUTHKEY holds a wrong or revoked key, and then it stops. Generate a new key, replace the line in .env and run docker compose up -d again.
HTTP/2 502 after restarting the Tailscale container
We restarted only the tailscale service, and Serve answered 502: nginx was still attached to the network of the old container. Restart the app container too (for example docker compose restart nginx). After that it answered 200 again.
The first HTTPS request takes half a minute
Tailscale gets the certificate during the first HTTPS connection to a device name: 33.5 seconds in our test. Later requests are immediate.
curl times out on a port that worked before
Look at the policy first. Since Step 7, only TCP 443 reaches the container, and curl's exit code 28 means a timeout. Remember that tailscale ping succeeds even when the policy blocks a port.
"Only alphanumeric characters are allowed." when you create an auth key
The key's description accepts letters, digits and spaces. Remove punctuation such as parentheses.
Frequently asked questions
Is Tailscale free?
Yes, for personal use: the Personal plan costs $0, with unlimited user devices and up to 6 users. Paid plans start at $8 per user per month for teams. Everything in this guide ran on the free plan.
Is Tailscale down? How do I check?
Look at status.tailscale.com, then run tailscale status and tailscale netcheck on your own device to see whether the problem is local. If Tailscale's coordination server is down, its docs say devices keep talking to each other with their saved keys and rules, but you cannot add devices or change the policy until it is back.
Tailscale vs WireGuard: which should I use?
Tailscale uses WireGuard for its tunnels. With plain WireGuard, you create and copy the keys, list every peer in each config, and open a UDP port on at least one side. Tailscale does the key exchange, NAT traversal, relays, names and access rules for you. Choose plain WireGuard for a fixed link between two machines you manage; choose Tailscale for many devices that move between networks.
Tailscale vs Cloudflare Tunnel?
They solve different problems. Cloudflare Tunnel publishes a web app on a public hostname, so visitors need no client; see our guide to create a Cloudflare Tunnel, and put a login in front of it with Cloudflare Zero Trust Access. Tailscale keeps the app private: only your devices, with Tailscale installed and allowed by the policy, can reach it, on any port and protocol.
Can Tailscale see my traffic?
No. The traffic is encrypted with WireGuard between your devices, and the private keys never leave the device that made them, so even a DERP relay cannot decrypt the packets it forwards. Tailscale's coordination server knows your devices, their public keys and your policy, and it does not carry your traffic.
Does Tailscale work behind CGNAT or without port forwarding?
Yes. We opened no port on any router. Tailscale tries a direct connection through NAT traversal, and falls back to a DERP relay when that fails, as our UDP-blocked test showed. Behind a strict NAT, expect more relayed connections and higher latency.
What are the best Tailscale alternatives?
Headscale is an open-source, self-hosted implementation of the Tailscale control server, used with the Tailscale clients. NetBird is an open-source network built on peer-to-peer WireGuard that you can also host yourself. Plain WireGuard suits a few fixed links, and Cloudflare Tunnel suits web apps that must be public.
Is Tailscale safe?
The connections are end-to-end encrypted with WireGuard, and no port is open on your router. The weak points are elsewhere: the account you sign in with (turn on two-step verification), the allow-all default policy (replace it as in Step 7), auth keys (one-off, short-lived, never in a compose file) and the public certificate logs (name your devices carefully).
Related guides
- Cloudflare Zero Trust 101: Put a Self-Hosted App Behind Access (Free Plan, 2026)
- How to create cloudflare tunnel and expose your services with-synology
- How to Install Home Assistant with Docker Compose: Port 8123, Synology and Cloudflare Tunnel (2026)
- Install Docker Compose on Ubuntu using Docker’s repository
Sources
- Tailscale: Pricing
- Tailscale docs: Quickstart
- Tailscale docs: Install Tailscale on Linux
- Tailscale docs: Key expiry
- Tailscale docs: MagicDNS
- Tailscale docs: Connection types
- Tailscale docs: DERP servers
- Tailscale docs: Tailscale SSH
- Tailscale docs: Exit nodes
- Tailscale docs: Auth keys
- Tailscale docs: Tags
- Tailscale docs: Docker
- Tailscale docs: Enabling HTTPS
- Tailscale docs: Tailscale Serve
- Tailscale docs: Grants
- Tailscale docs: Tailnet policy file
- Tailscale docs: Synology
- Tailscale docs: What happens if the coordination server is down?
- Tailscale docs: Troubleshooting
- Headscale on GitHub
- NetBird on GitHub

Leave a comment
Your email address will not be published. Required fields are marked *